- Call us 01444 237070

-
- Back
- Used Cameras
- Used Accessories
- Used Lenses
- Back
- Used Canon Lenses
- Used Nikon Lenses
- Used Fujifilm Lenses
- Used Sony Lenses
- Used Micro 4/3rds Lenses
- Used Leica Lenses
- Used Panasonic Lenses
- Used Pentax Lenses
- Used Samyang Lenses
- Used Sigma Lenses
- Used Tamron Lenses
- Used Tokina Lenses
- Used Voigtlander Lenses
- Used Zeiss Lenses
- Used Hasselblad Lenses
- Used Video
- Used Film Equipment
- Used Stock Alert
- Used Blank Test
- Sell or Part Exchange
- Used Clearance
- Recently Added Used Equipment
- Park Picks
- Faulty
- Trade-In
- Blog
- New in
- Call us
- Contact us
- Stores
- Sign in
- Categories
- Tips & Inspiration
- Reviews
- News
- Events
- Features
- Buying Guides
- Competitions
Camera Lenses Explained
A camera lens is the ‘eye’ of the camera and the lenses you choose have a big impact on the outcome of your photos. We think it’s a great idea to know how a lens works in order to advance your skills, even though it can be quite technical to begin with. For this reason, it’s useful to have camera lenses explained so that you understand how they affect the outcome of your photos, particularly if you’re just starting out.

Table of contents
- Inside A Camera Lens
- Optical Centre
- Filter Threads
- Focusing Ring
- Focal Length Ring
- Aperture Ring
- Aperture
- Lens Mount
This post explains everything you need to know so that you can take the best photos and videos possible with the lenses you use. We cover technical aspects including what’s inside a camera lens, what the optical elements are and how they can affect your images. Using lens filters can add a whole new creative layer to your images so we explain what the filter thread is on the front of a lens. If you’ve ever wondered what the focusing ring does and how you can use it either manually or in autofocus mode we cover it here, with the same for changing the aperture, discussing what it does and how to change it both in manual and auto mode. Finally, we’ll cover lens mounts, as you should choose the right lens mount to ensure it fits correctly onto the camera you have. So let’s dive right in.
Inside a Camera Lens
Camera lenses are made up of a number of lens elements (at least two, that are typically made from glass), which are arranged into various groups inside the lens casing. These lens elements are carefully designed by optical engineers to allow light to enter into the lens and hit the camera sensor, recording the image which you have composed. Each lens element is ground down to have a specific curve, with various curves being used such as biconvex, biconcave and so on. These all interact together to direct the light and the manner in which they are designed and arranged is responsible for how they transmit light and how good (or well controlled) the outcome is.
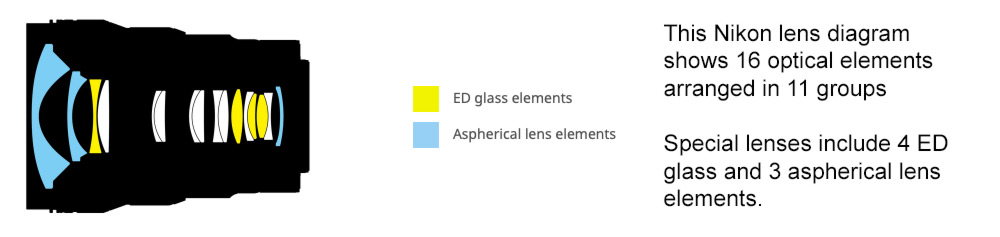
Special lens elements are often used to improve the final image, controlling various aspects which make up a photo. These are:
- Contrast – ideally we want a good degree of contrast in our images.
- Aberrations – there are various types of aberrations which should ideally be kept to a minimum.
- Vignetting – this is where the corners of an image are darker than the middle.
- Sharpness – this is the amount of sharp details across the frame, which we want to be high.
- Distortion – there are various types of distortion which make an image appear less realistic and should be kept to a minimum.
- Focus breathing – this mainly affects video recording, with focus breathing appearing as zooming when focusing during video capture. Ideally this should be kept to a minimum.
Special lens elements are subject to more stringent manufacturing processes and include aspherical elements, low dispersion, extra low dispersion and apochromatic elements,, amongst others. Usually, a lens with one or more special elements will yield more controlled (better) results, although the focal width of a lens does impact the number of special elements required to have a positive effect. For example, a fixed focal width 40mm prime lens will require less special elements to deliver excellent results than a super telephoto zoom lens such as a 100-400mm lens. This is down to physics and how light transmits through glass, with more glass being needed to give you a longer focal width, therefore needing more special elements to deliver better results. Each manufacturer employs their own techniques for creating the optimum balance between these various elements in their lenses to create the best outcome at any given price point.

Optical Centre
The optical centre of a lens (sometimes referred to as nodal point) is the point in the lens where light is entering completely flat, without being bent on its way to the sensor. As we move outwards towards the edges of the lens, or tilt the lens, or make other adjustments, light may enter flat, but is then bent by the curves of lens elements towards the sensor. All light entering the lens converges on the sensor to find the focus point and make the complete image. Lens manufactures will take into account the optical centre of a lens when calibrating and designing the lens, allowing for manufacturing tolerances, focus motor effects and so on.
The optical centre of a lens plays a significant part when you are shooting panoramas, as you need the lens to be flat and find the correct nodal point throughout the vertical, or more commonly horizontal rotation of the images, which will be stitched together in post production. If the optical centre is quite far out, you will find panorama software is unable to stitch the images together and you’ve possibly missed a brilliant shot!
The optical centre also plays a part in specialist lenses such as tilt shift lenses, where the plane of focus is adjusted to create perspective shifts. This can be used to either correct converging lines when photographing architecture for example, or exaggerate the effect with a ‘miniature model’ style result. Some of our most popular tilt shifts include the Canon TS-E 24mm f/3.5L II tilt-shift and TTArtisan 17mm F/4 Tilt-Shift Full Frame Lens For Sony E.
There’s a brilliant PDF here with high levels of detail regarding the technical aspects of camera lens optical centre and how it works from a technical standpoint.
Filter Threads
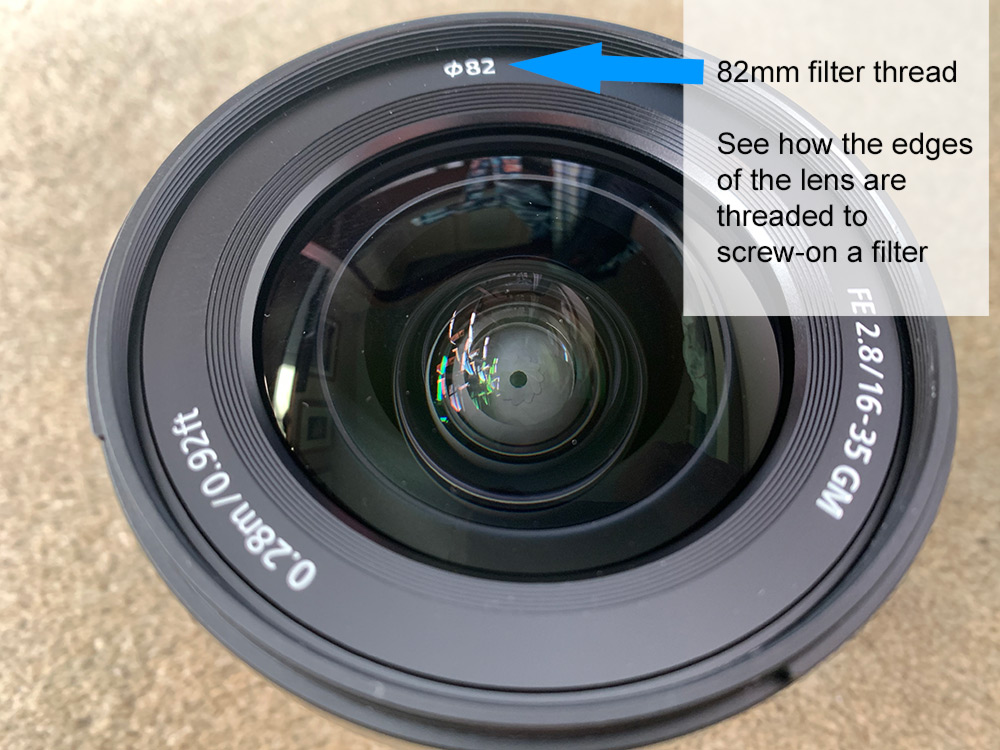
On the front of most camera lenses there is a threaded section which is designed to allow the photographer to attach a lens filter. The threaded section is made to accept a specific millimetre size of filter, and is typically noted on the front of the lens barrel with a mm size and / or ø diameter symbol. For example, the Sony FE 16-35mm f/2.8 GM II lens has an ‘ø82’ mark on the front, which means lens filters need to be 82mm diameter in order to screw on correctly. Another example we can take is the Nikon Nikkor Z MC 105mm f/2.8 VR S Macro Lens, which has a ‘ø62’ mark, meaning you’ll need to use 62mm filters.
There are various types of lens filters which perform different functions that can both dramatically or subtly change the outcome of a photograph or video. In the two lens examples used above we might, for example, choose a variable neutral density filter to record movies in brighter daylight conditions with the Sony. We might choose the excellent PolarPro McKinnon Chroma 82mm VND/PL 2-5 Stop Filter as we all love Peter McKinnon and his PolarPro filter range is extremely competent. For the Nikon macro lens, we could choose a circular polariser to remove unwanted reflections from wet leaves when we’re shooting close-ups. In this case we might choose the Urth 62mm Circular Polarising (CPL) Lens Filter Plus+, as it strikes a good balance between effective polarisation, filter cost and the amount of light reduction it causes.
If you enjoy shooting landscapes, the chances are at some time you will consider investing in a square filter system, such as the renowned LEE Filters system. In this case, you’ll still need to attach the system to the front thread on your lens and will need to choose a correctly sized adaptor ring, which is screwed onto the lens in the first place. This would require the LEE 82mm Wide Angle Adaptor Ring in the case of the Sony 16-35mm GM lens, onto which your filter system would then be mounted. You could start with something like the LEE100 Landscape Kit for example.
When you are adding any type of lens filter remember to double check the front of your lens to ensure you’re buying the correct mm size filter, which will screw-in correctly and avoid damaging the lens.
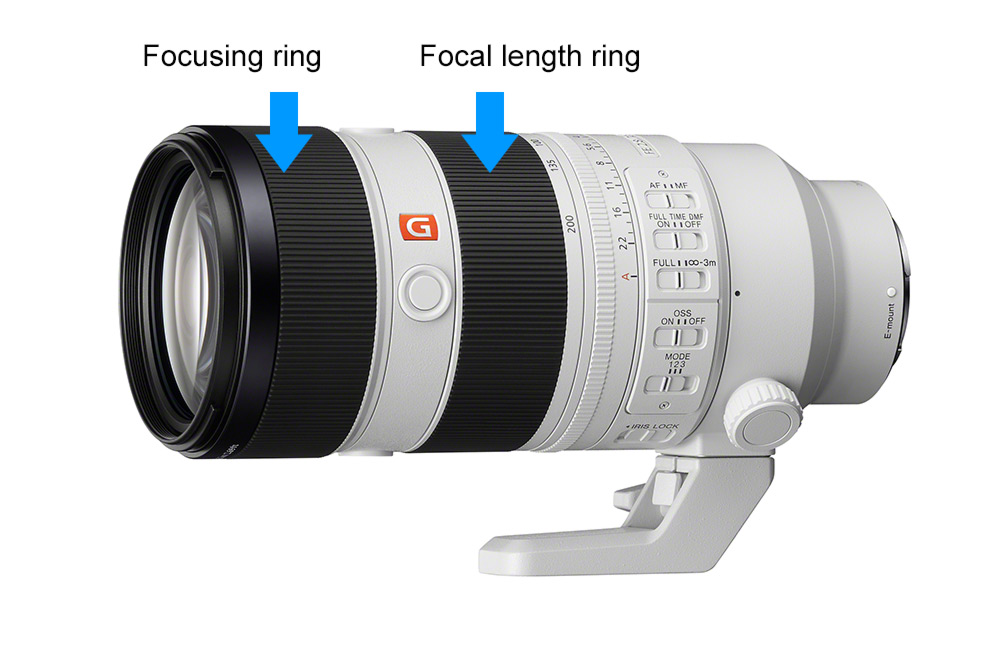
Focusing Ring
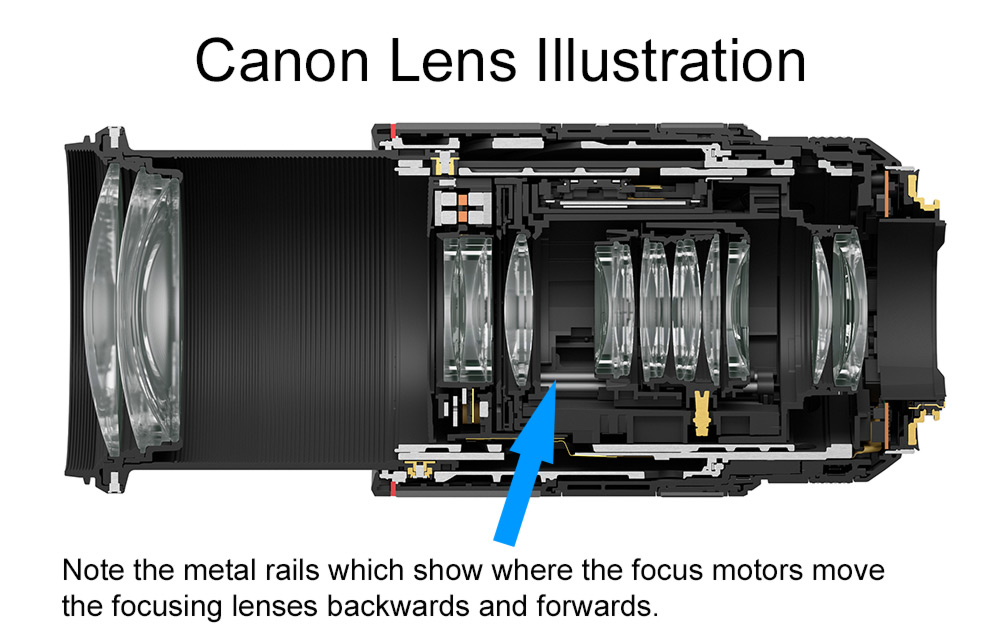
Just about all lenses have a focusing ring, which is used when manually focusing for getting the image into sharp focus. Some lenses are manual-only focus, such as all Voigtlander and all Laowa Lenses (at the time of writing). Manual-only focus lenses will only allow you to manually focus, which is done by turning the focusing ring clockwise or anticlockwise by hand. The focus ring is typically found at the front of the lens, although it could be anywhere along the lens barrel. As you turn this ring it moves one or more of the optical lens elements inside the lens forwards or backwards, which brings different parts of the image into and out of focus.
Aside from certain manual-only lens manufacturers the vast majority of today’s lenses do have autofocus capabilities (often simply referred to as ‘AF’), which means that you use the camera, rather than the lens to achieve focus for your image. When using a lens in autofocus (AF) mode, internal motors in the lens move the focusing elements back and forward to get sharp focus on your chosen focal point. Different manufacturers have different types of focus motors, which all perform the same task. Ideally you want fast and quiet focusing and some modern lenses use as many as four focus motors to achieve this.
The updated Sony FE 70-200mm f/2.8 GM OSS Mark II Lens has four Extreme Dynamic motors to get the task of focusing done quickly and effectively. Having fast autofocus is particularly important if you shoot moving subjects, like sports or wildlife or pets and kids running around at a party. In these cases, you might need to switch focus from very near to very far away in a short time, as the subject moves about the scene.
Quiet autofocus is important for video in particular, as focus motor noises can be recorded if they are too loud, which could ruin the audio in your movie. Other examples of where focus motor noise could be disruptive might be if you are shooting an interior where noise echos around a room, for wildlife where it could scare away your subject, or at a wedding during the vows.
Out of the box, most cameras use the same techniques to gain focus when AF lenses are mounted. In the most simple method, focus can be achieved by half-pressing the shutter release button, which engages the focus motor(s) to hunt for the focus point you have selected. There are also several other ways to get focus, depending on which type of camera you have. Many cameras let you use the rear LCD screen to achieve focus. If your camera has touchscreen control on the LCD you may be able to simply click the screen and it focuses on that point where you clicked. This is very quick and can be useful when the camera is away from your face as you are evaluating the scene in front of you.
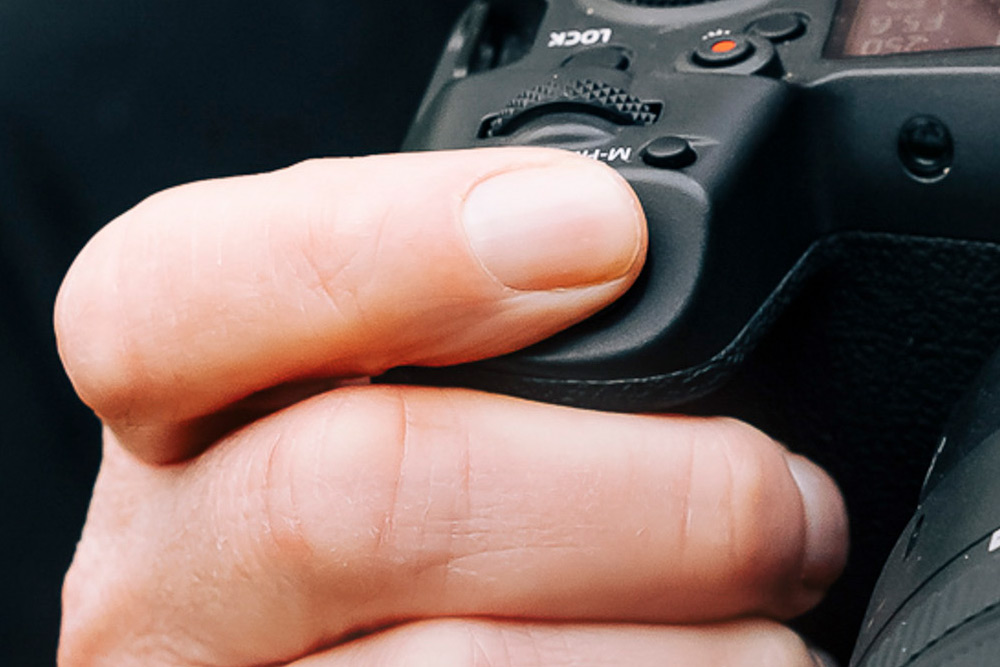
Half press of the shutter button to gain AF focus on the lens
Many advanced photographers will also custom program their cameras to use ‘back button focus,’ which removes the half-press of the shutter in exchange for a focus button on the rear of the camera instead. This is arguably far quicker than using the shutter button and adopted by many photographers who work quickly for portraits, street, weddings or documentary for example. Other AF options include the incredible capabilities of the Canon EOS R3, which can be calibrated to simply use the point where your eye is looking through the viewfinder to achieve focus on that point. You just look at your subject and the camera focuses for you!
Despite being autofocus capable, most AF lenses will usually still have a focusing ring on them, even if you never use it. The reason is because there are certain times when manual focusing the lens can be more accurate than using the camera to autofocus for you. An example might be when you are photographing a bird in a tree and the camera incorrectly focuses on a branch immediately in front of the bird, rather than the bird itself. If this type of situation occurs, you may want to manually override autofocus and use the focusing ring and fine-tune yourself. Often lenses will include an AF/MF switch to enable you to change or override the AF setting. Other lenses might let you manually override focus simply by twisting the focusing ring, without needing to change the switch, which is often preferable because it’s quicker and more intuitive than changing a switch.
You may wonder why some photographers still use manual focusing lenses, or AF lenses set to manual, as it might slow them down or be less accurate. Surprisingly there are a number of reasons, which is why we wrote a blog post here about The Benefits Of A Manual Focus Lens, which is worth checking out.
Focal Length Ring
As well as a focusing ring, zoom lenses will also have a focal length ring. The purpose of the focal length ring is to enable the user to zoom between the various focal lengths available on that lens, bringing the subject nearer or further away in the frame. Ideally the focal length ring will be smooth to turn by hand and will not require too great a twist to zoom throughout the available focal range. Some lenses offer the ability to adjust the torque of that ring, making it either smoother to twist, or adding more friction. This is useful depending on how the user likes the lens zoom to feel, or for locking-off the ring so it doesn’t move for storage or transport.
The focal lengths available on a zoom lens are always described as the first set of numbers in the name of the lens. Here are some examples of popular zoom lenses and which focal lengths they cover:
- Sony FE 200-600mm f/5.6-6.3 G lens. This is a highly popular super telephoto zoom lens for Sony cameras. The first set of numbers refer to the focal lengths which the lens offers, which are between 200mm and 600mm. These types of super telephoto lengths are very useful for sports, wildlife, action and anything where the subject is further away.
- Fujifilm XF 70-300mm F/4-5.6 R LM OIS WR Lens. This is an extremely versatile zoom lens for the Fujifilm X system, which covers a very useful focal length between 70mm and 300mm. Because the Fujifilm X system is APS-C crop sensor format, the effective focal width translates to 107-457mm in full frame format.
- Panasonic Leica DG Vario-Elmar 100-400mm F/4-6.3 II ASPH Power OIS Lens. Again, the first set of numbers reflect the fact this lens has a focal length between 100mm and 400mm for micro four thirds cameras. In full frame equivalent this equates to 200mm to 800mm providing exceptional reach for distant subjects.
Many photographers will abbreviate a lens name to simply the focal length it offers. For example, you might be considering a 24-70mm lens, or a 70-200mm lens, so the many other elements of the lens names might be left off when talking about them.
Certain zoom lenses have a feature where they are able to override the focal length ring in a similar way to which focusing rings can be overridden between manual and automatic. For example, the Sigma 150-600mm f/5-6.3 DG DN OS Sports Lens for Sony E has a clever feature where the lens can be zoomed simply by pushing and pulling the ring rather than twisting it. This allows you to quickly go from any focal length within the 150mm to 600mm range in an instant, which can be far quicker than twisting the ring if you switch between subjects which are nearer and further away.

Aperture ring
To adjust the depth of field in an image we use the aperture and some lenses include an aperture ring allowing you to change aperture on the lens, rather than by using the camera. This was more common on older lenses, but the rise in videography as well as retro or vintage-style cameras has made aperture rings on lenses popular once again. Fujifilm has been instrumental in the resurgence of aperture rings, having been adding them to many of their X-mount lenses since forever.

There are some potential benefits to using the aperture ring on a lens rather than the camera, but the resulting depth of field is the same whichever method you use. For video, if you have a ‘clickless’ aperture ring on the lens you can adjust the depth of field and amount of light entering the lens silently and efficiently. Many videographers use manual focusing and are holding the camera and lens as stably as possible while they record. The ability to adjust the aperture without changing their grip on the lens is extremely useful to avoid shake in the movie. It can also be quicker to look at a lens and see which aperture is currently set and then adjust it accordingly, rather than look for the f-stop value on the LCD or viewfinder.
If there is an aperture ring on the lens, it will typically be the thinnest ring, and be marked with the available apertures which the lens offers, from the widest to the narrowest. There may also be an ‘A’ setting, which would set the aperture ring to Automatic to be controlled by the camera. The ring may be located at the front of the lens or the rear nearest the camera body, but typically not in the middle as it could get changed in error. On the manual-only Voigtlander 65mm F/2 Macro Apo-Lanthar Aspherical Lens Sony E (which is an incredibly sharp lens) the aperture ring is at the front of the lens with f/2 to f/22 markings. This leads us to another potential advantage of using a lens aperture ring, which is that you can change between them more quickly than scrolling through on your camera. A simple twist of the ring can get you from f/2 to f/22 in an instant.
If you shoot in Aperture Priority mode, your camera will adjust the settings on the camera based on the aperture you have chosen. As an example, if you are shooting portraits, you might want to keep a shallow depth of field to keep your subject separated from the background. If you choose Aperture Priority mode on your camera and set it to f/2.8, the camera will adjust the other settings in the exposure triangle in order to maintain an f/2.8 aperture. This means the shutter speed and ISO will change, but the aperture will be automatically maintained. If you are shooting in fully Automatic mode (Auto or A), the camera will adjust the aperture and other settings automatically on a picture-by-picture basis. Bear in mind that this takes away your control over depth of field unless the camera lets you manually override the aperture even when in Auto mode. Whatever level of photography you are at, we recommend at least trying manual photography as it will open up creative choices which are otherwise decided by the camera on your behalf. Our blog post Learn Manual Photography In 10 Minutes is a great place to start and includes a video to watch on the subject.
Aperture
Simply put, aperture is the opening in the lens through which light travels to hit the sensor. Adjusting this lens opening, or aperture, allows more or less light to enter the lens, which directly affects the depth of field in the image. Depth of field is the amount of the image which is in focus, from front to back, foreground to background. Aperture is measured in f-stop values with a ‘wide’ aperture being a smaller number, and a narrow aperture being a higher number. Apertures can fall between f/1.4, 2, 2.8, 4, 5.6, 8, 11 and so on, being measured on the f-stop scale.
This might all sound very dry and boring, but understanding aperture is a fundamental to photography as it plays a major part in the end result. It is one of the three elements of the exposure triangle, affecting the shutter speed and ISO values. Once you get the hang of aperture, you’ll never have to think about it other than choosing the best one to suit for your creative endeavours.
As an aside, lenses are sometimes referred to as ‘fast’ or ‘slow’. This because a ‘fast’ lens will have a wider aperture, meaning you can shoot at faster shutter speeds because the opening lets in more light.
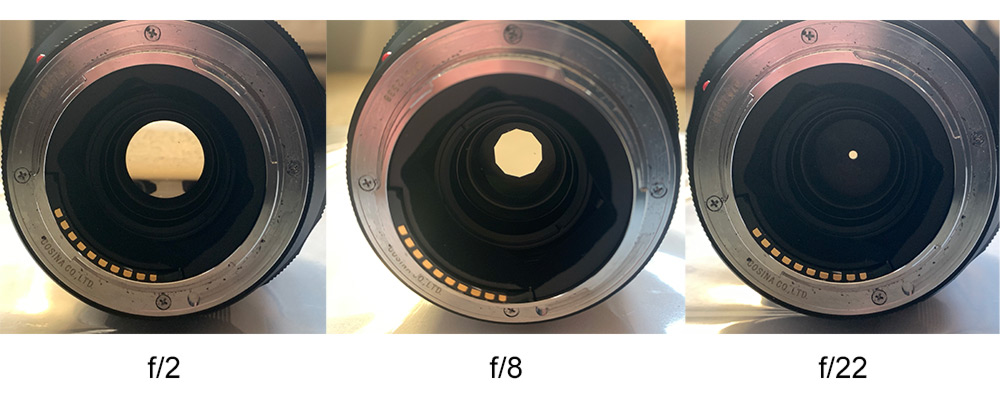
Lens aperture showing how opening changes based on f-stop – between f/2 and f/22 the maximum and minimum apertures available on this particular lens
Here are two examples of where you might want to change depth of field by adjusting the aperture:
- Photographing a portrait. For many photographers a classic portrait will have the subject’s closest eye in sharp focus, with focus falling away into a completely soft and blurry background. This draws the viewer into the point of focus on the subject’s eye and separates them from distractions behind or in front of them. To get this effect a very shallow depth of field is required, as the focal plane is narrow. To achieve this, we would open the lens to the widest aperture available, which may be f/1.2 or f/1.4 and so on. If we enjoy separating the subject from the background, we might choose to buy lenses which have the widest possible maximum aperture. This would often be a prime lens, or fixed focal width, rather than a zoom lens as prime lenses will usually have a wider maximum aperture available.
- Photographing a landscape. Landscape photographers often employ the opposite approach to that which is described in the example above. That is because they want the maximum depth of field in their landscapes, with as much foreground to background in sharp focus as possible. To achieve this, we set the aperture far higher, perhaps to f/8, f/11 or f/16. This lets in less light through a smaller aperture opening which results in a greater (or deeper) depth of field. Many lenses are able to go to f/22 or f/32 or even higher, but an optical flaw called ‘diffraction’ affects virtually all lenses when stopped down to this level, making the image soft. This isn’t noticeable unless the image is enlarged considerably though, so if you’re viewing on Instagram or other social media you’d never notice.
Lens mount
Every lens is made with a particular lens mount. This means it is only intended to be mounted onto a corresponding camera body and will not connect to another camera without a lens converter. The lens mount is usually noted nearest the mount itself, which is the end where the lens is twisted onto the camera opening for a secure and accurate fit. Different manufacturers have designed their lens mounts according to their own proprietary interface. With all auto-capable lenses there will be electronic communication points or electrical contacts where data is transferred between the body and lens, such as focal point, aperture and focal length. These allow the camera to control the lens and relay settings back to the camera which are stored in EXIF data on each image.
There are differences between not only these electrical contacts but also the physical size of the lens mounts themselves. When Nikon entered the mirrorless camera market, they designed their ‘Z-mount’ to be as wide as possible, with a view to allowing more light to enter the sensor from as wide an angle as possible. Their particular mount has a large 55mm inner diameter and shallow 16mm flange distance, allowing Nikon Z lenses to allow in lots of light with a very short distance to travel before hitting the sensor.
Where lens mounts are similar between manufacturers is that most use a bayonet style of attachment. Most lenses will have a round red or white dot near the mount, which should be aligned with the same dot on the camera opening. Once lined up you simply twist the lens onto the camera body until it clicks in place and you’re ready to shoot. A small lever release mechanism can be found on most camera bodies, which releases the lens so you can unmount it.
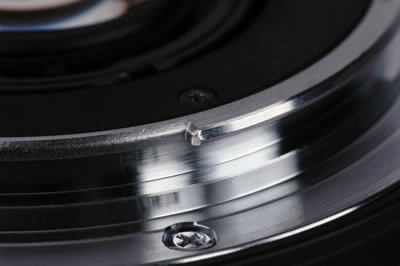
Rugged brass bayonet to mount the Sigma lens securely
Here are some of the most popular lens mounts for today’s cameras:
- Canon EF for DSLR
- Canon RF for full frame and crop mirrorless
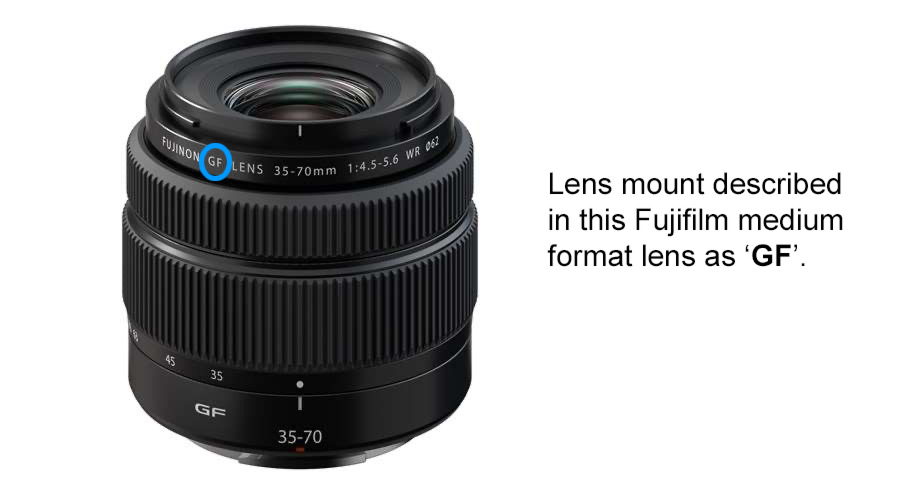
- Fujifilm G for medium format mirrorless
- Fujifilm X for APS-C mirrorless
- Hasselblad H for medium format mirrorless with a separate camera back
- Hasselblad X for medium format mirrorless
- Leica L for full frame L-mount cameras (Leica, Panasonic Lumix and Sigma)
- Leica M for rangefinders
- Leica S for medium format mirrorless
- Micro Four Thirds for four thirds format mirrorless
- Nikon F for DSLR
- Nikon Z for mirrorless
- Pentax 645 for medium format
- Pentax K for DSLR
- Sigma SA for DSLR
- Sony E for mirrorless
- When you are choosing a new lens for your camera it’s essential to get one which has the correct lens mount. Double check for a DSLR or mirrorless lens, then check whether it’s full frame or APS-C crop sensor and note the mount name is the right one. If you ever need advice or get stuck choosing our telephone and in-store teams are always happy to help.
We hope this post has helped to demystify some of the more technical aspects of camera lenses. We looked at the inside of a lens, discussing optical lens elements which help to make up the final results, including special elements and how they improve image quality. We touched on the optical centre of a lens and how specialist lenses are used to manipulate this, as well as filter thread sizes with help for choosing the right diameter lens filters. Focusing rings and focal length rings are found on certain lenses, and we discussed options for to use them when working manually or to use the camera instead to get accurate focus. The resurgence of aperture rings on lenses was discussed, along with how they can help for videography and how the aperture you choose will affect the depth of field in an image. Lastly, we reiterated that it is essential to choose the correct lens mount for your camera body when considering any new lens, why not browse our huge range of camera lenses today to find your perfect one.
Share this post:
By Nick Dautlich on 10/11/2021
Nick Dautlich
Senior Content Writer and Product Reviewer
Nick Dautlich is the Senior Content Writer and Product Reviewer at Park Cameras, with over 15 years of photography experience. A Sony Imaging Professional and expert reviewer, Nick has worked with major brands such as Canon, Sony and Nikon. His work is also featured on Vanguard World UK’s website, Capture Landscapes, and Shutter Evolve. Nick’s photography includes National Trust projects and magazine covers and he is passionate about landscapes and storytelling. Nick also enjoys hiking and teaching his children about nature. Learn more on his profile page.

Trade in your old equipment
Fast and easy trade in service ensures your old gear is collected efficiently and you are paid quickly! It's very simple to trade in your unwanted photography gear. Just head over to our dedicated Sell or Part Exchange page, fill out the details, and we'll get back to you with an offer for your old gear. Take the cash, or put it towards the cost of your new gear. It's up to you! Find out more
sign up to the newsletter
Keep up to date on the latest photography news, events and offers. Sign up now