- Call us 01444 237070

-
- Back
- Used Cameras
- Used Accessories
- Used Lenses
- Back
- Used Canon Lenses
- Used Nikon Lenses
- Used Fujifilm Lenses
- Used Sony Lenses
- Used Micro 4/3rds Lenses
- Used Leica Lenses
- Used Panasonic Lenses
- Used Pentax Lenses
- Used Samyang Lenses
- Used Sigma Lenses
- Used Tamron Lenses
- Used Tokina Lenses
- Used Voigtlander Lenses
- Used Zeiss Lenses
- Used Hasselblad Lenses
- Used Video
- Used Film Equipment
- Used Stock Alert
- Used Blank Test
- Sell or Part Exchange
- Used Clearance
- Recently Added Used Equipment
- Park Picks
- Faulty
- Trade-In
- Blog
- New in
- Call us
- Contact us
- Stores
- Sign in
- Categories
- Tips & Inspiration
- Reviews
- News
- Events
- Features
- Buying Guides
- Competitions
Using ND Filters For Long Exposure Photography
Slowing down shutter speed to create long exposures can add a whole new dimension to your photos. Long exposure photography will exaggerate motion, make a scene look tranquil and lets you experiment with creative styles. The simplest way to blur movement is with an ND filter, which reduces the amount of light entering the lens causing motion blur in clouds, water and other moving elements.
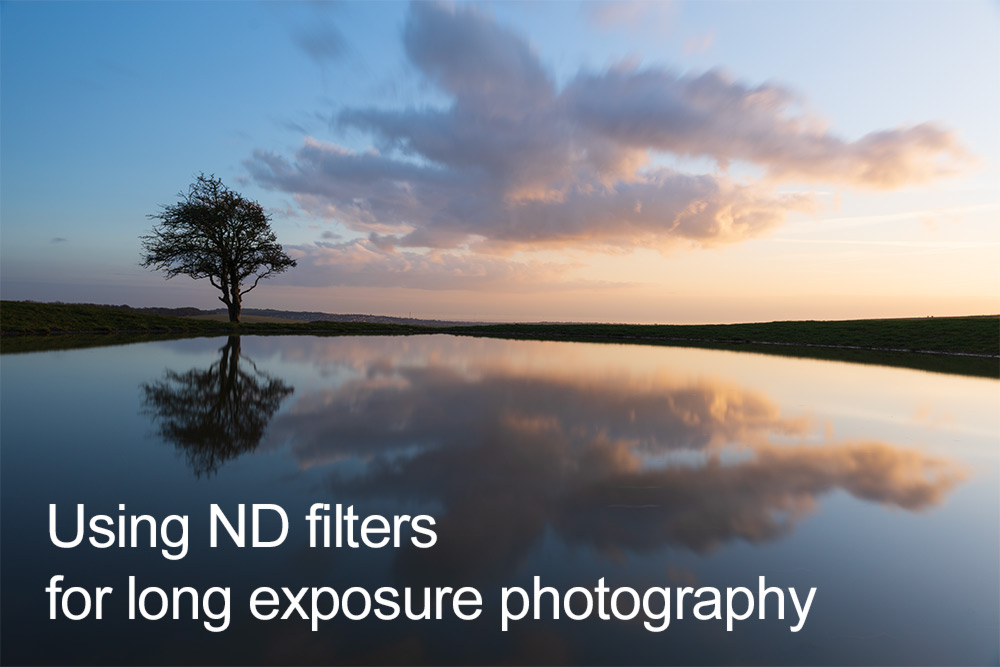
When the opportunity arose I jumped at the chance to shoot local landscapes with Hoya’s ND filters and try using ND filters for long exposure photography. Hoya is synonymous with lens filters and have several ND (neutral density) and variable ND’s available, which we explore in depth. Whether you’re new to long exposures or want to discover more about Hoya’s range, we have lots of tips in this guide.
Table of contents
- What does an ND filter do?
- Do you need an ND filter for long exposure?
- How many stops ND filter for long exposure?
- How do you calculate long exposure?
- How do you shoot long exposures with an ND filter?
- How to use the Hoya 77mm variable ND filter II
- What’s new in Hoya’s Variable density version II filter?
- ND filters with step up rings
What does an ND filter do?
In the same way as sunglasses reduce light to your eyes, an ND filter reduces light to the lens. This allows you to slow down the camera shutter speed and create different effects for photography, as well as achieve the correct shutter speed for videography, when recording during brighter conditions.
This guide focuses on using solid ND and Variable ND filters for landscape photography, but an ND can be also used in other situations, such as:
- to achieve a wider aperture for shallow depth of field long exposure portrait photography
- to blur motion
- to remove people from the frame
- for long exposure urban photography and cityscapes
- for timelapse photography, astrophotography and fireworks and more genres
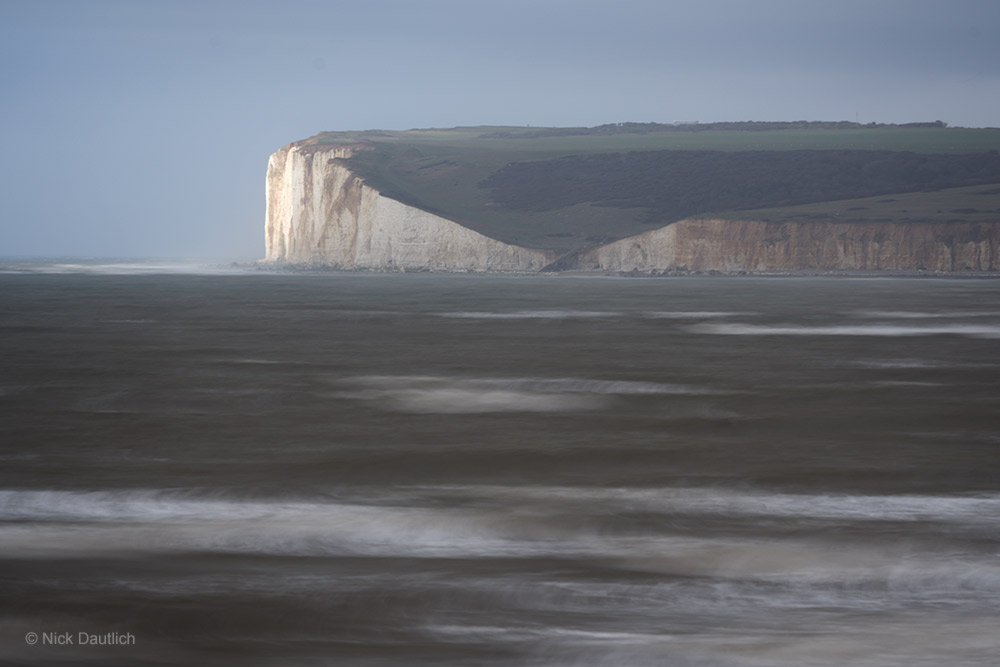
Long exposure landscape by Nick Dautlich with Hoya VND II, Sony A7R III and Sony FE 100-400mm F/4.5-5.6 GM OSS Lens @276mm. Camera settings: 30 seconds. f/7.1. ISO 100
Do you need an ND filter for long exposure?
It is possible to create long exposures without an ND filter, however it’s far easier to achieve creative results by simply adding an ND. An ND filter does all of the work, rather than capturing multiple exposures and stacking them during post production or shooting at aperture’s, which cause diffraction.
Sample seascape long exposure by Nick Dautlich with Hoya VND II, Sony A7R III and Sony FE 100-400mm F/4.5-5.6 GM OSS Lens @198mm. Camera settings: 2.5 seconds. f/8. ISO 100
How many stops ND filter for long exposure?
There are several options when choosing a screw-in ND filter and many photographers will have a selection for different conditions and shooting situations. Hoya offers variable ND filters, which allow you to rotate the filter to set different densities, as well as single ND filters, in 1-10 stops and even higher.
How many stops you need for long exposures really depends on what you are shooting, how bright it is and the result you want to create. In order to help you decide, we’ve included an ND filter chart below, and you can also use an ND filter app, such as ND Calc which helps to create beautiful LE shots.
Creating pleasing motion in fast moving clouds or water such as a waterfall might only need 1 or 2 stops of light reduction, whereas you might choose 10-stops for a much longer effect when subjects are slower or conditions are brighter.
Sample showing blurred foreground, with Hoya VND II, Sony A7R III and Sony FE 100-400mm F/4.5-5.6 GM OSS Lens @128mm. Camera settings: 20 seconds. f/8. ISO 100
How do you calculate long exposure?
To calculate long exposure first set up your shot normally without an ND filter and make a note of the shutter speed for a correctly exposed image. Use the table or a long exposure calculator app to establish the settings when you add a filter of your choosing.
ND filter chart
|
No filter |
ND2 1-stop |
ND4 2-stops |
NDS 3-stops |
ND16 4-stops |
ND32 5-stops |
ND64 6-stops |
NDlOO 6 2/3-stops |
ND200 7 2/3-stops |
ND400/500 8 2/3 -9-stops |
NDlOOO 10-stops |
|
1/4000s |
1/2000s |
1/lOOOs |
1/500s |
1/250s |
1/125s |
1/60s |
1/30s |
1/l5s |
1/8s |
1/4s |
|
1/2000s |
1/lOOOs |
1/500s |
1/250s |
1/125s |
1/60s |
1/30s |
1/l5s |
1/8s |
1/4s |
1/2s |
|
1/lOOOs |
1/500s |
1/250s |
l /125s |
1/60s |
1/30s |
1/l5s |
1/8s |
1/4s |
1/2s |
1s |
|
1/500s |
1/250s |
1/125s |
1/60s |
1/30s |
1/15s |
1/8s |
1/4s |
1/2s |
1s |
2s |
|
1/250s |
1/125s |
1/60s |
1/30s |
1/l5s |
1/8s |
1/4s |
1/2s |
1s |
2s |
4s |
|
1/125s |
1/60s |
1/30s |
1/15s |
1/8s |
1/4s |
1/2s |
1s |
2s |
4s |
8s |
|
1/60s |
1/30s |
1/l5s |
1/8s |
1/4s |
1/2s |
1s |
2s |
4s |
8s |
15s |
|
1/30s |
1/l5s |
1/8s |
1/4s |
1/2s |
1s |
2s |
4s |
8s |
15s |
30s |
|
1/l 5s |
1/8s |
1/4s |
1/2s |
1s |
2s |
4s |
8s |
15s |
30s |
1m |
|
1/8s |
1/4s |
1/2s |
1s |
2s |
4s |
8s |
15s |
30s |
1m |
2m |
|
1/4s |
1/2s |
1s |
2s |
4s |
8s |
15s |
30s |
1m |
2m |
4m |
|
1/2s |
1s |
2s |
4s |
8s |
15s |
30s |
1m |
2m |
4m |
Bm |
|
1s |
2s |
4s |
8s |
15s |
30s |
1m |
2m |
4m |
Bm |
16m |
|
2s |
4s |
8s |
15s |
30s |
1m |
2m |
4m |
8m |
16m |
32m |
How do you shoot long exposures with an ND filter?
Once you have your exposure times dialled into the camera, a simple procedure can be used to shoot long exposure with ND filter:
- Pre focus your shot and switch to manual focus before adding the ND filter. So much light can be reduced that you may struggle to gain focus once an ND is mounted.
- Shoot in manual mode using RAW rather than JPEG images, to gain full control over the outcome.
- It is recommended to use a remote control shutter release, in order to expose without moving the camera and to get the perfect timing if you’re capturing waves or similar moving subjects. A remote shutter release is also useful for accurate exposures in bulb mode, although you can set the camera intervalometer if you prefer.
- When shooting with a mirrorless camera you can view a live histogram to check exposure if it’s not too long. Otherwise check your results after each frame for clipping highlights and blacks, and adjust exposure settings to reshoot if necessary.
- Mount your camera on a stable tripod for anything longer than 1/2 to 1 second, at which point most camera and lens stabilisation will fail. Our Gitzo Systematic Series 3 Tripod review is a great place to start if you’re looking for a world class platform.
- If it’s windy get your camera as low to the ground as possible, especially when shooting with a longer lens, where even minor shake will become exaggerated.
- Experiment with different exposure settings, longer and shorter exposure times, as well as trying black and white photography, which can look stunning for long exposures.
- Make sure you have plenty of camera batteries and a spare memory card to hand.
As with all types of photography there’s no right and wrong and you’ll often discover the best results by experimenting to find the settings, which most appeal to you. Shooting long exposures can be extremely immersive, as you might double check settings, refocus and compose more often for each scene.
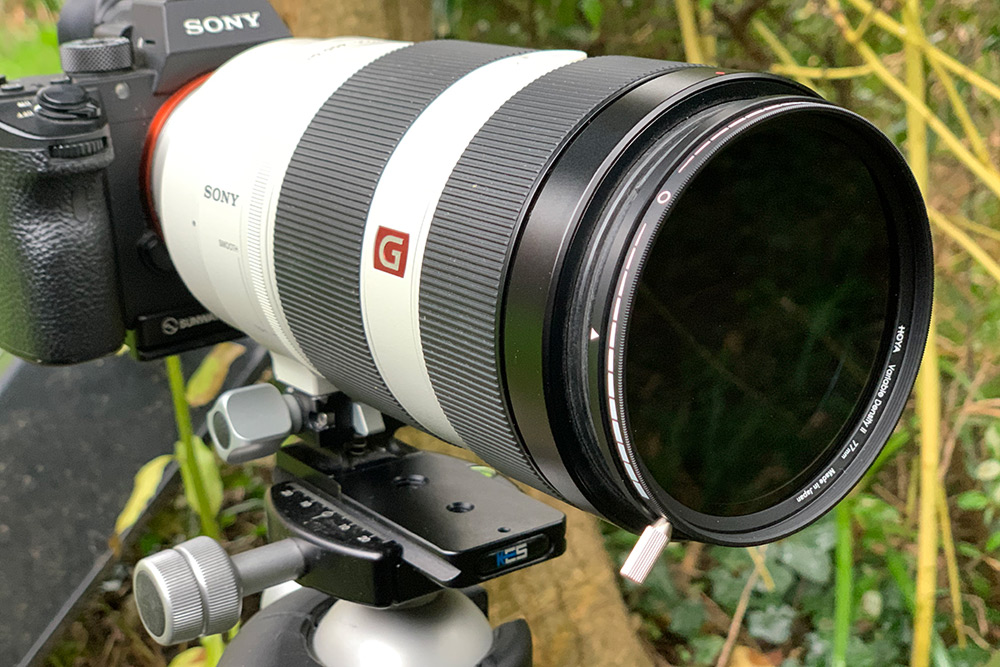
How to use the Hoya 77mm variable ND filter II
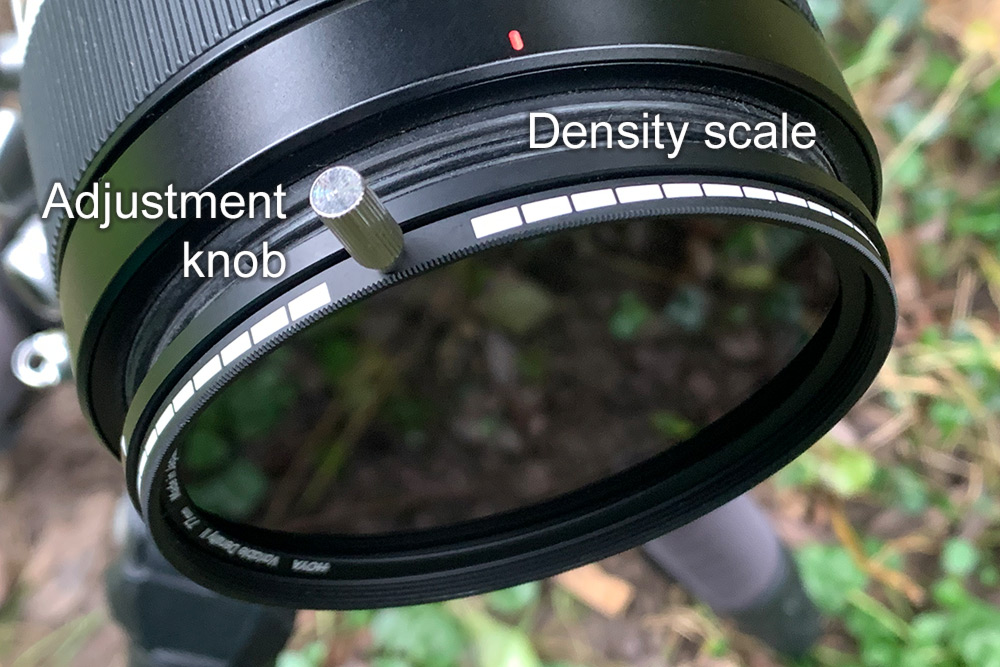
The Hoya Variable Density II filter utilises two polarised glass elements that rotate, allowing you to control the optical density of the filter between ND3 (1 2/3 stops, 0.5) and ND400 (8 2/3 stops, 2.6). The ability to adjust the brightness/darkness of the filter was a minor revelation, providing excellent control over exposure settings, for creative shutter speed and aperture combinations to create the desired effect.
Hoya notes that all Variable ND filters will exhibit cross-polarisation, which shows as a darkened ‘X’ pattern throughout the image when using a VND filter at its maximum ND value and beyond (∇ matches with X).
The ability to adjust density with the Hoya 77mm Variable Density II Filter for long exposure photography was a dream, providing the versatility to shoot during different lighting conditions with various exposure times.
Results were consistently impeccable, with total sharpness, clarity and minimal colour shift. At maximum polarisation when the X appeared, I simply switched to the Hoya 77mm PRO ND EX 1000 Neutral Density Filter or Hoya 77mm PRO ND EX 64 Neutral Density Filter, which delivered similarly high-quality results at a single density.
Sample 4 by Nick Dautlich with Hoya VND II, Sony A7R III and Sony FE 100-400mm F/4.5-5.6 GM OSS Lens @315mm. Camera settings: 3.2 seconds. f/8. ISO 100
What’s new in Hoya’s Variable density version II filter?
Hoya’s mark II Variable ND has an oversized front element, which minimises the risk of vignetting compared to the first generation filter. I found the VND II extremely easy to use, with robust build-quality, smooth threading on and off the lens thread, as well as delivering great results, with only a very minor green tint, which was easy to remove during editing.
Rotating the filter was nice and smooth, with the supplied screw-in control knob effortless to rotate and clear markings on the frame edge. The density range is versatile enough to ensure this could be your one and only ND, although it’s always nice to have the option to get to 10-stops with a dedicated 10 stop ND filter.
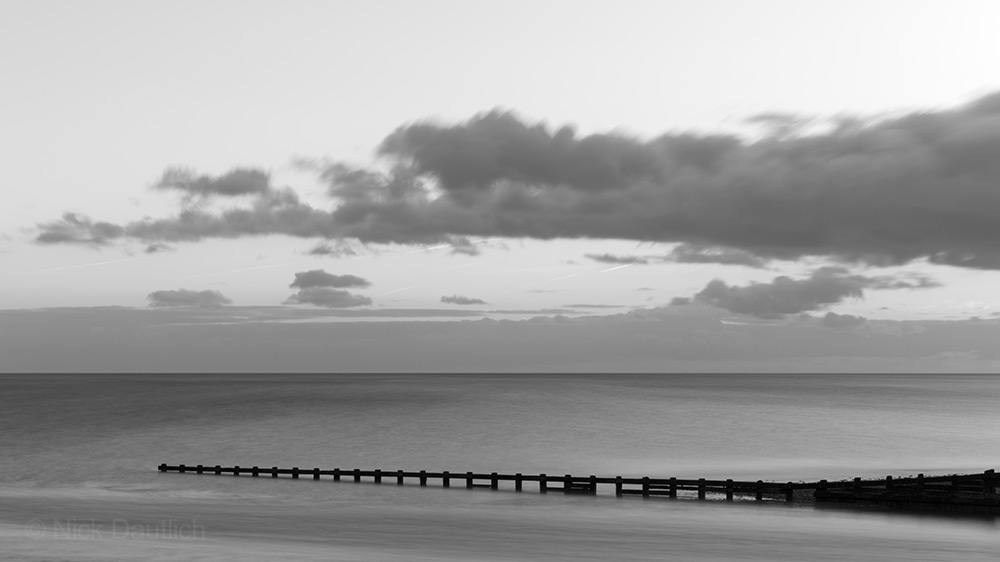
Sample LE converted to BW by Nick Dautlich, with 10 stop ND filter and step up ring, Sony A7R III and Sigma 24-70 f/2.8 DG DN Art Lens @70mm. Camera settings: 30 seconds. f/8. ISO 100
Hoya 77mm variable ND filter II specifications
- Filter type: Round screw-in type
- Thread sizes (mm): 52, 55, 58, 62, 67, 72, 77, 82
- Frame material: black anodised aluminium
- Filter material: Glass/PL film
- Density range: 1.67 to 8.67 f/stops
- ND filter factor: 3-400
Hoya ND filter rating
|
ND Filter Model |
ND Number |
Optical Density |
f-Stop Reduction |
Light Transmittance (approx.) |
|
HOYA PROND2 |
ND2 |
0.3 |
1-stop |
50% |
|
HOYA PROND4 |
ND4 |
0.6 |
2-stops |
25% |
|
HOYA PROND EX 8 |
NOB |
0.9 |
3-stops |
12.5% |
|
HOYA PROND16 |
ND16 |
1.2 |
4-stops |
6.25% |
|
HOYA PROND32 |
ND32 |
1.5 |
5-stops |
3.13% |
|
HOYA PROND EX 64 |
ND64 |
1.8 |
6-stops |
1.56% |
|
HOYA PROND100 |
NDlOO |
2.0 |
6 2/3-stops |
1% |
|
HOYA PROND200 |
ND200 |
2.3 |
7 2/3-stops |
0.5% |
|
HOYA NDx400 |
ND400 |
2.6 |
8 2/3-stops |
0.25% |
|
HOYA PROND EX 500 |
ND500 |
2.7 |
9-stops |
0.2% |
|
HOYA PROND EX 1000 |
ND1000 |
3.0 |
10-stops |
0.1% |
|
HOYA PROND100000 |
ND1OOOOO |
5.0 |
16 2/3-stops |
0.001% |
ND filters with step up rings
All three 77mm ND filters fitted natively onto the Sony 100-400mm lens, which really pushed my creativity, as typically I’d use wide angle or ultra wide angle lenses for long exposure landscapes. Having captured three or four telephoto shots during overcast and windy conditions I decided to buy a 77mm to 82mm stepping ring, enabling the filters to be mounted onto a wide angle zoom lens, which has an 82mm thread. This opened up new opportunities for wider shots, which can look great, especially when motion is moving towards the camera.
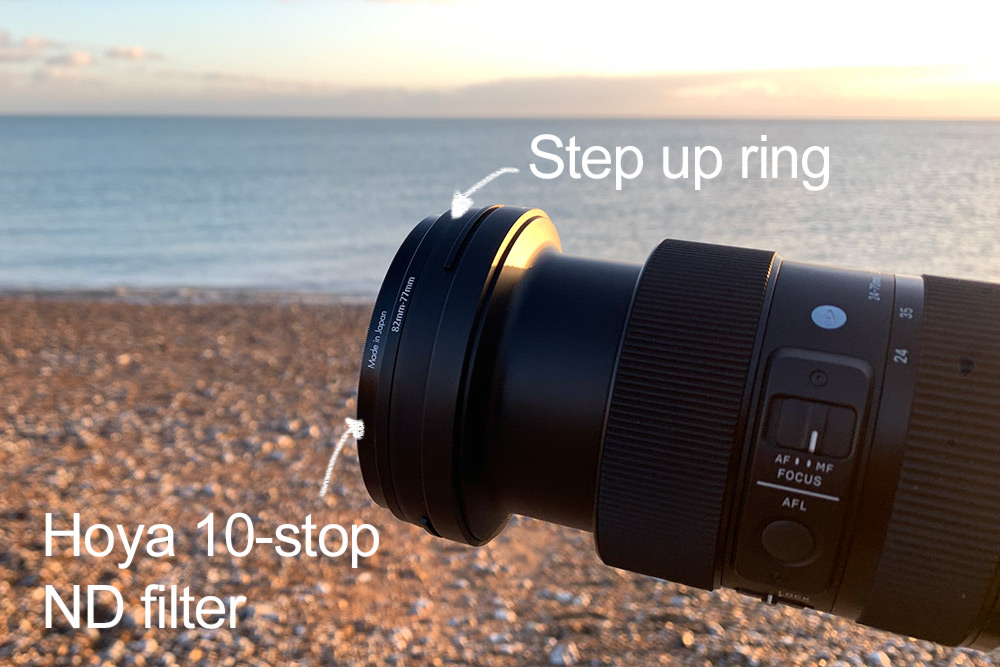
Vignetting was quite heavy at ultra wide angles with a step-up ring, but virtually disappeared at around 50-70mm, providing the versatility to use these brilliant filters across several lenses. Stepping rings are a great solution if you want to save money by buying only one or two larger filters and stepping them down (or up in a pinch), to fit lenses with different thread sizes. It’s a good idea to be prepared to adjust your compositions, crop images or spend some time removing vignetting if stepping up.
Using a lens cap with the Hoya VND II
It can be time consuming to screw lens filters on and off when changing locations, however this is no problem for the HOYA Variable Density II filter, which has a trick up it’s sleeve. Simply use a lens cap one size larger than your filter in order to leave it on!
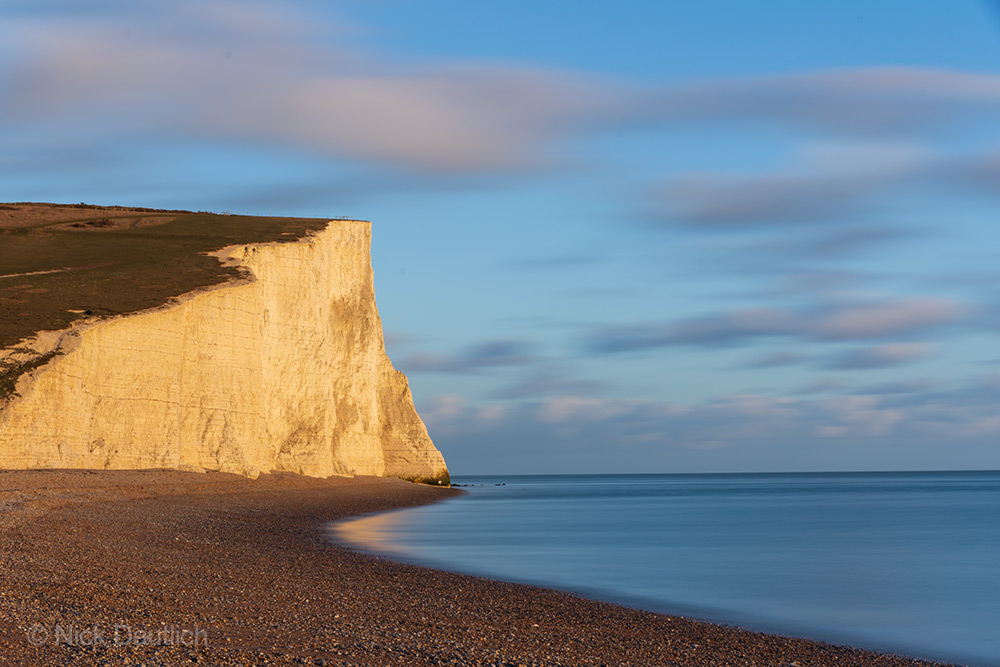
Sample 7 by Nick Dautlich with 10 stop ND filter and step up ring, Sony A7R III and Sigma 24-70 f/2.8 DG DN Art Lens @56mm. Camera settings: 30 seconds. f/13. ISO 100
Considerations for landscape photography
When a scene’s exposure was balanced, the Hoya VND II performed flawlessly every time. On occasions where the sky had to be darkened with a graduated ND filter, I switched to a square system, which allowed me to stack filters.
About Hoya
Every photographer has heard of Hoya filters, who have become synonymous with lens filters since being Japan’s first specialty manufacturer of optical glass in 1941. They employ advanced optical technology to create a wide range of options for every occasion, with a range which spans UV filters, ND filters and speciality options such as star and sparkle filters.
Getting Started with Long Exposure | Tutorial Tuesday
Watch Gareth's video all about getting started with long exposure photography
Neutral density filters can completely change the way you shoot, opening up new creative avenues by exaggerating motion in the shot. They can also be used for portrait photography, videography and many of other situations where a shot benefits from slower shutter speeds.
Browse our huge range of Hoya filters and ND filters to fit any lens and start experimenting with long exposure photography today to see where this absorbing genre takes you.
Share this post:
By Nick Dautlich on 28/02/2023
Nick Dautlich
Senior Content Writer and Product Reviewer
Nick Dautlich is the Senior Content Writer and Product Reviewer at Park Cameras, with over 15 years of photography experience. A Sony Imaging Professional and expert reviewer, Nick has worked with major brands such as Canon, Sony and Nikon. His work is also featured on Vanguard World UK’s website, Capture Landscapes, and Shutter Evolve. Nick’s photography includes National Trust projects and magazine covers and he is passionate about landscapes and storytelling. Nick also enjoys hiking and teaching his children about nature. Learn more on his profile page.

Trade in your old equipment
Fast and easy trade in service ensures your old gear is collected efficiently and you are paid quickly! It's very simple to trade in your unwanted photography gear. Just head over to our dedicated Sell or Part Exchange page, fill out the details, and we'll get back to you with an offer for your old gear. Take the cash, or put it towards the cost of your new gear. It's up to you! Find out more
sign up to the newsletter
Keep up to date on the latest photography news, events and offers. Sign up now