- Call us 01444 237070

-
- Back
- Used Cameras
- Used Accessories
- Used Lenses
- Back
- Used Canon Lenses
- Used Nikon Lenses
- Used Fujifilm Lenses
- Used Sony Lenses
- Used Micro 4/3rds Lenses
- Used Leica Lenses
- Used Panasonic Lenses
- Used Pentax Lenses
- Used Samyang Lenses
- Used Sigma Lenses
- Used Tamron Lenses
- Used Tokina Lenses
- Used Voigtlander Lenses
- Used Zeiss Lenses
- Used Hasselblad Lenses
- Used Video
- Used Film Equipment
- Used Stock Alert
- Used Blank Test
- Sell or Part Exchange
- Used Clearance
- Recently Added Used Equipment
- Park Picks
- Faulty
- Trade-In
- Blog
- New in
- Call us
- Contact us
- Stores
- Sign in
- Categories
- Tips & Inspiration
- Reviews
- News
- Events
- Features
- Buying Guides
- Competitions
Why Shoot Photos in RAW
Do you want to shoot RAW photos and don’t know where to start, or maybe you’re wondering why to shoot RAW Vs JPEG? In this post we talk about why it’s a good idea to make your photographs in RAW for post processing. We discuss the benefits of RAW and share Gareth’s video going over some of the basics of making the switch from JPEG, along with examples, crops and edits to illustrate.
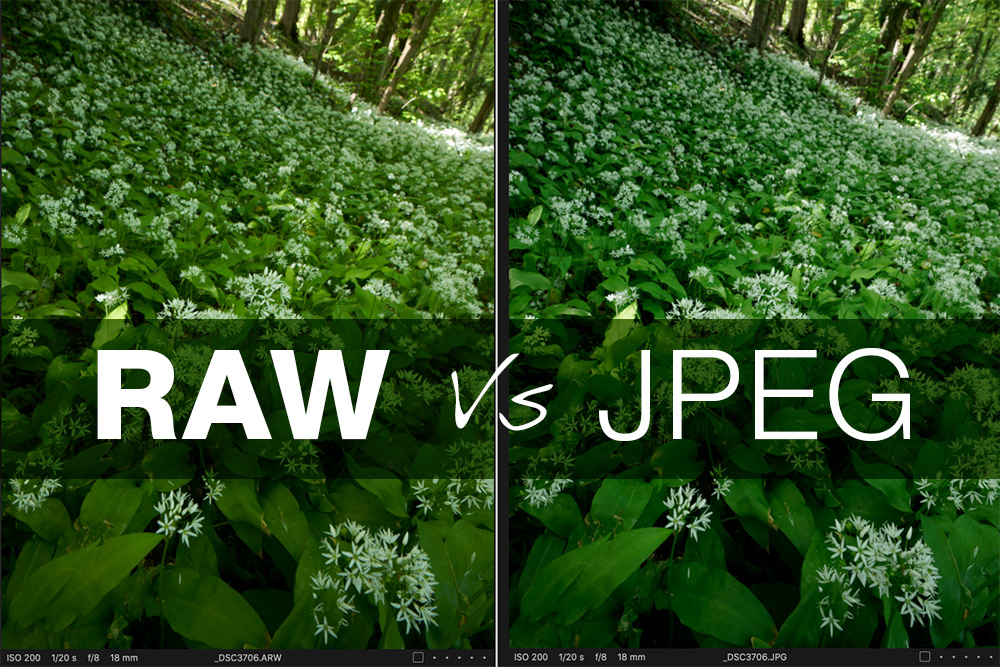
Table of contents
- Introduction - What are RAW images in Photography?
- What Type of RAW files are there?
- RAW Vs JPEG
- Why Shoot Photos in RAW?
- Types of RAW compression
- How to open and edit RAW files
- RAW Vs JPEG In-Depth
Introduction - What are RAW images in Photography?
Quite simply RAW files are images captured on a digital camera, then stored on the memory card, which are not processed by the camera, so they’re referred to as RAW (unedited) files. RAW files contain all of the data captured by the camera sensor and can be used for any scene whatsoever, whether that’s a portrait, building or landscape.
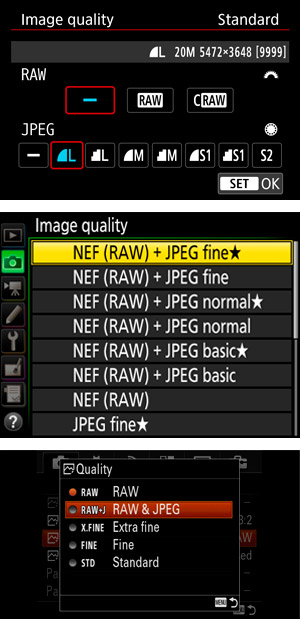
Examples of camera menu settings to choose RAW + JPEG file recording
What Type of RAW files are there?
Each camera manufacturer uses their own RAW recording system, with the file having their own file extension, but they are all RAW image files. Here are some examples of different manufacturer file extensions:
- Canon CRW
- Nikon NEF
- Sony ARW
- Fujifilm RAF
- Panasonic Lumix RW2
- Olympus ORF
- Leica RWL
- Pentax PEF
Any of these could have slightly different extensions, for example Canon also has CR2 and CR3 depending on the camera model and firmware version. Most modern digital cameras have the ability to shoot in RAW format, whether a mirrorless, DSLR, compact or action camera. Check the menus for picture quality and file type.
Watch the Park Video ‘Why Shoot Raw’ here
100% crop comparing RAW (top) and JPEG without any editing applied in Capture One
RAW Vs JPEG
Where RAW files are unprocessed, JPEGs (or a jpg) are processed by the camera software before being recorded. All digital files are processed to some degree, JPEG’s captured straight in the camera rely on the algorithms supplied by the manufacturer. This doesn’t make them better or worse photographs, it just means the manufacturer has chosen the outcome of processing, rather than us choosing. JPEG’s limit what we can do with them when we get the files onto our computer when compared to how we can process RAW files.
Why Shoot Photos in RAW?
Shooting JPEG makes a lot of sense for some purposes, however shooting RAW makes more sense if we want to edit (post process) our images to our own taste. Because RAW images are unprocessed by the camera, we can make our own creative choices. RAW files are a better starting point for editing because:
- More colour information is stored
- Higher resolution is recorded
- A wider dynamic range is captured
- Editing possibilities are endless with RAW
It can be a great idea to shoot a combination of RAW + JPEG if your camera has this feature, which many models do these days. By recording both file types you’ll be able to see how the manufacturer processes the photo and you get a JPEG image for reference or to share immediately if you’re happy with it. A word of warning, shooting both files will increase the amount of data you capture to your memory card. RAW files take up more room anyway, as they have more data per file, so if you’re recording both expect to be buying plenty of memory cards! We go into each of the four main benefits RAW files provide in more detail below.
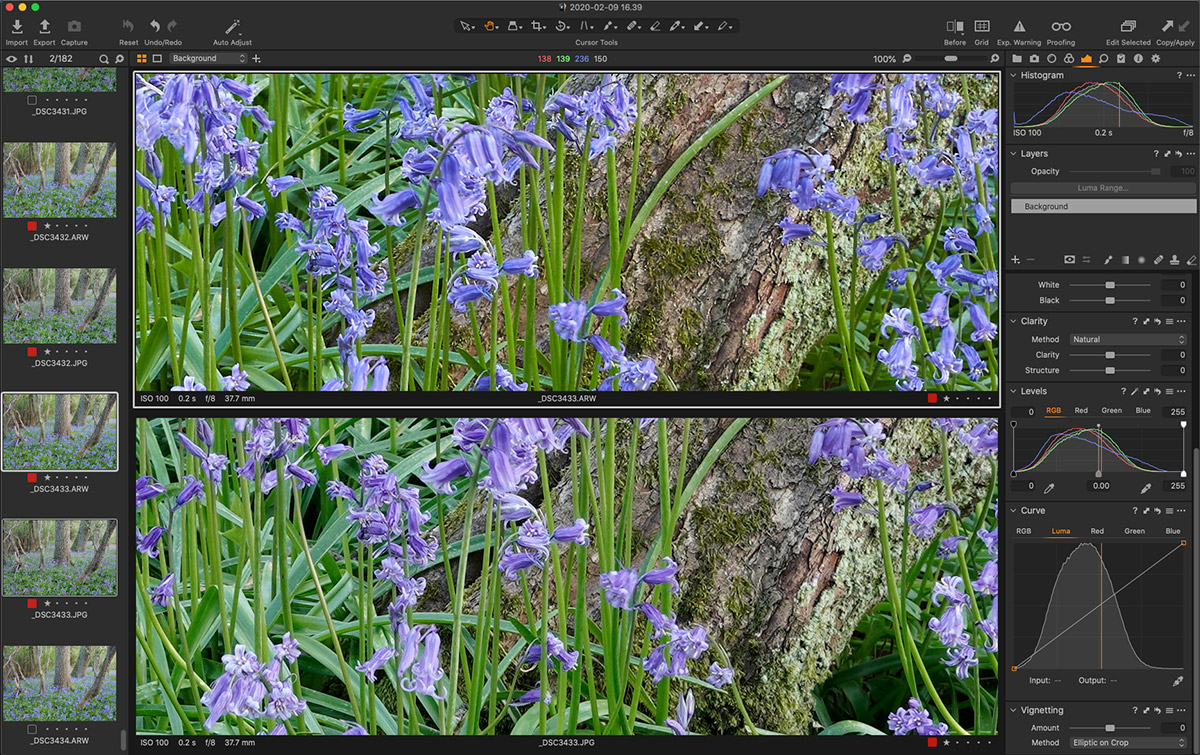
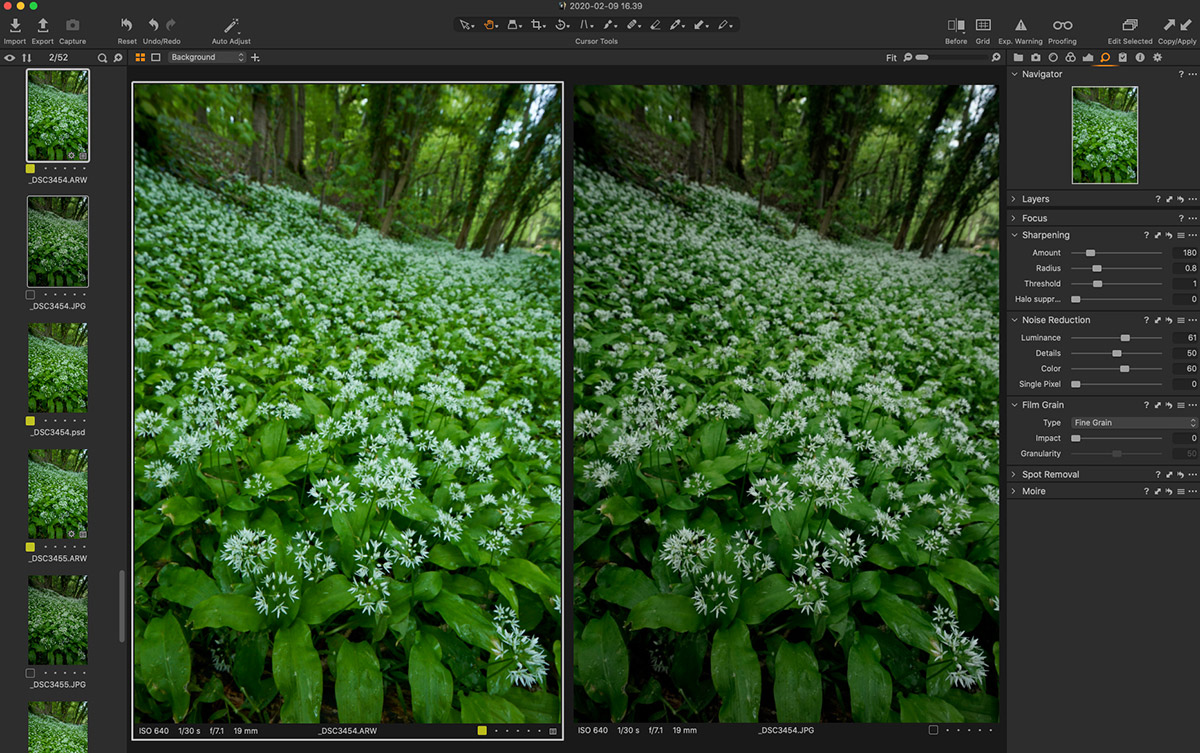
Processed RAW in Capture One (top), compared to JPEG processed by the camera, (below).
As a side note, photography is fundamentally about creativity for many of us, combining a particular moment in time with our personal expression of that moment. For some photographers that means doing very little editing, for others editing plays a significant part in the creative process. For me personally I might change settings including white balance, contrast, vibrance or saturation, curve adjustments and vignetting when editing pictures. I can only do this successfully if processing a RAW file. Whatever type of editing you want to do, it’s best done with the RAW files.
Types of RAW compression
- Lossless compressed
- Compressed
- Uncompressed
These types of RAW file will all record more information than a JPEG as described above, however they will be compressed in different ways. It is pretty difficult to spot the differences between a lossless compressed and compressed RAW file and you’d have to be printing huge pictures to really see the difference. However you can pretty readily see the difference between a JPEG and a RAW image, even on screen.
How to open and edit RAW files
Whichever camera you use, RAW conversion software is required to open and edit RAW files. Most camera manufacturers make their own file import software for free, however many of these are quite limited in what they can do, which is why many photographers use universal software such as Adobe Photoshop, Adobe Lightroom or Capture One. There are a growing number of photo editing apps available and many have a free trial period so you can find out which one works best for you. I usually use Capture One Pro combined with Adobe Photoshop for editing, having moved on from Adobe Lightroom a couple of years ago.
Example of colour shift between RAW file (left) and JPEG (right)
RAW editing in Capture One, Lightroom or other RAW software is an entirely non-destructive process, meaning you can completely reset or change the edit any time you like without any loss of quality. When you edit a JPEG you will be making permanent adjustments, which degrade the image file over time the more you edit it. There’s more about this below, as one of the main reasons to use RAW over JPEGs.
RAW Vs JPEG In-Depth
We outlined above why RAW files are a better starting point if you choose to edit your photos so in this section here we take a deeper dive into each of those benefits.
More colour information
RAW files tend to be 12-bit or 14-bit whereas JPEGs have 8-bits of colour information. The maximum number of colours a JPEG can store is 16.8 million colours, while a 12-bit RAW file will contain up to 68.7 billion, and 14-bit or higher has trillions of colours embedded, depending on the scene you’re shooting.
In real terms this means you will see smoother colour graduations, richer , more varied hues and colours as well as more colours overall. When recording a JPEG the camera will discard excess colour information in order to fit the data into the 8-bit limitation. What this means is that we lose some amount of colour data, which we can never get back.
I’ll just throw it in here that camera manufacturers are starting to introduce a newer format called HEIF which will one day replace JPEG’s IMO, as they record 10-bits of colour data at around the same file size as a JPEG. This will make the very smallest files better quality, but they still won’t be able capture as much information as a RAW file.
Higher resolution
RAW files record everything the sensor sees without any editing or discarding of information and this includes detail in the image. There’s less compression so images will appear slightly sharper (if they were accurately focussed) with more detail visible throughout the frame. The example here of a small area of the image showing some leaves demonstrates this point well, with the RAW image showing the finer detail of the veins in the leaves far more accurately.
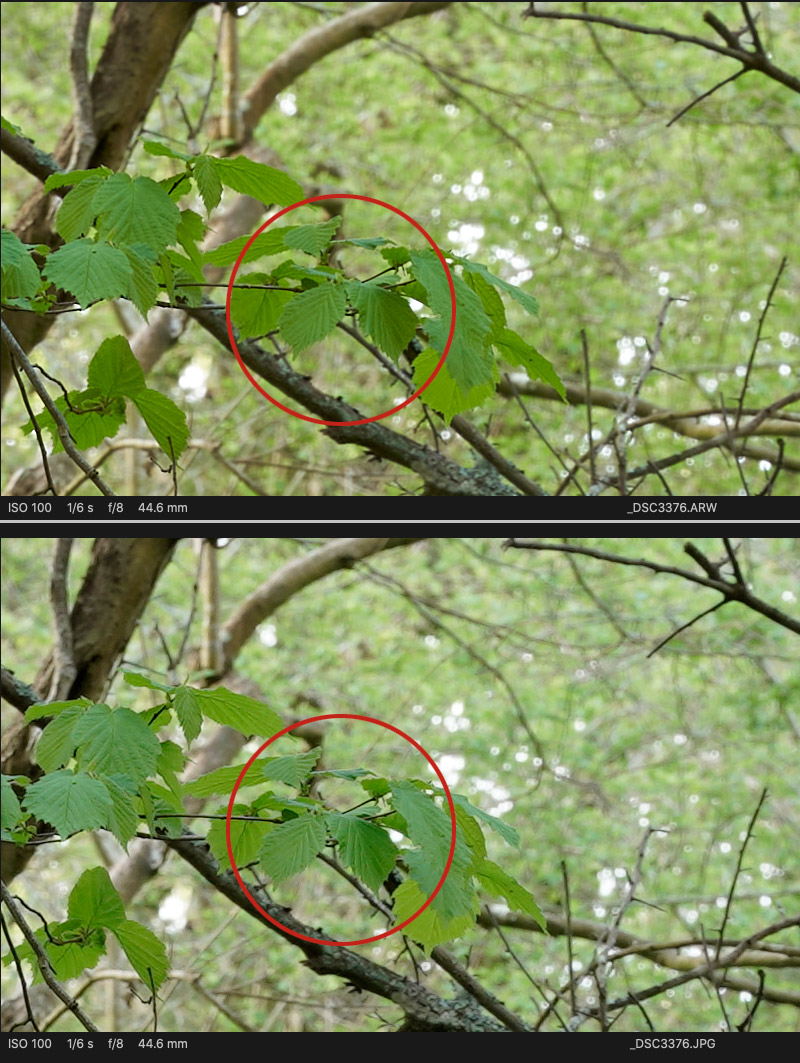
The higher resolution of the RAW file is apparent in this 100% crop of a tiny detailed leaf, with RAW (top) and JPEG (below)
When using any editing software you will get the option to sharpen the image, in fact all editing software has a starting point for sharpening by default. This can help with detail overall, depending on what kind of look you’re going for. Sometimes we’ll reduce sharpening to create ethereal pictures, maybe use Orton Effect for softer results. The default setting for Capture One sharpening is 180 for Sony RAW files, which can be too high for some images.
Wider dynamic range
In simple terms the dynamic range is the difference between highlights and shadows in a scene, or more technically the ratio between the highest and lowest light intensities. For example a landscape with deep valleys and lots of sky above will have a wide dynamic range between the brighter sky and darker valleys below. A JPEG will show 256 levels of brightness, whereas a RAW file records between 4,096 up to 16,384 brightness levels. This means you will once again see far smoother transitions between light and dark as well as brighter lights and darker darks without losing information.
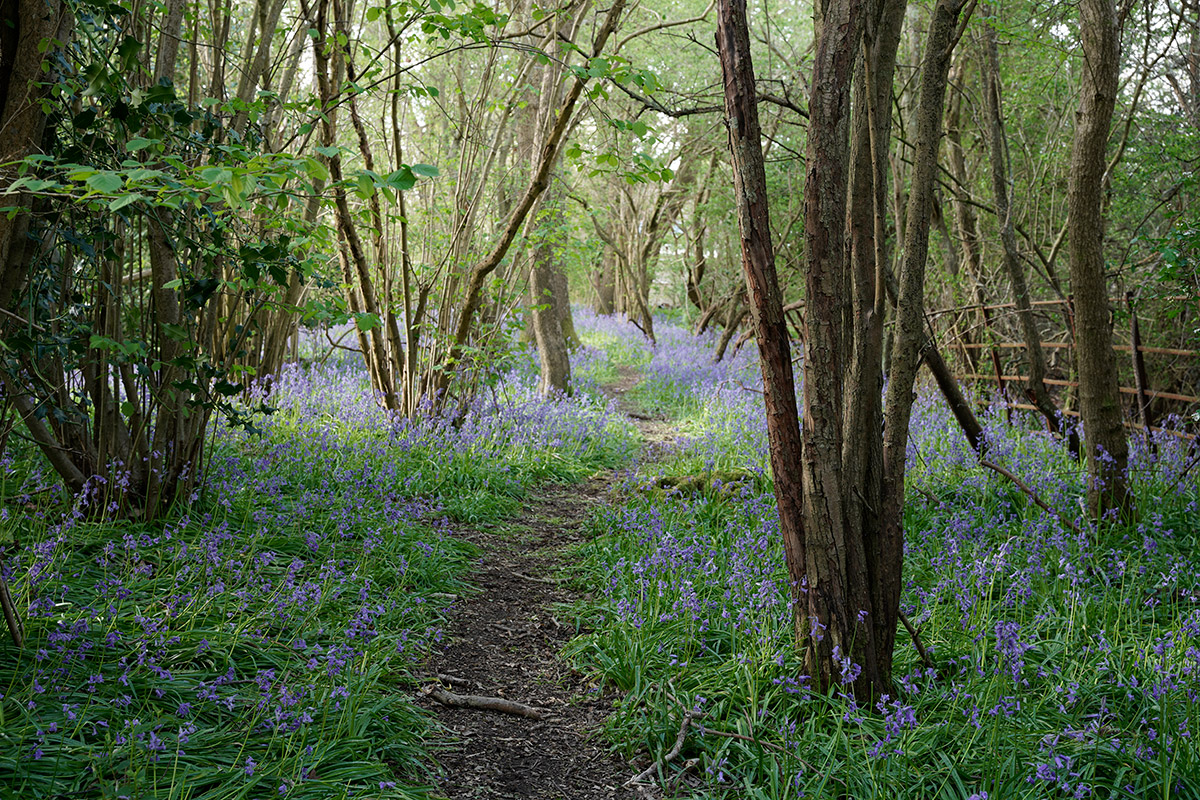
JPEG image of bluebells file straight out of camera - no further edit
If we are shooting in scenes with a wide dynamic range, we could either clip highlights or lose shadow detail if the scene has more EV stops than our camera sensor can capture. However a JPEG will have a far lower chance of capturing the highlights and shadows in high dynamic range scenes.
Out of interest most modern cameras have incredible dynamic range capabilities with 13 stops stops to 15 stops being the norm. 35mm film is said to record around 13 stops of dynamic range, so we’re as good, and generally better results from this perspective with digital photography. The human eye sees around 25 stops of light, so we are far better at looking at a wide dynamic range scene than a camera is capable of capturing, so why not get as much information as possible with a RAW file!
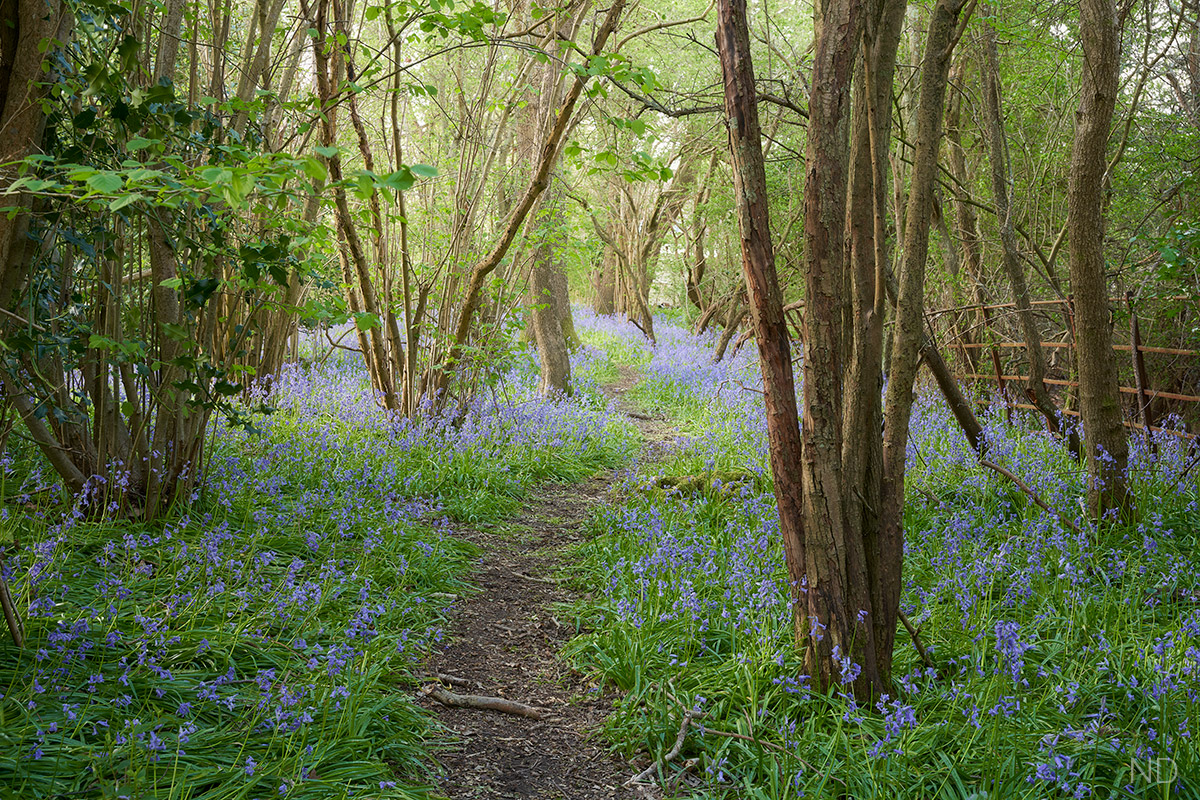
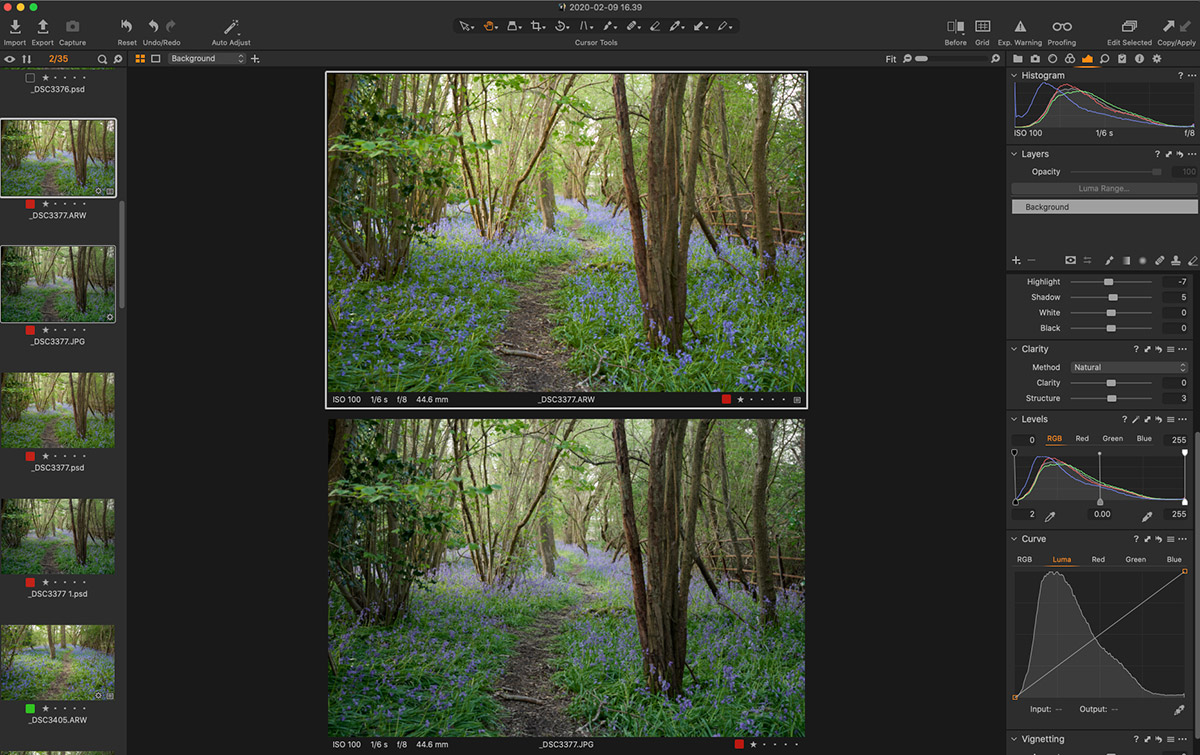
Lightly processed RAW file using the same image as above
For anyone who wants to know the precise science behind dynamic range I would recommend this article on Cambridge In Colour which goes into far more detail.
Editing possibilities
Once we get to the point where we decide to start editing our own photographs (which often happens not long after we get the photography bug) and decide we want more control over the outcome of our images, RAW comes into play. We can edit RAW files endlessly if we choose, then start all over again from scratch without ever damaging the original data. That’s because we are actually editing a separate XML file associated with the picture, which stores our edit information. When we edit a JPEG we are overwriting the file itself, so over time if we open and close it making edits each time the JPEG will deteriorate and we’ll lose detail, colours, sharpness etc. We posted a tutorial which may be of use if you’d like to try using your camera in manual mode, which helps you to learn manual photography in 10 minutes. Your creativity can really take off when you shoot manually, followed by post processing your own RAW files.
There are loads of courses around for editing pictures (see Park Cameras post processing courses here), millions of Youtube tutorials and a lot of books and blogs to get editing tips for the style you shoot and aspire to. Park Cameras Youtube channel has Tutorial Tuesday photography tutorials as well as Learn Photography (beginner tutorials), so I won’t go into detail here.
It is worth mentioning that RAW files may come out looking quite ‘flat’ compared to a JPEG in the first instance, which is because there’s been no editing done by the camera, whilst JPEG’s are edited by the camera. Whatever the starting point, these basic edits are worth considering as a starting point for your images and easily adjusted in RAW editors.
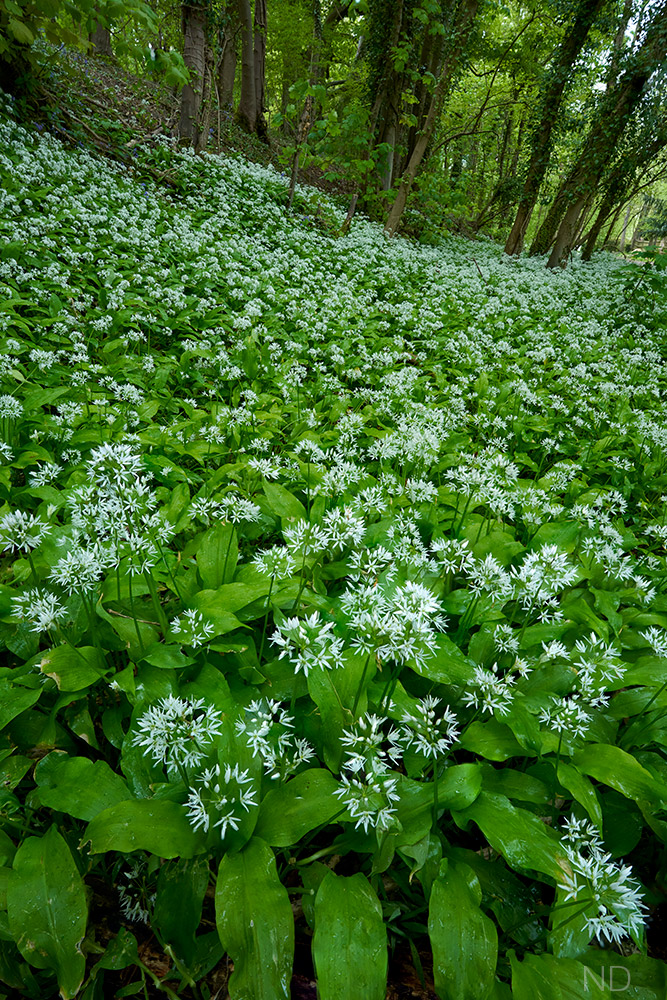
Processed RAW file of wild garlic
- White balance - The colour of light is difficult for sensors to judge so it’s a good thing that we can adjust the white balance of a RAW file with the click of a button.
- Contrast - There are a lot of factors which contribute to the contrast in a photo and you’ll find multiple ways to increase or decrease contrast in RAW.
- Vibrance and saturation - RAW images may reduce vibrance and saturation which can be enhanced in post production.
- Sharpening - Capture One has pretty aggressive default sharpening settings for Sony cameras, which I sometimes forget to reduce (you can also set a default for every camera). If you use Lightroom or other apps you might find you want to increase sharpness to refine details.
Many corrections are done automatically for us when opening a RAW file in the editing software, things like lens corrections, distortion, vignetting and even noise reduction.
We hope this has been a useful post going into why it’s a good idea to shoot RAW, why not take a look at our other photography tips and inspiration posts.
Share this post:
By Nick Dautlich on 20/05/2021
Nick Dautlich
Senior Content Writer and Product Reviewer
Nick Dautlich is the Senior Content Writer and Product Reviewer at Park Cameras, with over 15 years of photography experience. A Sony Imaging Professional and expert reviewer, Nick has worked with major brands such as Canon, Sony and Nikon. His work is also featured on Vanguard World UK’s website, Capture Landscapes, and Shutter Evolve. Nick’s photography includes National Trust projects and magazine covers and he is passionate about landscapes and storytelling. Nick also enjoys hiking and teaching his children about nature. Learn more on his profile page.

Trade in your old equipment
Fast and easy trade in service ensures your old gear is collected efficiently and you are paid quickly! It's very simple to trade in your unwanted photography gear. Just head over to our dedicated Sell or Part Exchange page, fill out the details, and we'll get back to you with an offer for your old gear. Take the cash, or put it towards the cost of your new gear. It's up to you! Find out more
sign up to the newsletter
Keep up to date on the latest photography news, events and offers. Sign up now