- Call us 01444 237070

-
- Back
- Used Cameras
- Used Accessories
- Used Lenses
- Back
- Used Canon Lenses
- Used Nikon Lenses
- Used Fujifilm Lenses
- Used Sony Lenses
- Used Micro 4/3rds Lenses
- Used Leica Lenses
- Used Panasonic Lenses
- Used Pentax Lenses
- Used Samyang Lenses
- Used Sigma Lenses
- Used Tamron Lenses
- Used Tokina Lenses
- Used Voigtlander Lenses
- Used Zeiss Lenses
- Used Hasselblad Lenses
- Used Video
- Used Film Equipment
- Used Stock Alert
- Used Blank Test
- Sell or Part Exchange
- Used Clearance
- Recently Added Used Equipment
- Park Picks
- Faulty
- Trade-In
- Blog
- New in
- Call us
- Contact us
- Stores
- Sign in
- Categories
- Tips & Inspiration
- Reviews
- News
- Events
- Features
- Buying Guides
- Competitions
10 Garden bird photography tips
Firstly let me say that I’m not a bird photographer by any means, I am a landscape photographer trying something new. In the spirit of learning a new skill while we #stayathome I’ve been out every morning trying bird photography in our garden and gathering tips for readers. If you are up for a new challenge, to learning a new skill and benefitting from the wellbeing that photography and being outdoors can provide, read on. All of these images have been taken in the last few days while at home in our garden or shooting out of our windows.
We’re very lucky that our family have an outdoor space. It’s tiny at around 25 feet x 20 feet, but surrounded by trees, within reach of open fields and we’re very grateful for it right now. Whether you live in a flat in town or have a large backyard, these tips for garden bird photography will help you get started with what camera settings to use, the best equipment to use and how to approach birds when photographing them. The cover image for this blog was taken from our lounge out of the front window.
| Equipment | Recommendation | Alternative |
| The longest zoom lens | 100-400mm lens | TeleConverter lens |
| A recent camera body | Mirrorless | Micro four thirds or DSLR |
| Spare batteries | High capacity originals | Battery grips |
| Spare memory cards | Sandisk Extreme Pro 64GB SDXC 170MB/s | High speed XQD cards |
| Spotting scope | ZEISS Dialyt 18-45x65 | Nikon Fieldscope Prostaff 5 |
| All binoculars | Bushnell Prime 12x50 | ZEISS Victory Pocket |
| Sturdy tripod | 3 Legged Thing Winston II | Any Manrotto tripod |
| Gimbal head | Benro GH5 | Wimberley Sidekick |
Tip 1: The best light for photographing birds
One of the main ingredients for a good photograph is light and this stands true with bird photography. What this means in our limited capacity of photographing from our garden is getting up early! The light is softer just after sunrise and often birds (as any subject, like landscapes) will be side-lit with far softer directional light. Harsh midday light will tend to show high contrast between light and dark and can be too harsh for these small delicate subjects. The sky will be often blow out when the sun is higher and feathers will appear too light or dark.
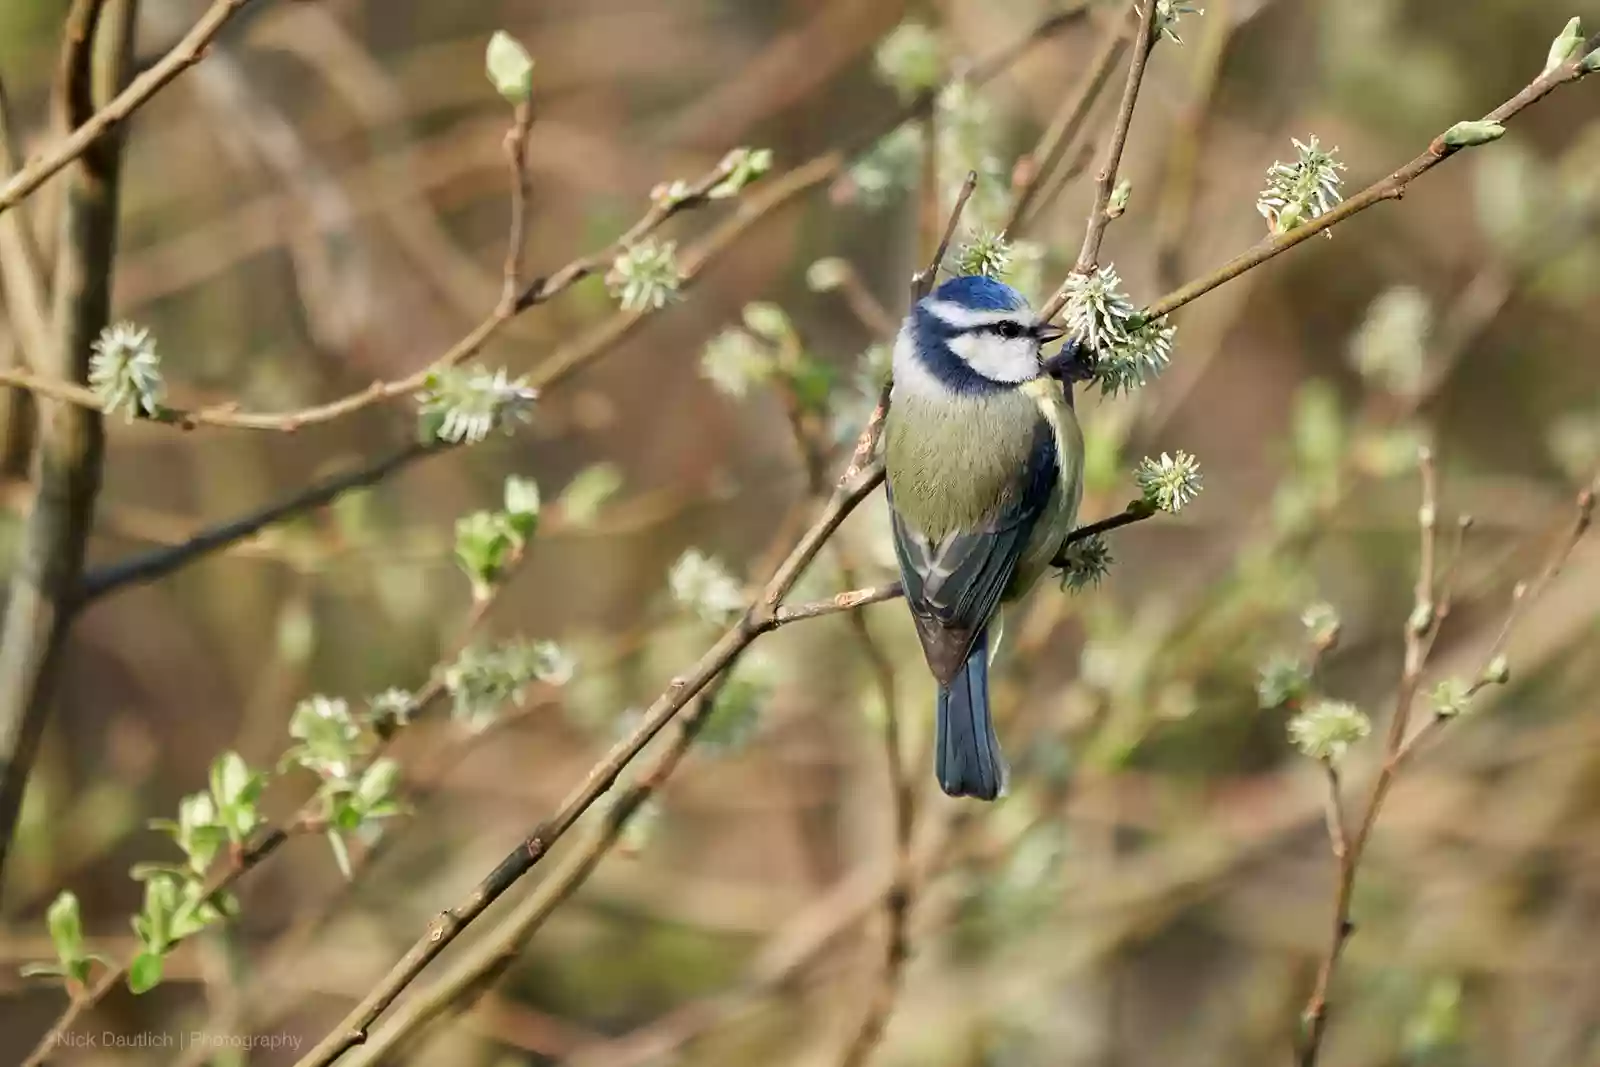
Bluetit image taken from the garden just after first light
Late afternoon and evening will also have softer light, but I found in our suburban garden setting, that birds tended to be harder to spot, perhaps wary of more human activity and cats prowling the neighbourhood.
Tip 2: Try and capture behavioural images
We all know about birdsong in the mornings, which translates to mornings being the time when birds are most active. Even during this short time I’ve noticed behavioural patterns with different bird species. Images which include bird behaviour will tend to be more interesting. This could include preening, feeding, mating or fighting. Don’t get me wrong, to begin with getting any image in focus, sharp and close enough to camera were a real bonus for me, but I noticed the more interesting images captured an activity as well as the birds.
Here are some observations which have helped me to predict what the birds would be doing and therefore how to get a more interesting photograph:
- Male blackbirds tended to get up and strut about, often tussling with other males, protecting their patch. (This is likely very common in other species).
- Sparrows are happy to preen quite near to me, allowing me to get closer for more detailed shots. They’re also really quick, diving in and out of bushes during morning wrangles, be prepared to pan.
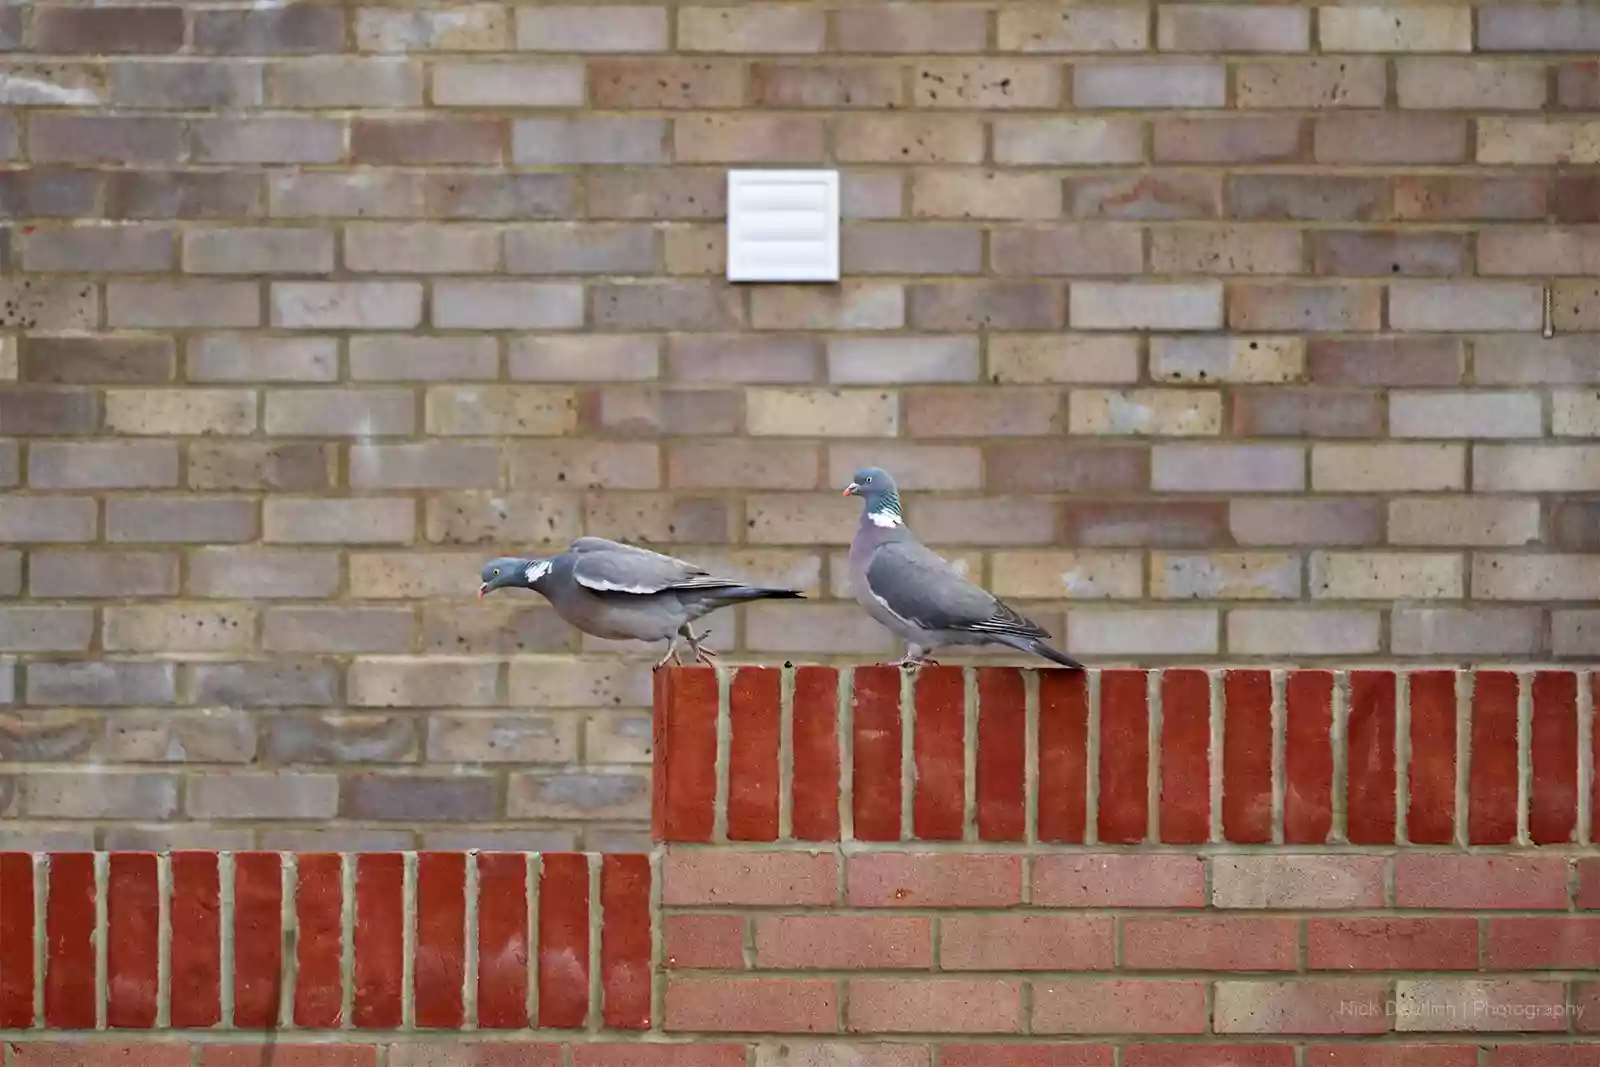
- The wood pigeons are great because they are pretty slow and have superb characterful faces. They look like they are permanently surprised by their own actions!
- Bluetits are small and fast. They’ve been feeding on higher branches in the morning, knowing this has allowed me to anticipate a picture.
These are the birds I’ve seen around our tiny patch here in Sussex, but there are around 600 species of bird in the UK (source: RSPB website here). Why not try and build up observations of your own, depending on what type are in your neighbourhood.
Tip 3: Camera settings for sharp birds
Birds are small and fast. Choosing the right camera settings for a sharp image of birds will probably mean adjusting your settings from general shooting. One thing I would say is that all modern camera sensors are capable of shooting quick enough for our purposes and that speed is of the essence here.
Shutter speed. I would recommend an absolute minimum of 350th second if a bird is ‘stationary’. I use quotes as they are always moving their heads, the wind might be catching their feathers, there’s always movement of some kind. For absolute sharpness aim to be at around 1000th second or higher.
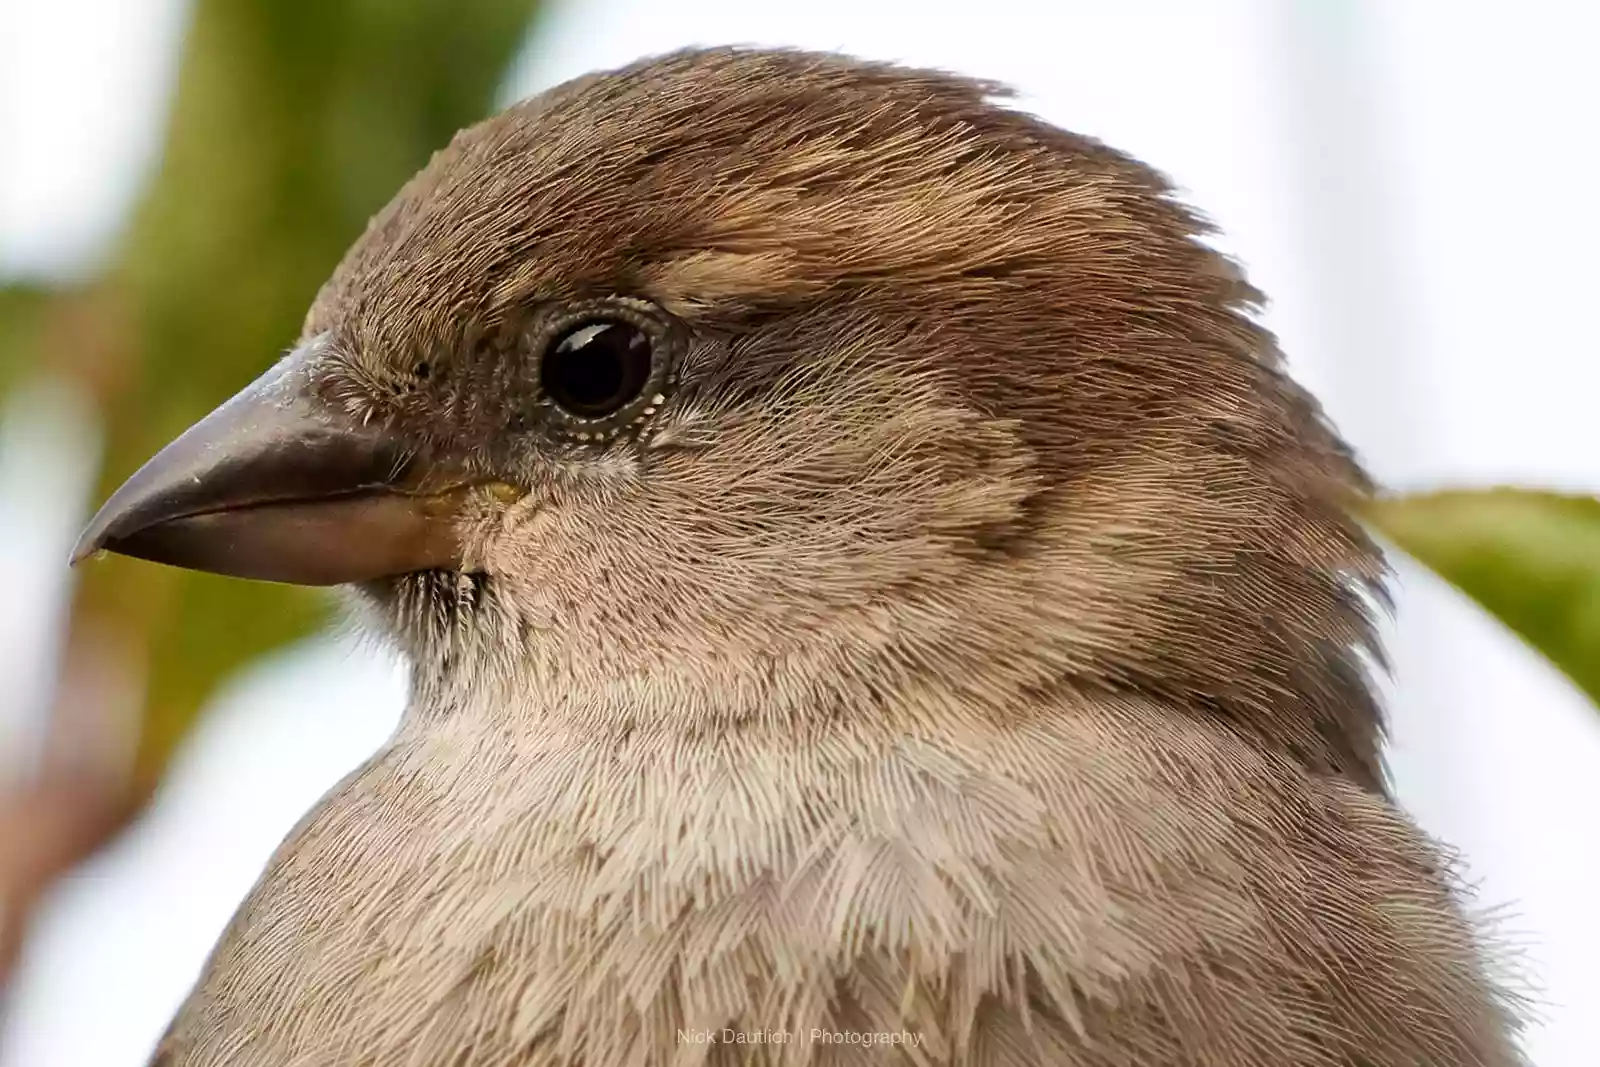
Extra fine feathers and sharp details of bird in the garden
ISO. Shooting at high speeds during low light means you’ll definitely be pushing ISO higher than normal. For a landscape photographer who always uses a tripod using ISO over 100 causes me anxiety! We have to get over that for bird photography. I’ve been shooting at ISO 1600 or 3200 regularly and would be happy to capture an amazing shot at virtually any ISO, rather than miss a wonderful moment. Any visible noise in wildlife images tends to be far less important than the moment captured.
Aperture is the last consideration from the exposure triangle and this will depend on your lens capabilities. I’ve been using a Sony 100-400mm which has a widest aperture of f/5.6 at the long 400mm end. The wider the aperture the better, as more light is entering the lens. Don’t worry about soft corners or any of that for now. Use the fastest aperture your lens is capable of (f/4 etc) which will allow for the quickest shot possible, lowest noise and best overall results for birding.
Autofocus. Use continuous autofocus if the birds are moving about (which they probably will be). I’ve set up my camera for back button focus which allows me to compose and shoot after pre-focussing. If you’d like to know how to set up your camera like this let me know in the comments below. One final consideration is to focus on the eye if possible. A sharp eye will always bring the image together, irrespective of whether other parts of the bird are in focus or not. Using thinner focal planes with wide open apertures will inevitably lead to some part being out of focus, just try and catch the eye.
PRO TIP: Settings like AWB (auto white balance) can be excellent during fast changing morning light, particularly as you probably won’t be blending images. The highlight clipping setting can avoid blowing out bright skies if you are pointing your lens upwards.
Tip 4: Use the longest lens possible
This probably seems quite obvious, but getting your subject as large in the frame as possible, whilst still capturing an environmental shot is key for interest. A speck in the distance with a 24mm lens will not have as much impact as a closer shot using a 100-400mm or 70-200mm for example. If you own and use anything over 400mm you’ll probably already be familiar with fast shooting of action, wildlife or birds. Third party lens manufacturers such as Sigma produce excellent sports lenses, together with all of the major camera manufacturers.
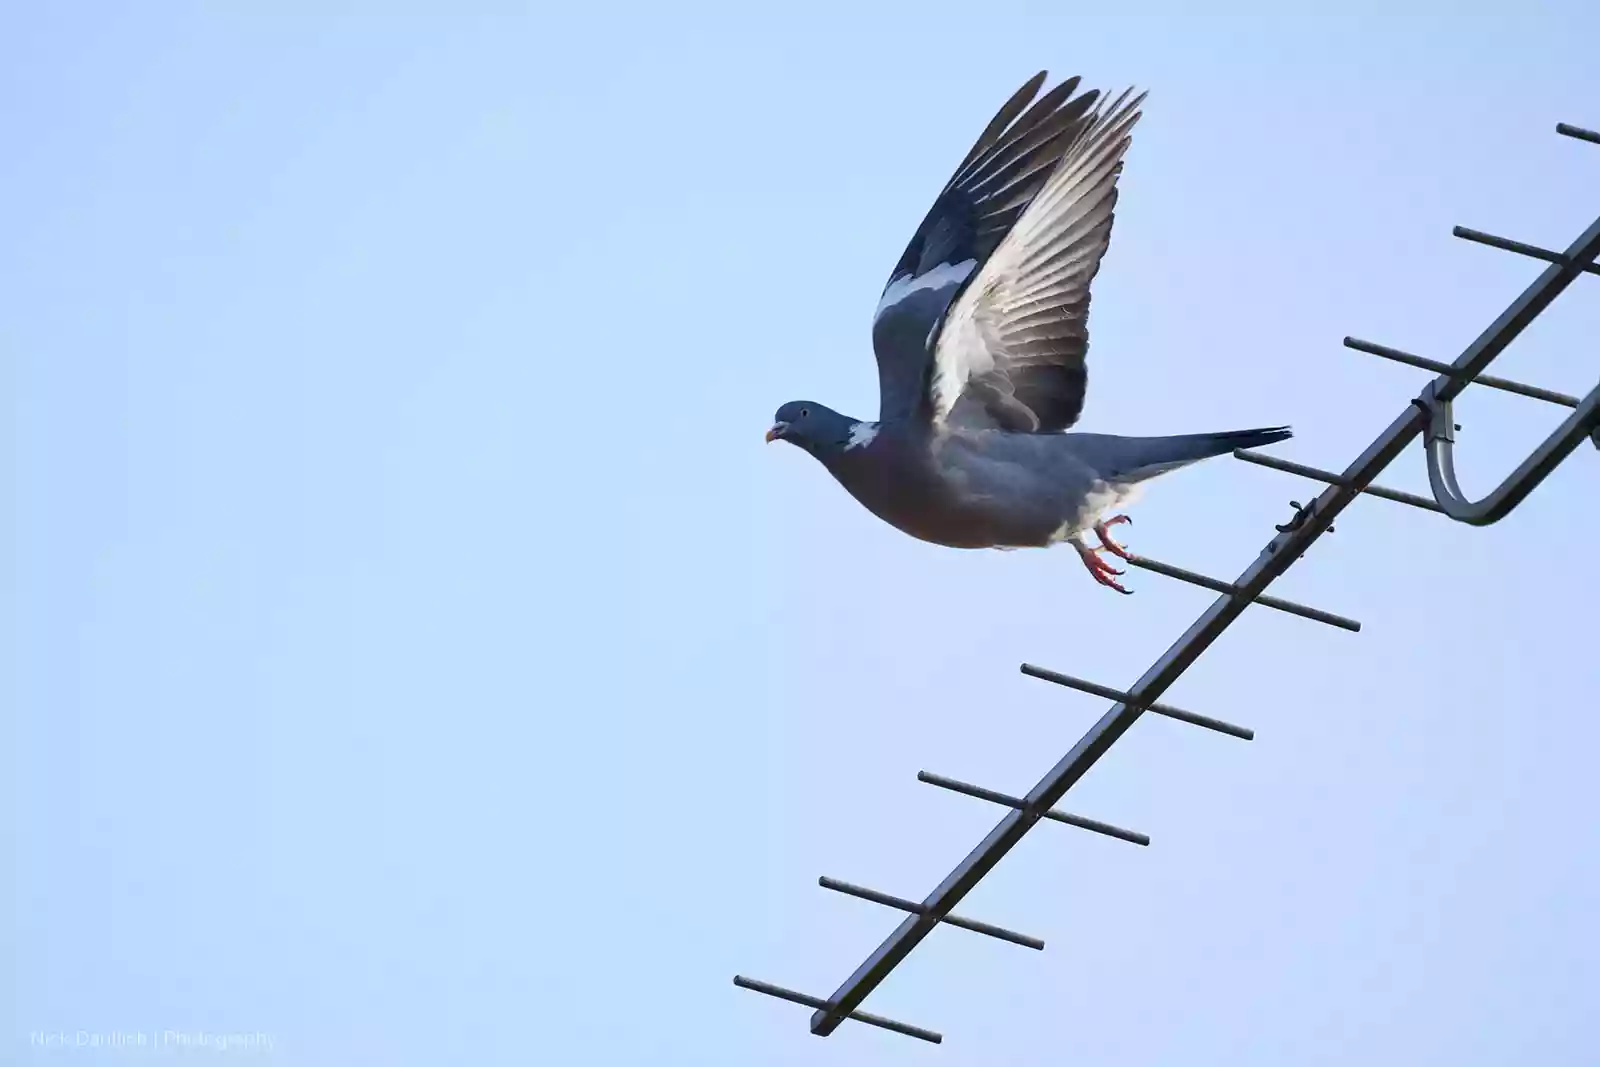
Pigeon launching off TV ariel at 400mm
PRO TIP 1: If you are new to bird photography you might consider a teleConverter. These will extend the reach of your lens at lower cost than buying a whole new lens. Generally they come in two concession lengths; 1.4x and 2x. One will add 40% to your lens range, the other will double it. As an example a 70-200mm will be extended to either 98-280mm (1.4x) or 140-400mm (2x). You will lose a stop or two stops of aperture, but the gain in reach is well worth considering in my opinion.
PRO TIP 2: The Sony lens I’ve been using has some settings on the side of the barrel which can really help for this type of photography. Many longer telephoto zooms from other manufacturers will have similar settings.
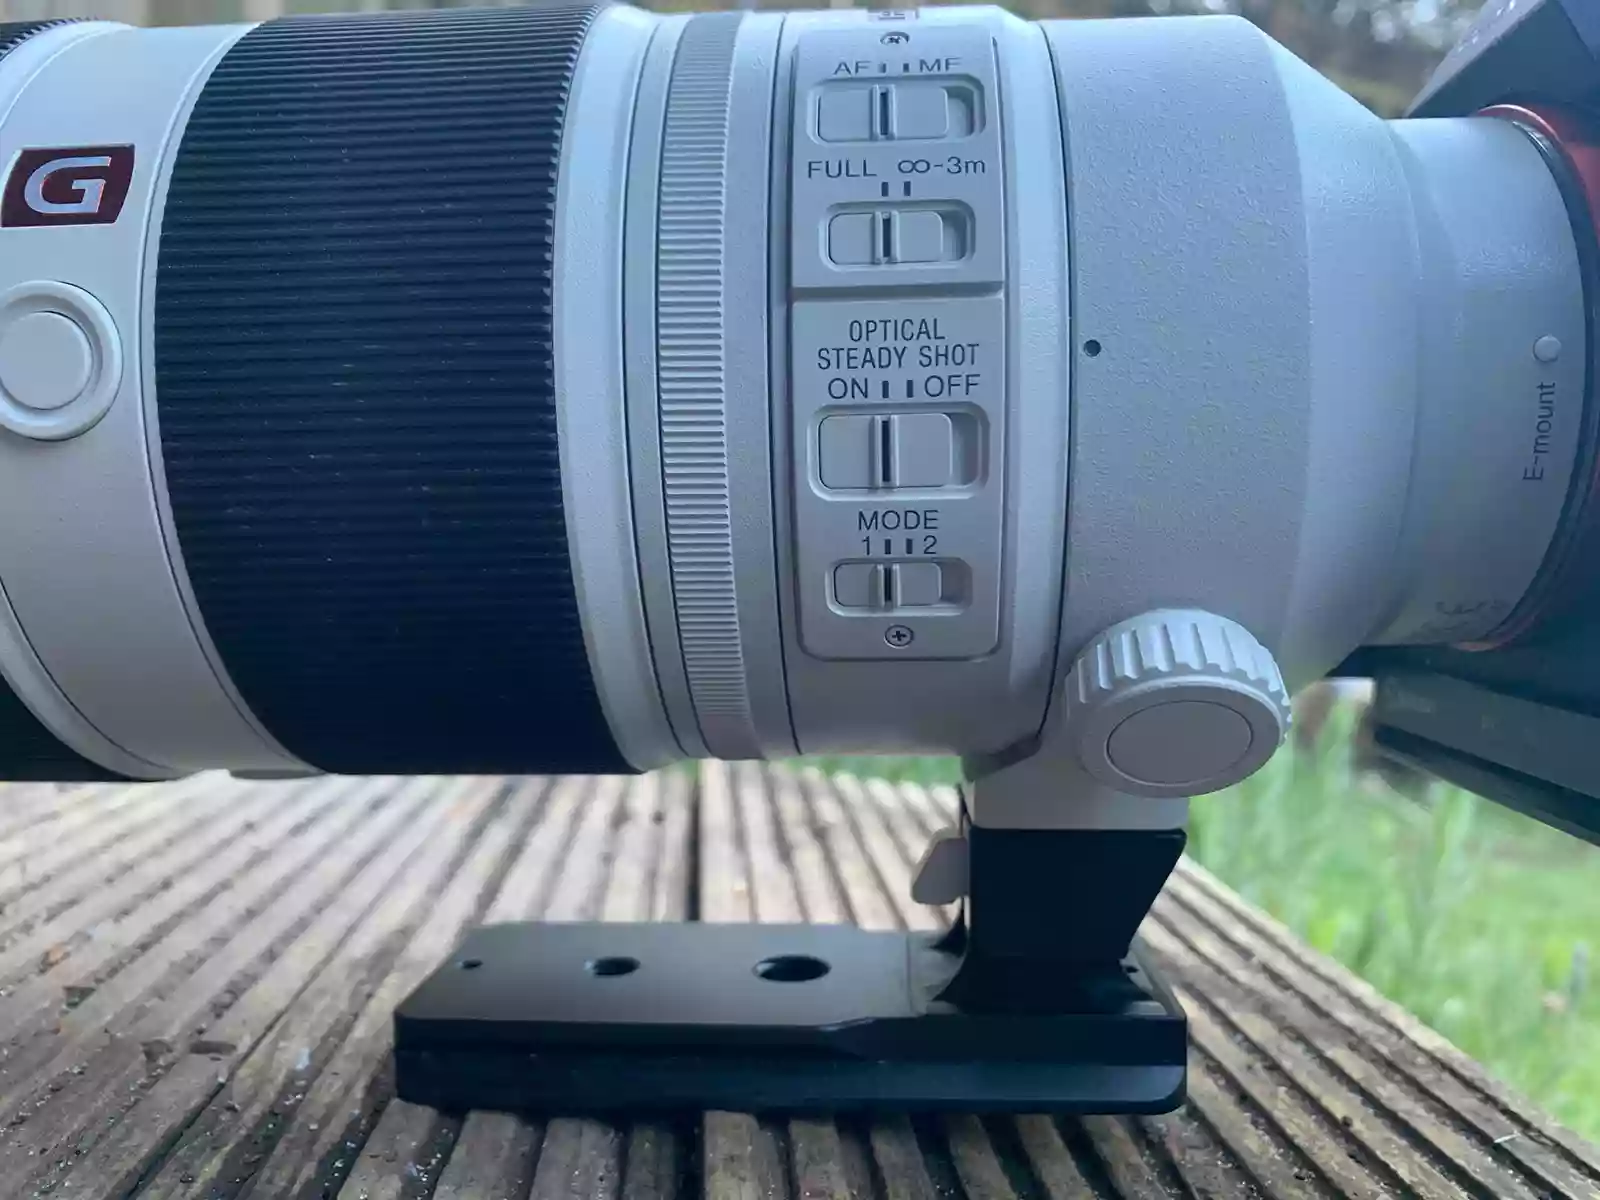
Lens barrel functions explained for 100-400mm zoom
AF/MF. This sets auto or manual focus. I’ve been grabbing focus in AF then switching to manual for fine adjustment, particularly if there are branches or leaves in front of the subject.
FULL infinity to 3m - this refers to whether the lens will allow focussing closer than 3m. I’ve used this a number of times as the birds tend to be a lot further away than 3m up in trees. Enabling this function means the lens doesn’t have to hunt through the whole range, which speeds up subject acquisition considerably.
Steadyshot - this is Sony’s name for optical stabilisation. Many longer zoom lenses from other manufacturers use this too, whether it’s called image stabilisation (Canon), or Vibration Reduction (Nikon) the setting should definitely be switched on, as it will compensate for any movement during your shot.
Mode 1/2 - Provides stabilisation for panning when set to 2. This is an excellent secret weapon in gaining sharp shots of birds flying. Alas our garden is so small I have not been able to react to flying birds, but will be using this as I get quicker with experience.

Focus on the bird eye with isolated subject blurry background
Tip 5: Position yourself to get the best background to your subject
This can be really tough when shooting from a home garden or out of a window, however being aware of what is behind your bird subject is well worth considering. Clearly many of the shots I’ve captured here have skies as the background, mainly as I was shooting upwards from the ground. If you can, put something like foliage behind the bird by adjusting your position even by a fraction and you’ll have less distractions from a blown out sky. That being said, if you’re doing this out of a window or in an urban environment, having a background such as a block of flats, windows, or television ariels will help to tell this particular story.
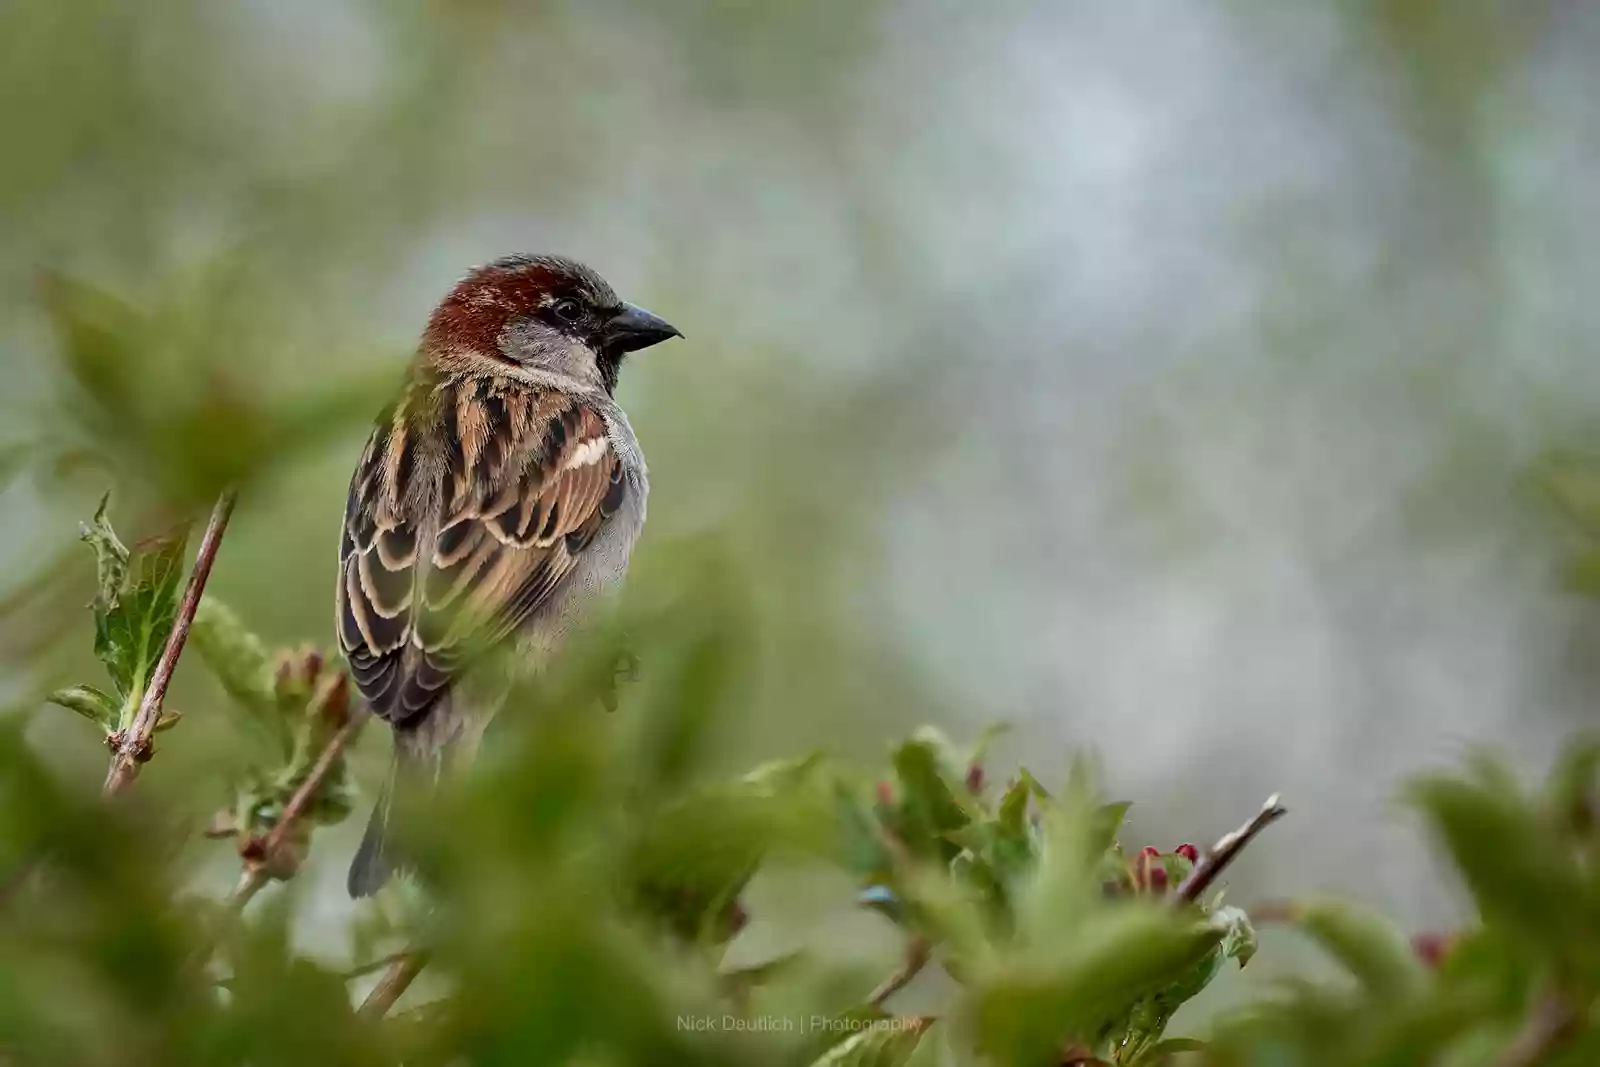
Background of twigs behind sparrow attempting to block sky highlights
Tip 6: Cropping and composition
Even with a longer lens, cropping your image in post production is absolutely acceptable to get the most interesting results. All modern cameras are extremely capable of cropping thanks to relatively high resolutions. This stands whether you have a high res beast like the Sony a7Riv or a micro four thirds 21MP body, you’ll be able to crop considerably. I’ve been using the more-than capable Sony A7Riii for these images, which is a veritable bargain at the moment!
When shooting and cropping in post consider the general rules of composition (whilst using artistic license of course). Place your subject in an intersection on one of the thirds to avoid your subject being right in the middle of the fame. Our human eyes prefer this as it creates balance and harmony in a photograph. If possible include some interest in the rest of the picture, an environmental perhaps such as foliage.
If you are able and have the time, try leading lines, S curves or other advanced compositional techniques to draw the viewer in. Negative space can also be a valuable tool when composing for birding.
PRO TIP: shoot through the action. This means if you are trying to capture action, perhaps a take-off, shoot as soon as you notice and don’t stop until well after it’s over. Shooting through the action means you have more chance of getting your winning image.
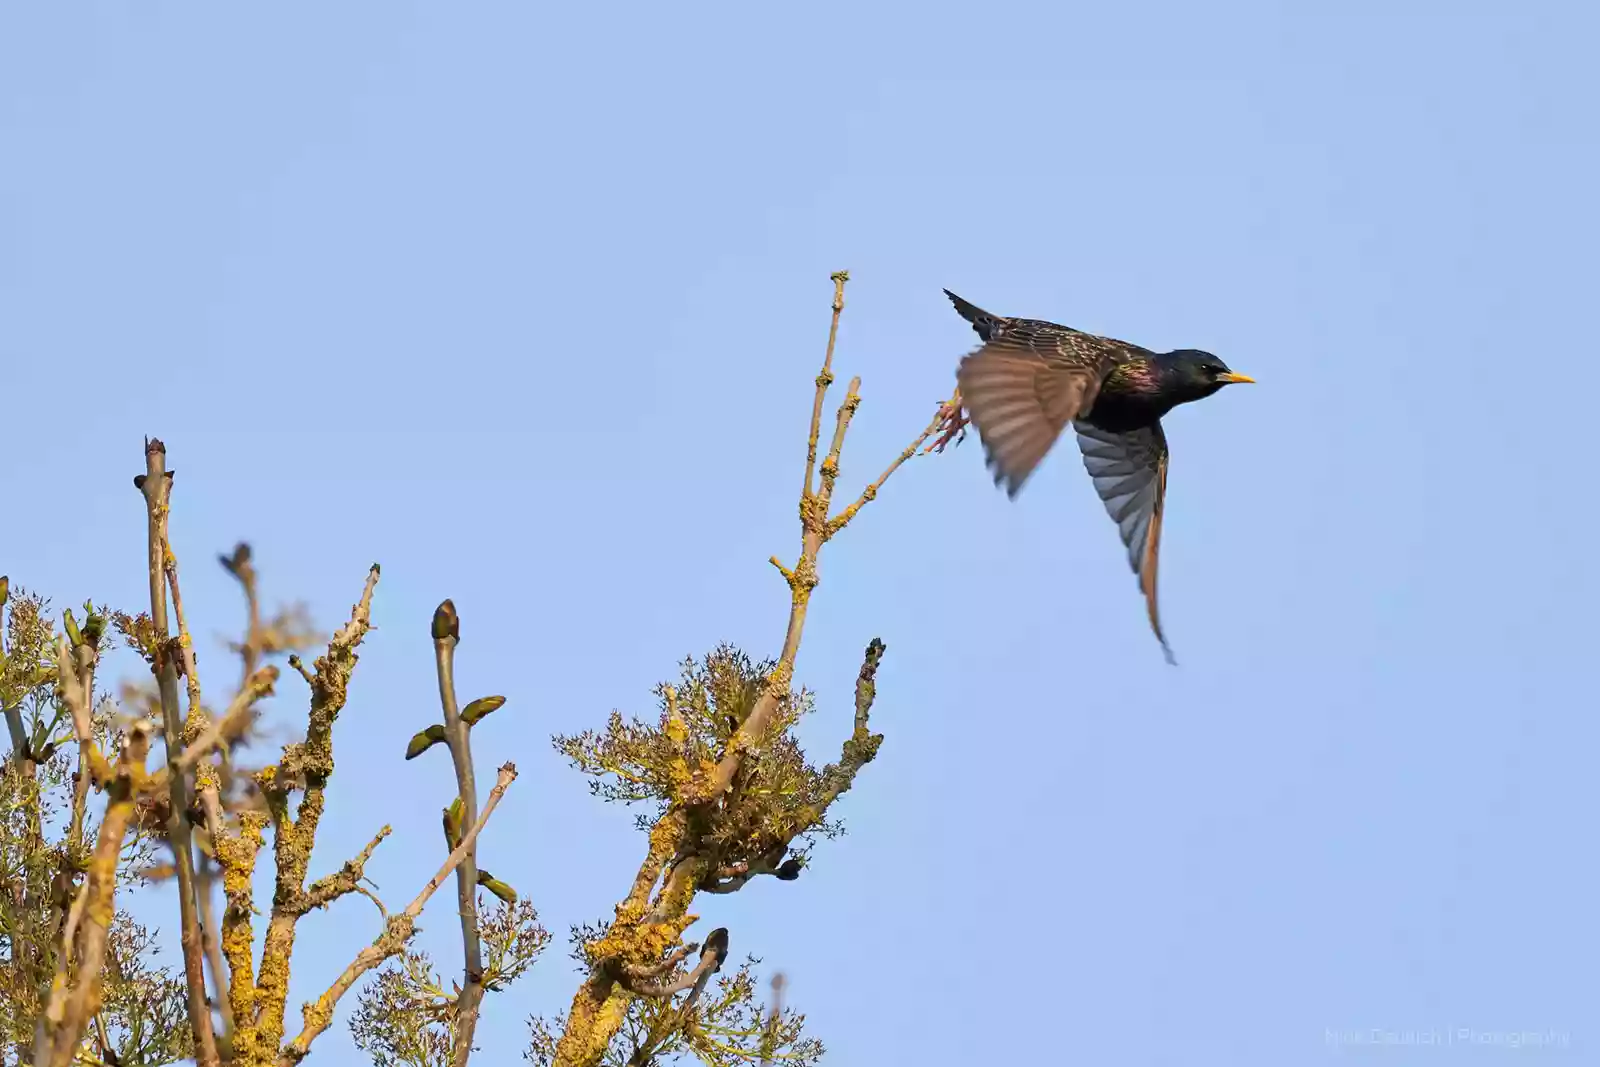
Shooting through the action enabled the capture of this starling take off
Tip 7: Patience
Let’s be honest, we’re stuck at home at the moment so we probably have some extra time right now, which is good as patience is vital for bird photography. The first couple of mornings I was not prepared for the waiting around! Maybe the birds were also more shy the first couple of mornings - wondering who this new person was observing them? Try and make yourself comfortable, make a hot drink in a flask and have your camera switched on and at the ready. What I did find was that after even a couple of mornings I became more and more absorbed by their songs, the tranquility and every sound around.
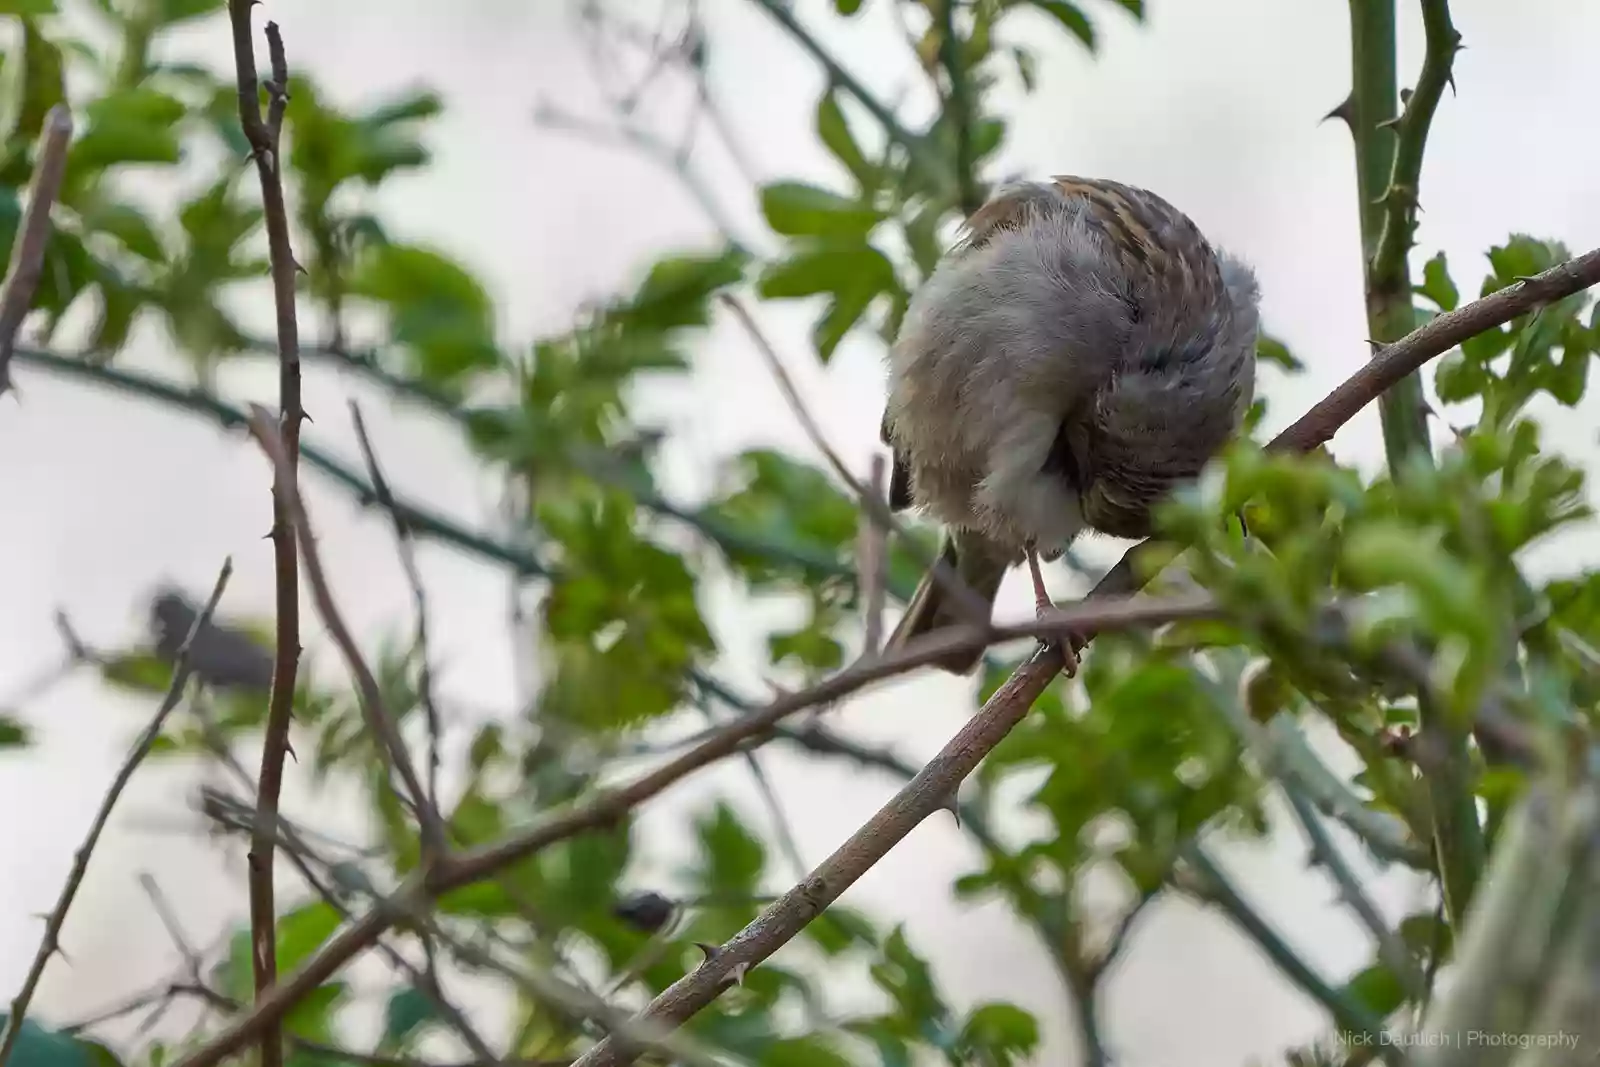
Morning preen in a rosebush
I became as absorbed in the moment as I if I was shooting landscapes and time slipped away without me realising. Photography is an excellent hobby for concentrating and learning, which I think is valuable during this time of social distancing.
Tip 8: Editing your images
I’m using Capture One for editing photographs, having switched from Lightroom a year or so ago. Read our previous post for Wacom and Capture One editing in the comfort of your own home.
If you get the exposure as accurate as possible when making your shot, editing should be a breeze in Capture One. As mentioned above, cropping is one of the considerations for edits. Bringing up shadows if necessary will also be useful if the available light was low.
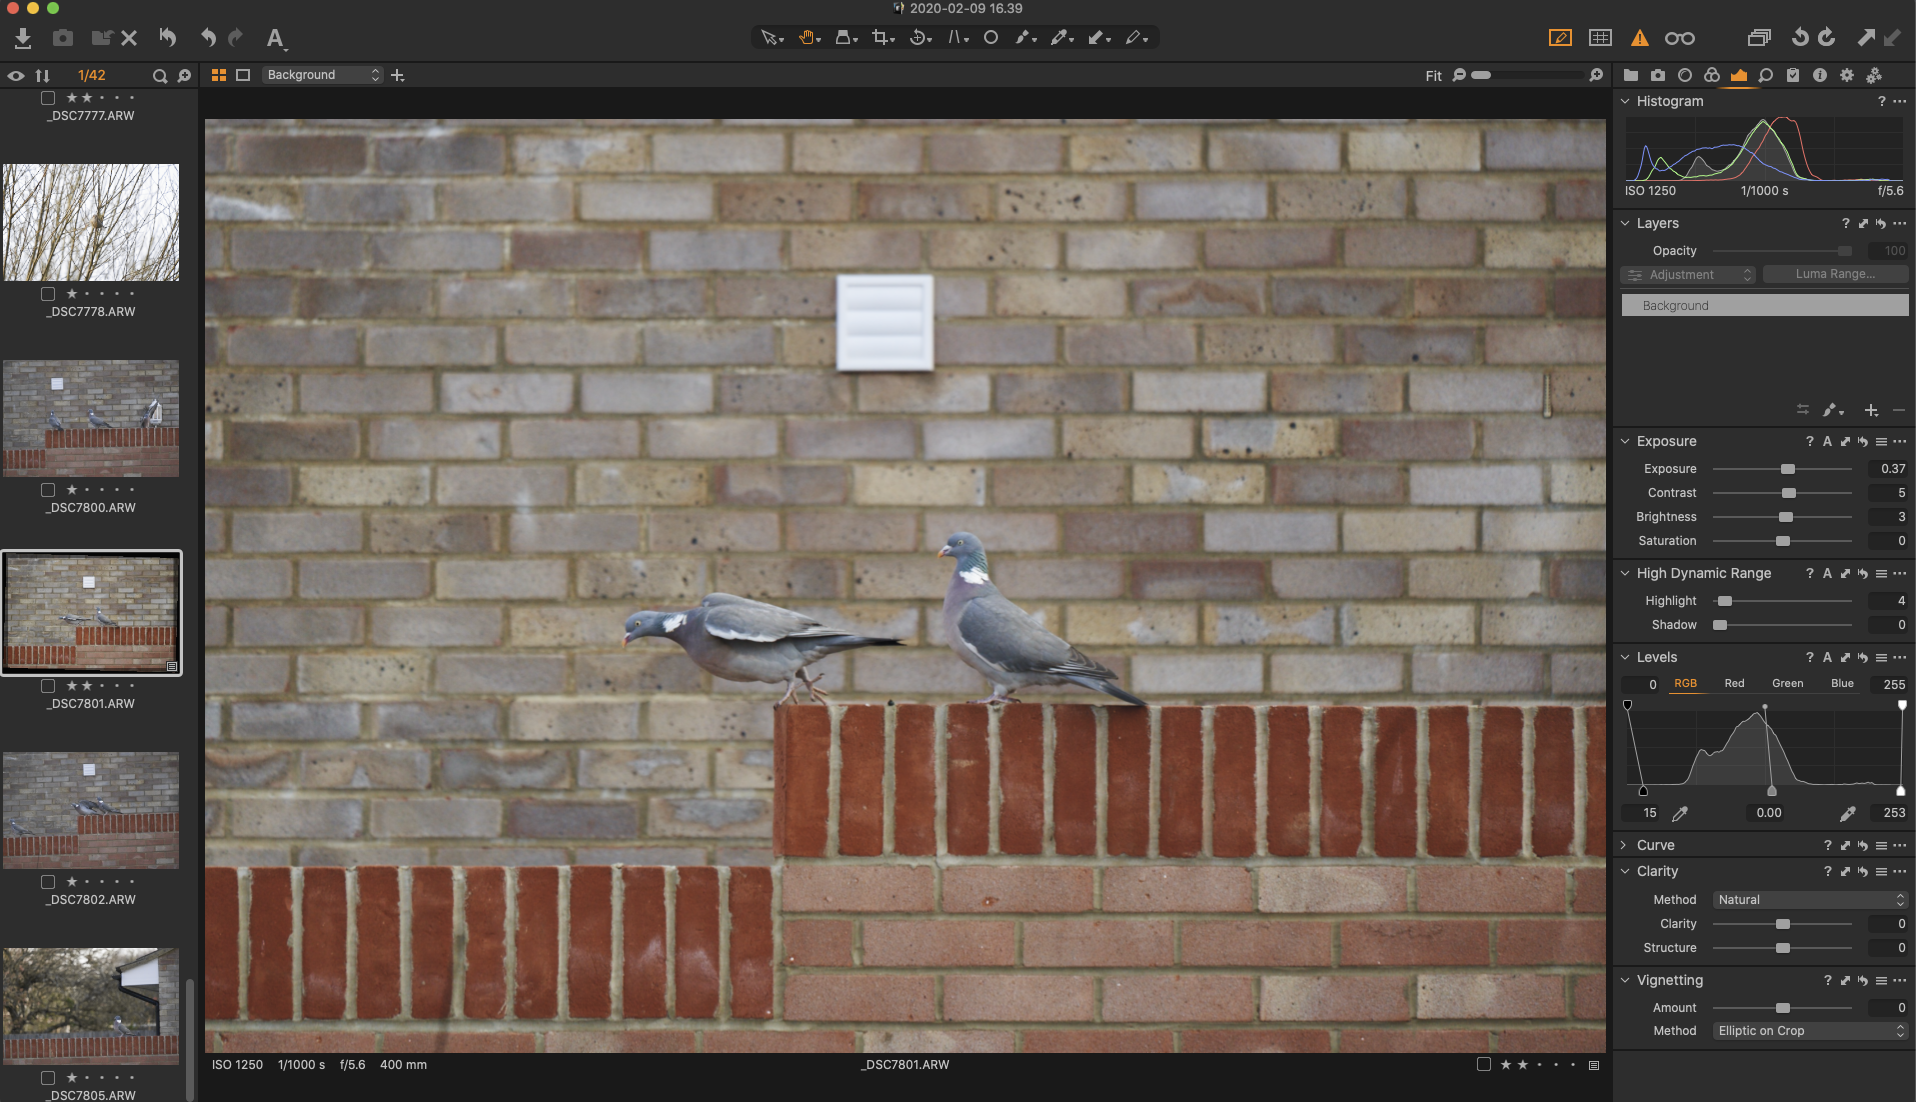
Capture One Software - highlight exposure warning and basic edit used
Highlights are one to consider if there are brighter areas of sky, or light was hitting white feathers for example. It’s a good idea in photography generally to avoid clipping highlights as they are hard to recover. The eye will tend to look for the brightest part of an image, so which can really distract from the subject. Pull back your highlights in post if they are too bright.
Throw in some contrast with levels or curve adjustments if your image is a little flat, although this is particularly open to personal taste.
Capture One interface with edits for contrast
Sharpening and noise. These are the two which might need a little more refined work when editing your bird pictures. High ISO levels and minuscule feather details can get washed out if focus wasn’t pin sharp. A small tweak of sharpening and minor noise reduction (which is excellent in Capture One) could improve your image considerably.
Overall editing is a creative process with no right and wrong. You might want to add vignetting, dodging and burning or anything which helps to tell the story in your image. Less is more for myself personally and despite the current UK pandemic lockdown, I prefer to be capturing images rather than editing them on the whole.
Tip 9: Spare batteries and cards
OK so we are probably only a few feet from our homes during this escapade, but I learned very quickly to bring everything outside into the garden with me. I forgot various things the first couple of days as I wasn’t really prepared, but the general ‘be prepared’ rules of photography outdoors apply.
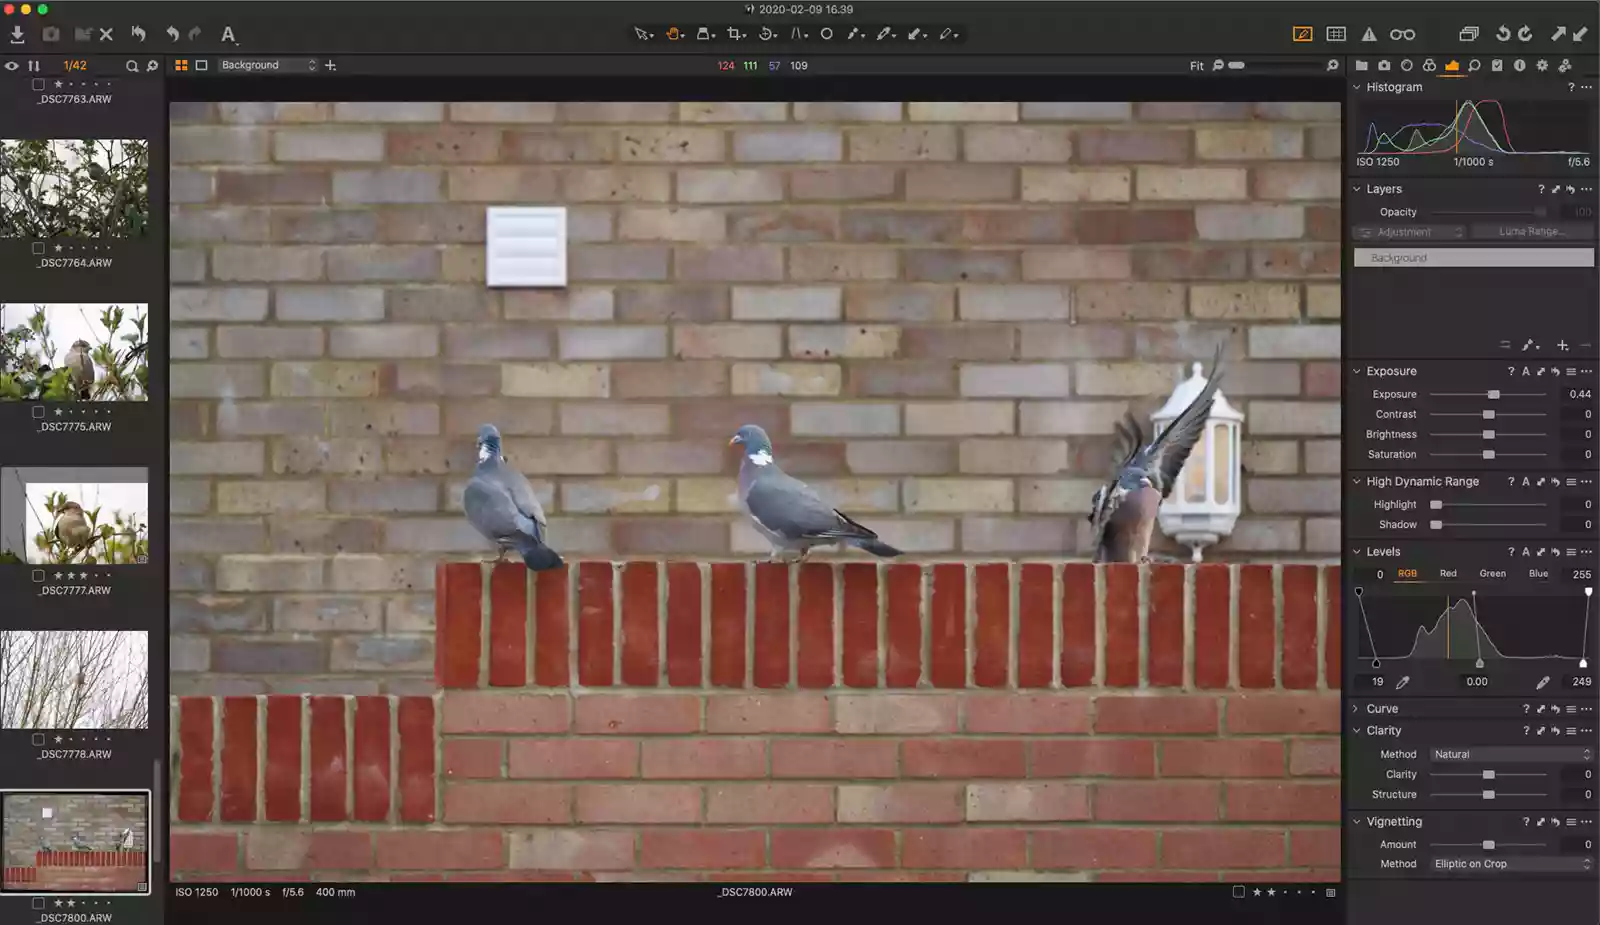
My shutter speed was too slow to capture fighting blackbirds sharply (250th. sec)
Photographing birds means you probably shoot more images in burst mode. Have your spare batteries fully charged and keep a couple of spare memory cards to hand. If you have more than one lens put it in your bag in case you want to switch. The less you have to move around the better, and I’ve missed a few shots for having to go back indoors for something. The larger the card capacity, the more images you’ll be able to fit onto your memory card without swapping out.
PRO TIP: Mount your lens hood as it will block unwanted light from entering the frame, which increases overall image contrast and reduced flaring.
Tip 10: Be creative
Learning new skills takes a while, but always try and think creatively. What are your images saying about the subject, what is the environment? Does some motion blur in wings add to the story? Can blurred branches add motion into the frame which tells the viewer about the situation. Snow or other weather can add emphasis to the time of year and story. Can you think of other ways to add your skills creatively to the photographs you’re capturing?
Morten Hilmer is one of my favourite wildlife photographers, always managing to be creative in his pursuit of images. I recommend taking a look for inspiration with birds and wildlife.
Bonus Tip: Use binoculars and spotting scopes
Observing nature can be relaxing in its’ own right as well as serving to spot distant wildlife and birds. A decent pair of binoculars or a spotting scope are excellent tools for seeing distant movement in the undergrowth or up in trees. Using a scope or binoculars will improve your chances of getting familiar with birds as well as helping to spot distant shots which you’d otherwise miss.
I hope you found this post useful, informative and helps to fuel your photography passion, whilst keeping you healthy and happy during this Corvid-19 lockdown.
You might wish to read the Park Cameras Corvid-19 statement here. And we are happy to say our online store is open for business despite our physical shops being closed. If you want to trade-in your old lens to get a super telephoto we’ll even collect your trade-in gear and deliver your new lens for you!
Update 03 April.
With spring literally bursting the garden birds are busier than ever. I really do recommend getting out to enjoy any garden birding if you are able to.
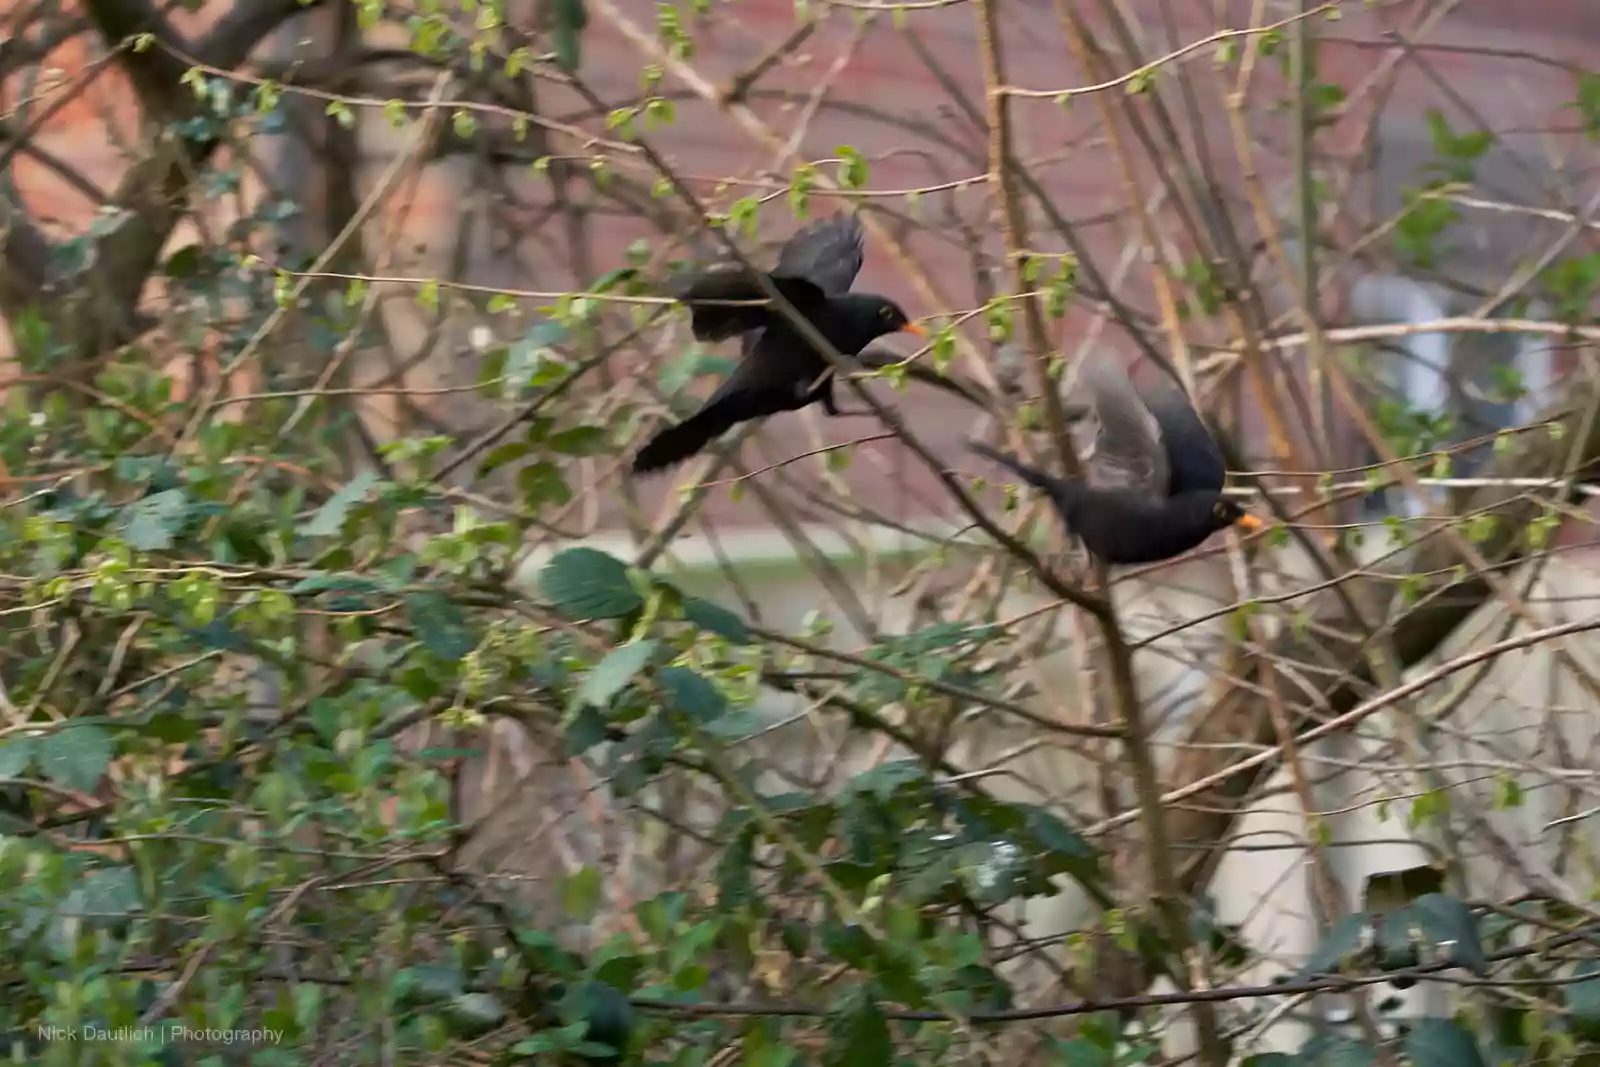
The wood pigeons in our garden have started nesting, so they are busy all day finding and fetching twigs. I'm thrilled to have captured the larger one flying whilst carrying twigs. Other updates include feeding sparrows, a puffed up bluetit looking very chilly and a tiny wren posing on a branch. All with meta data now. These were shot on the Sony A7riii with the Sony FE 100-400mm f/4.5-5.6 GM at various focal lengths.
This week's garden bird photography tip is: Anticipate. I've been learning to anticipate what the birds I'm focussed on might do next. If it looks like they are about to take flight, focus then recompose to allow yourself space in the frame to capture the motion. Good luck!
This week's garden bird photography tip is: Anticipate. I've been learning to anticipate what the birds I'm focussed on might do next. If it looks like they are about to take flight, focus then recompose to allow yourself space in the frame to capture the motion. Good luck!
Pigeon flying. 166mm. 1/500th sec. ISO 1250. f/5.6
Pigeon sitting in tree. 192mm. 1/500th sec. ISO 1250. f/5.6
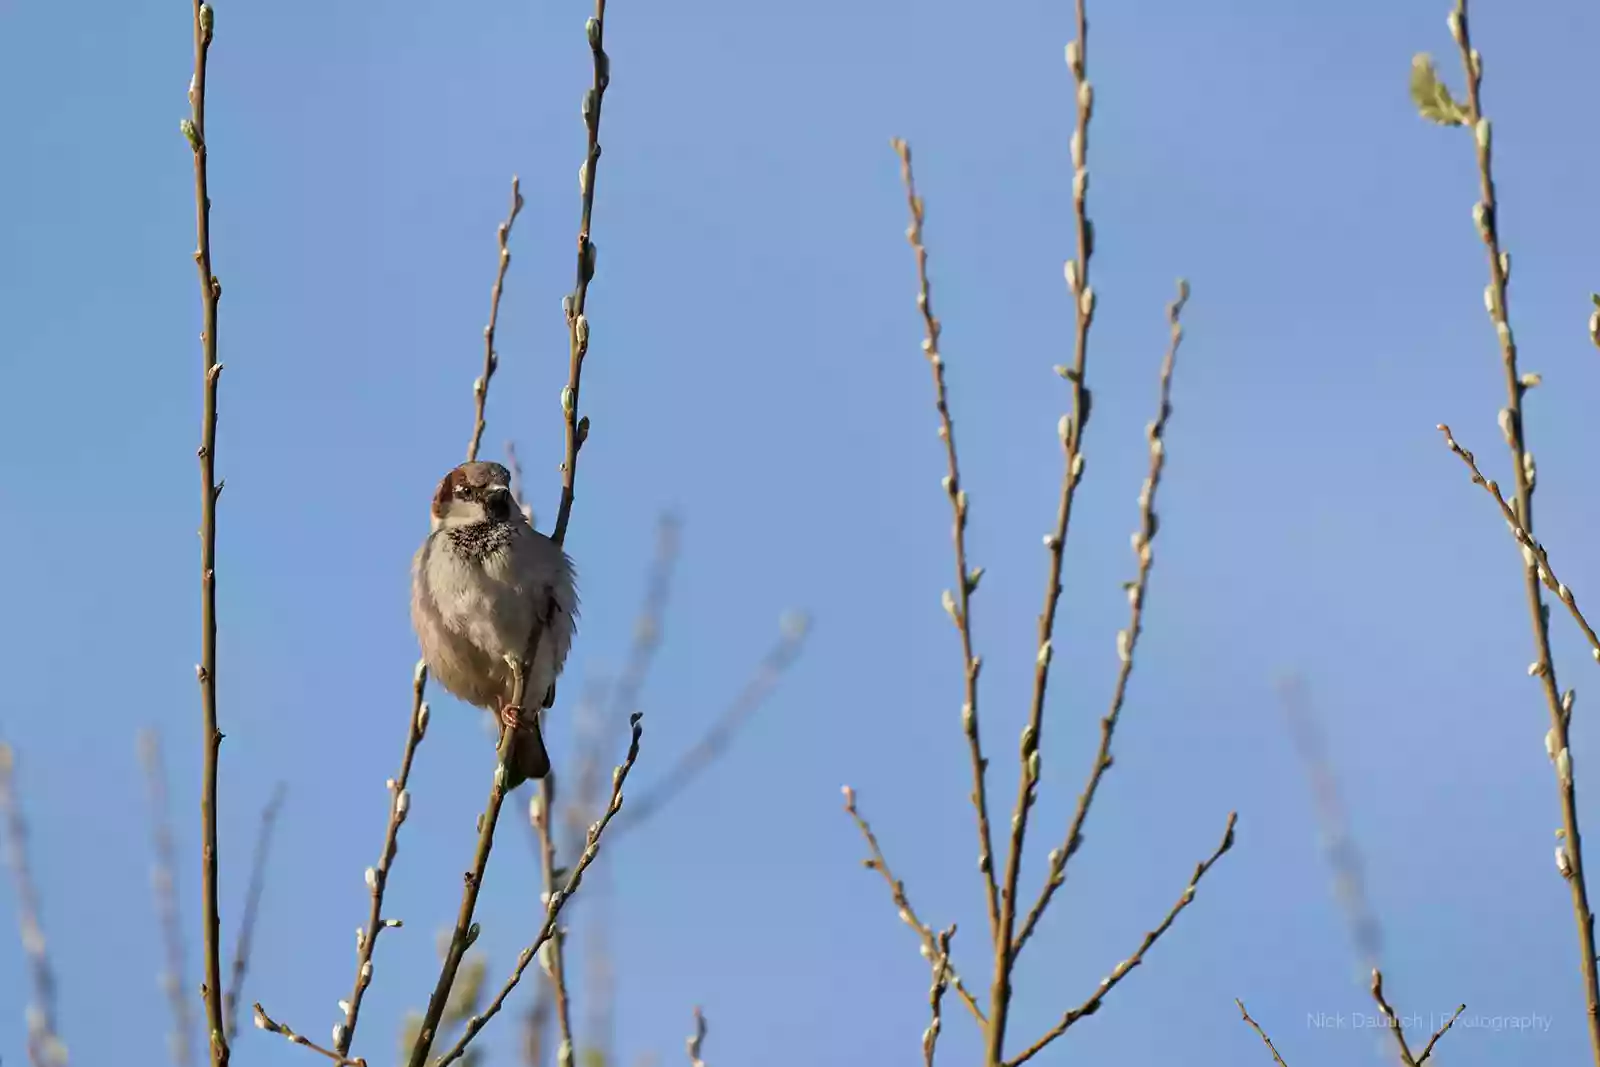
Sparrow watching. 400mm. 1/2000th sec. ISO 800. f/5.6
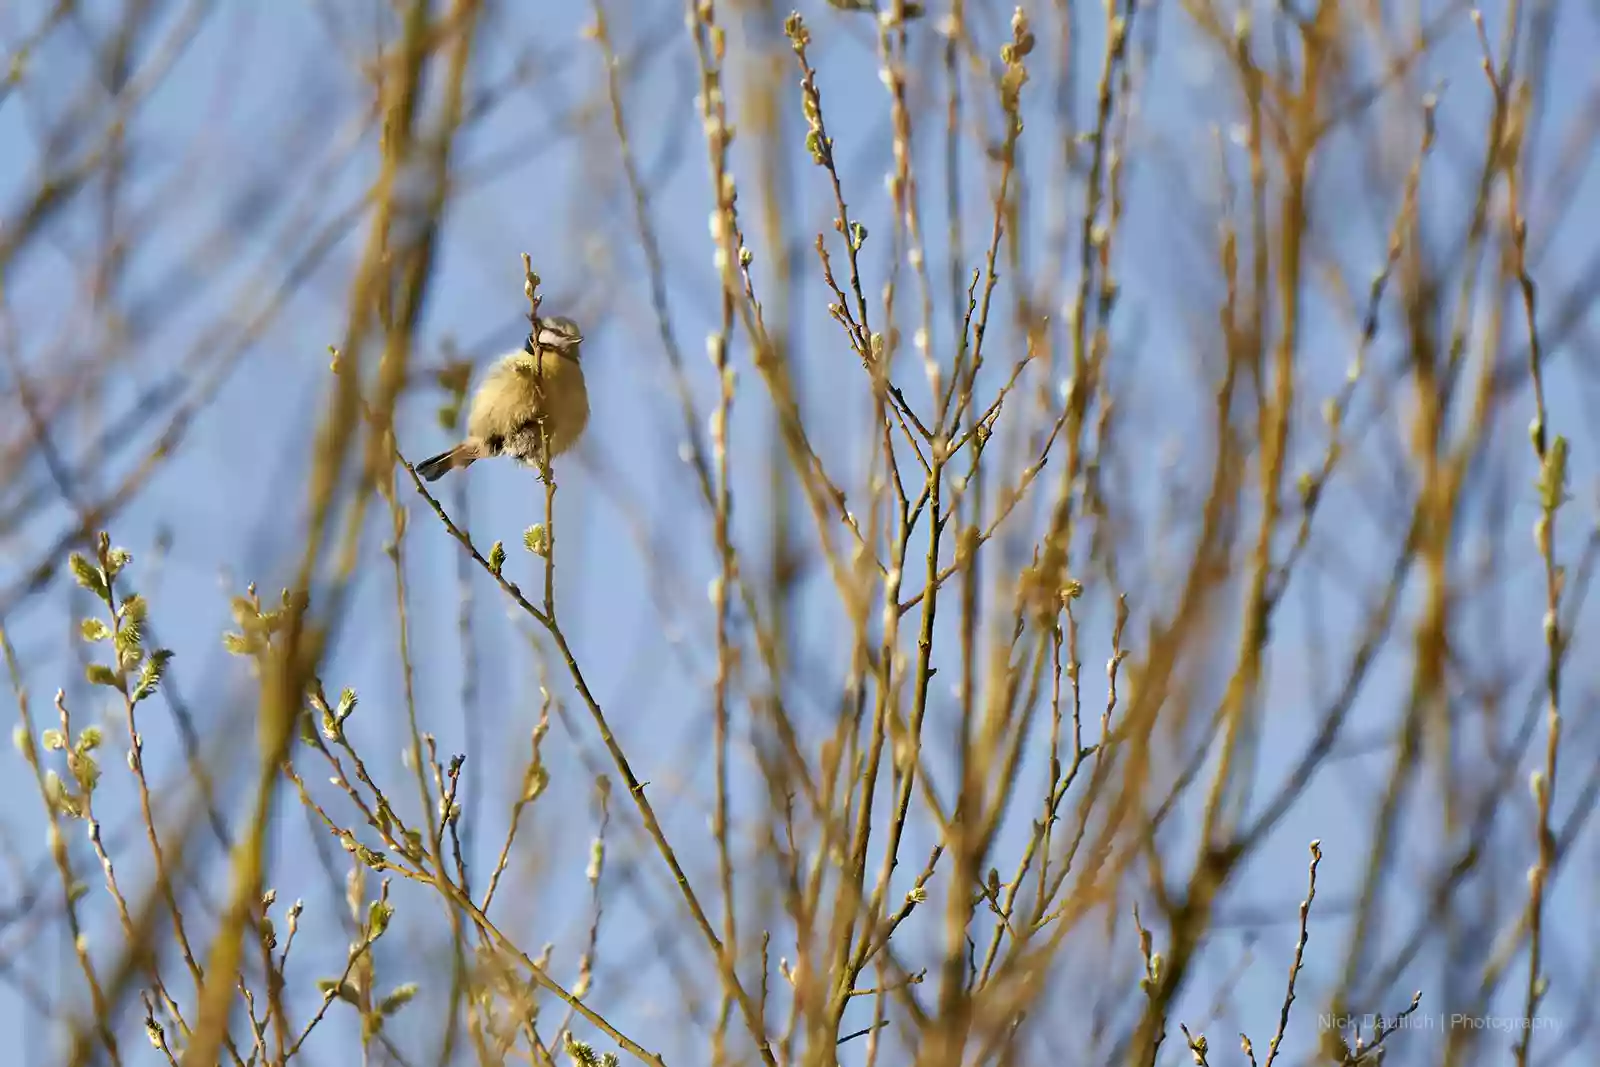
Bluetit puffed up. 355mm. 1/2000th sec. ISO 800. f/5.6
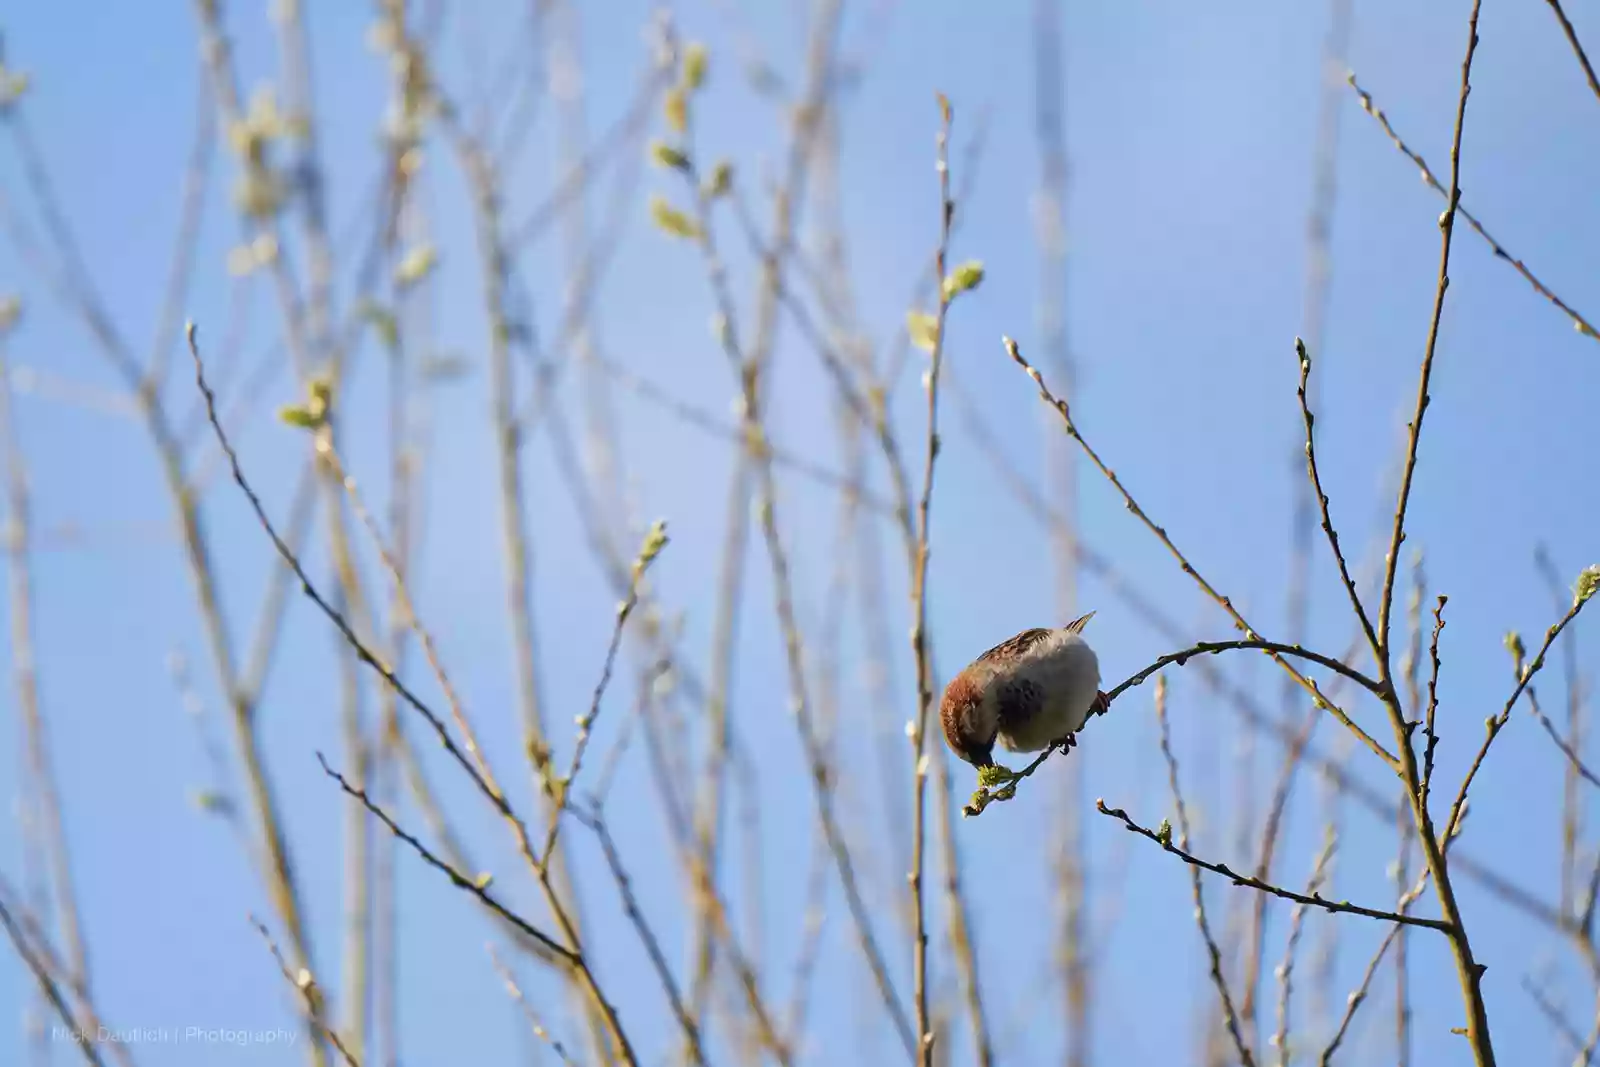
Sparrow eating. 400mm. 1/1000th sec. ISO 500. f/5.6
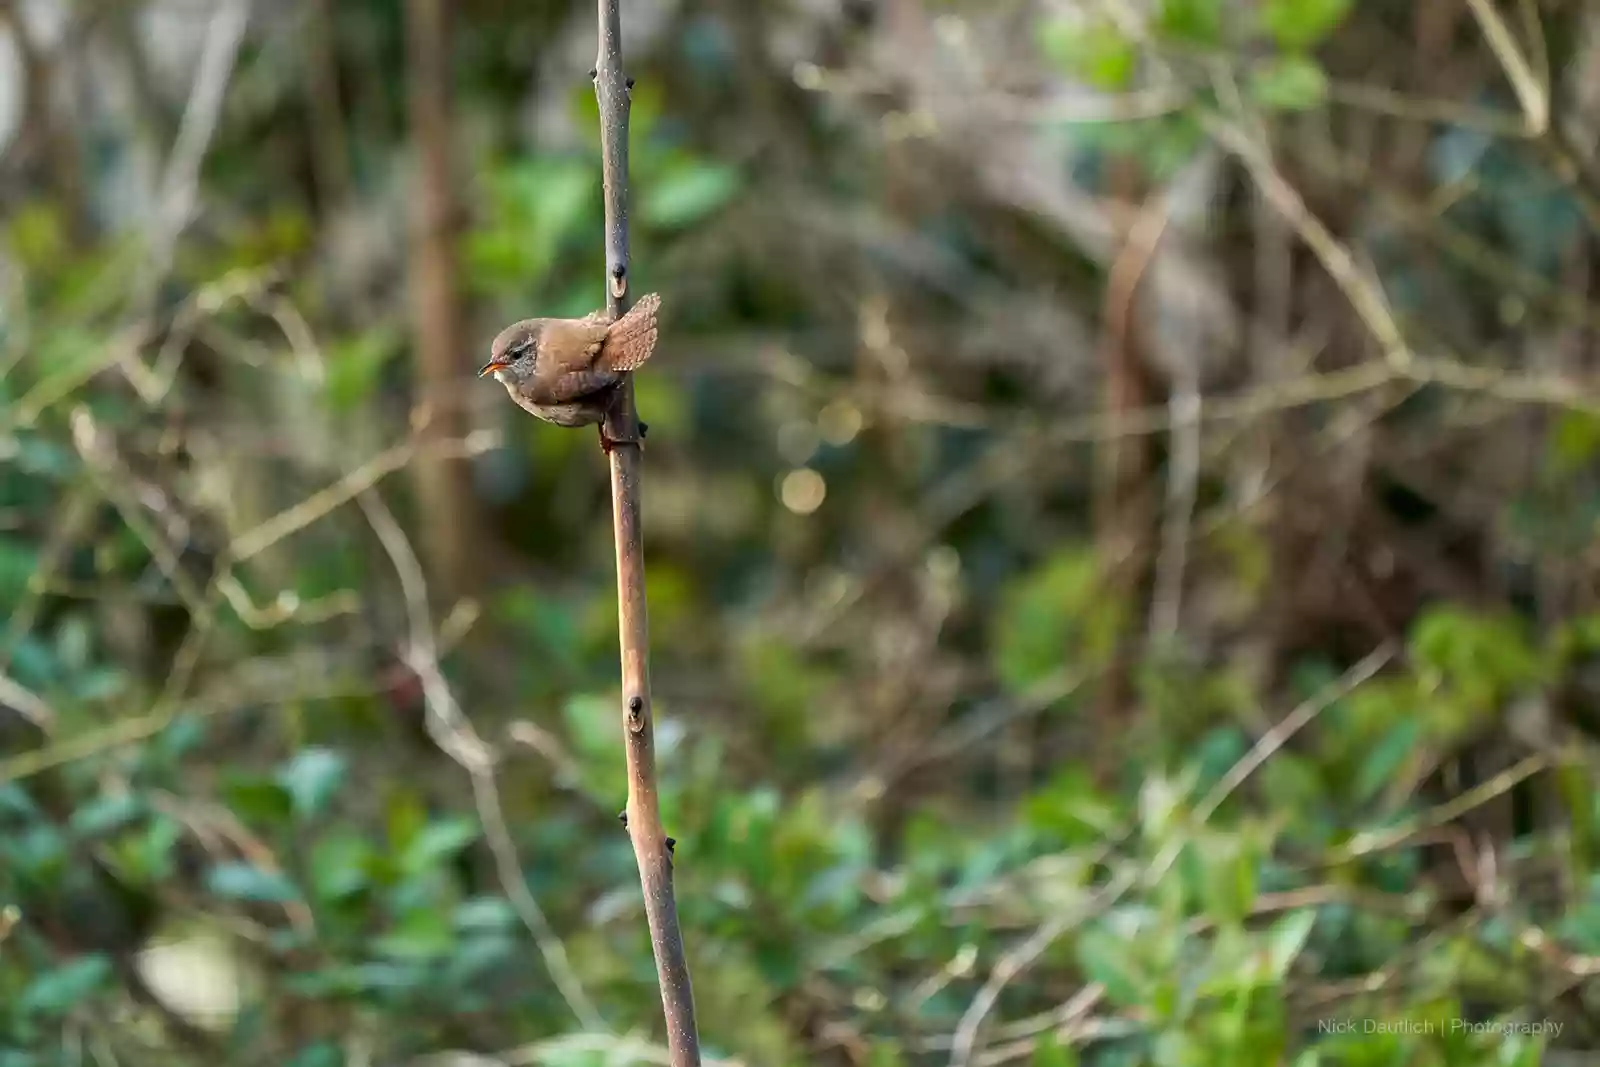
Wren. 400mm. 1/250th sec. ISO 1250. f/5.6
Video Review of Wildlife Lenses from Gareth:
Share this post:
By Nick Dautlich on 30/03/2020
Nick Dautlich
Senior Content Writer and Product Reviewer
Nick Dautlich is the Senior Content Writer and Product Reviewer at Park Cameras, with over 15 years of photography experience. A Sony Imaging Professional and expert reviewer, Nick has worked with major brands such as Canon, Sony and Nikon. His work is also featured on Vanguard World UK’s website, Capture Landscapes, and Shutter Evolve. Nick’s photography includes National Trust projects and magazine covers and he is passionate about landscapes and storytelling. Nick also enjoys hiking and teaching his children about nature. Learn more on his profile page.

Trade in your old equipment
Fast and easy trade in service ensures your old gear is collected efficiently and you are paid quickly! It's very simple to trade in your unwanted photography gear. Just head over to our dedicated Sell or Part Exchange page, fill out the details, and we'll get back to you with an offer for your old gear. Take the cash, or put it towards the cost of your new gear. It's up to you! Find out more
sign up to the newsletter
Keep up to date on the latest photography news, events and offers. Sign up now