- Call us 01444 237070

-
- Back
- Used Cameras
- Used Accessories
- Used Lenses
- Back
- Used Canon Lenses
- Used Nikon Lenses
- Used Fujifilm Lenses
- Used Sony Lenses
- Used Micro 4/3rds Lenses
- Used Leica Lenses
- Used Panasonic Lenses
- Used Pentax Lenses
- Used Samyang Lenses
- Used Sigma Lenses
- Used Tamron Lenses
- Used Tokina Lenses
- Used Voigtlander Lenses
- Used Zeiss Lenses
- Used Hasselblad Lenses
- Used Video
- Used Film Equipment
- Used Stock Alert
- Used Blank Test
- Sell or Part Exchange
- Used Clearance
- Recently Added Used Equipment
- Park Picks
- Faulty
- Trade-In
- Blog
- New in
- Call us
- Contact us
- Stores
- Sign in
- Categories
- Tips & Inspiration
- Reviews
- News
- Events
- Features
- Buying Guides
- Competitions
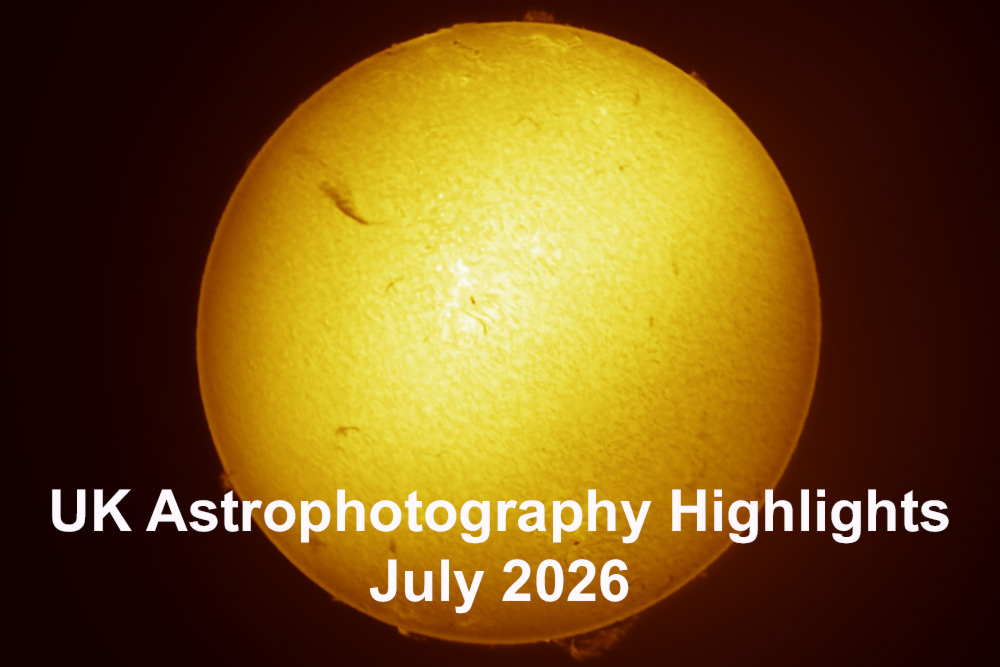
UK Astrophotography Highlights July 2026
Images ©Jonathan Penberthy
I love the month of July for Astrophotography. Finally the nights start to get longer and from around midnight / 1 am the Milkyway core is in our southern skies in the UK. This means that despite the imaging window only being a few hours long, we often find we get some really great conditions. Of course astro-dark begins to creep back into our imaging time, so it is a great time to get out there!
Solar system
Lunar
No Lunar from me this month...but here are the phases.
Sun
As an ode to how hot it has been this past week I have captured the Sun. I was at my Astro Club meet on the South Downs and Steve Goddard (Leader of Worthing Astronomers) brought along his Acuter Elite Phoenix 40 40MM F/10 H-alpha SOLAR TELESCOPE attached to a SkyWatcher SolarQuest Solar Tracking Mount. He very kindly let me attach a camera to it (ZWO ASI174mm Monochrome), and using my ASIAIR I was able to record a 60 second video of the sun. Processed directly in the ASIAIR and then tweaked in Photoshop.
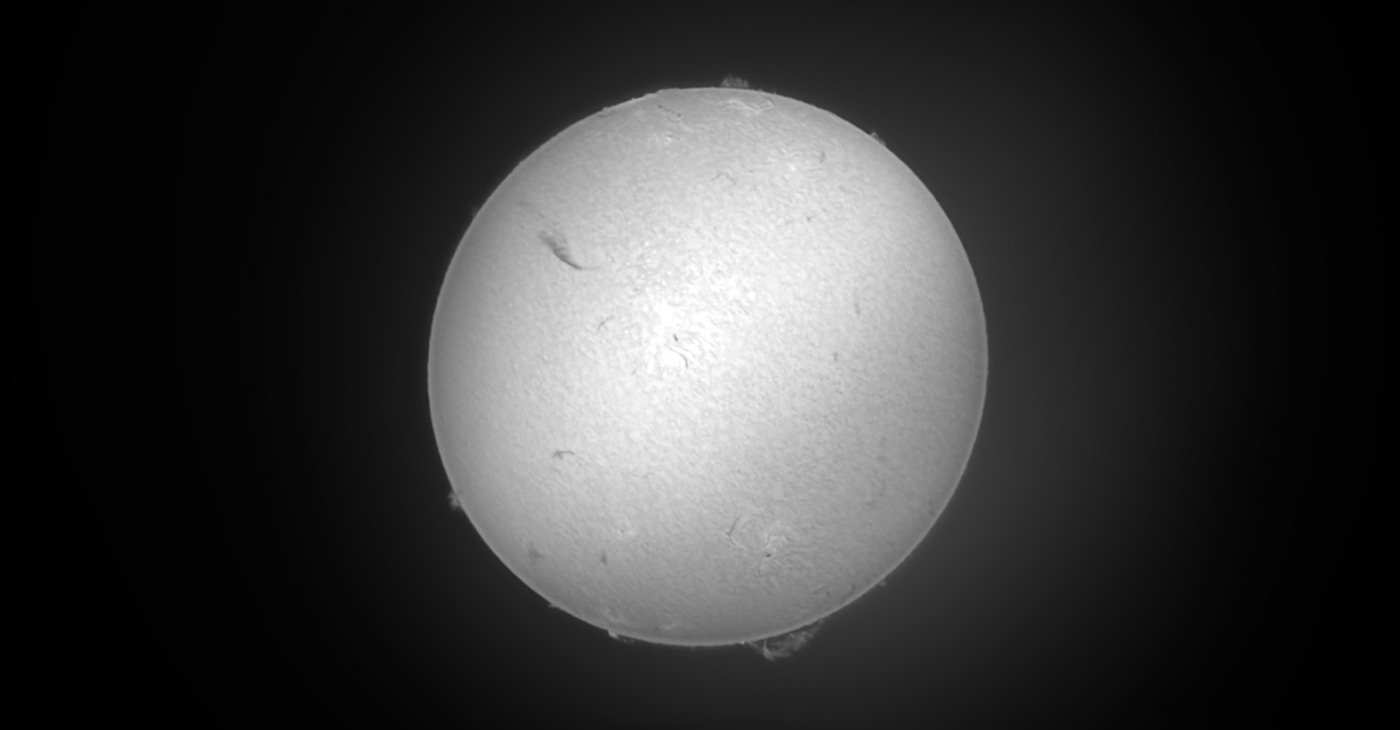
Monochrome version stacked in the ASIAIR. Exif in paragraph above.

Colour version stacked in the ASIAIR and colour layer added in Photoshop. Exif in paragraph above.
Milkyway
Whilst imaging the other night from a dark sky location on the South Downs, I could see the Milkyway faintly, but clearly in the night sky. My full rig was imaging a nebula and so all I had to hand was my trust Canon 7D, 18-55mm kit lens, cheap intervalometer and Manfrotto 290 lite tripod. The images have flaws, such as the foreground which should really be shot in a different manner and then the whole image recompiled in Photoshop. But this is the image straight out of Sequator, with a little stretching in Photoshop - how the stretching is done is covered in this tutorial. I enjoyed making this image and so in the near future I hope to do a showdown between Canon 7D, Canon 500D astro-mod, and the Canon EOS RA.
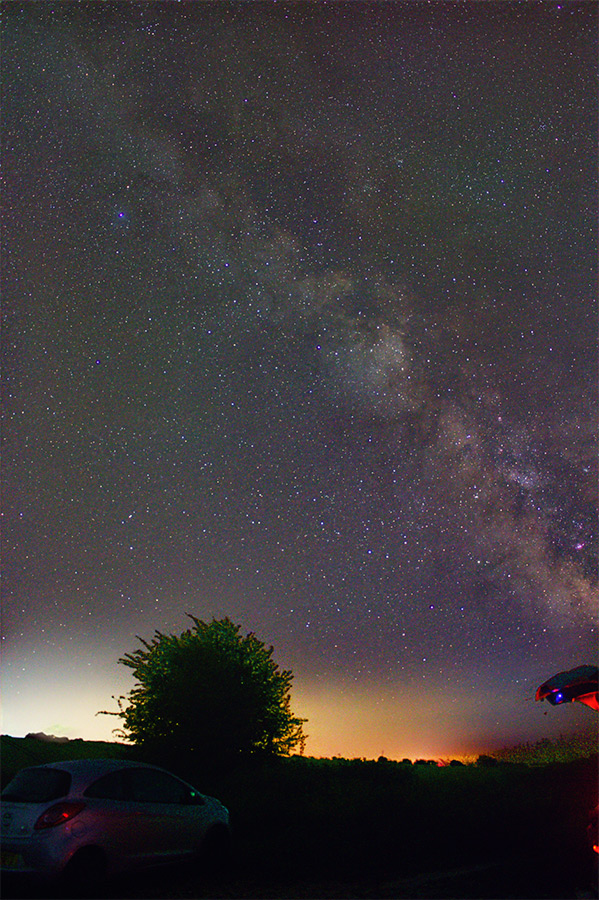
Exif
Camera: Canon EOS 7D
Lens: Canon EF-S 18-55mm IS.
Tripod: Manfrotto 290 lite
Method:
Lights: 200 x 10 sec, ISO 1600, f4 (for sharper stars).
Darks: 20 x 10 seconds
Flats: 0
Bias: 0
Stacked in Sequator, Stretched in Photoshop.
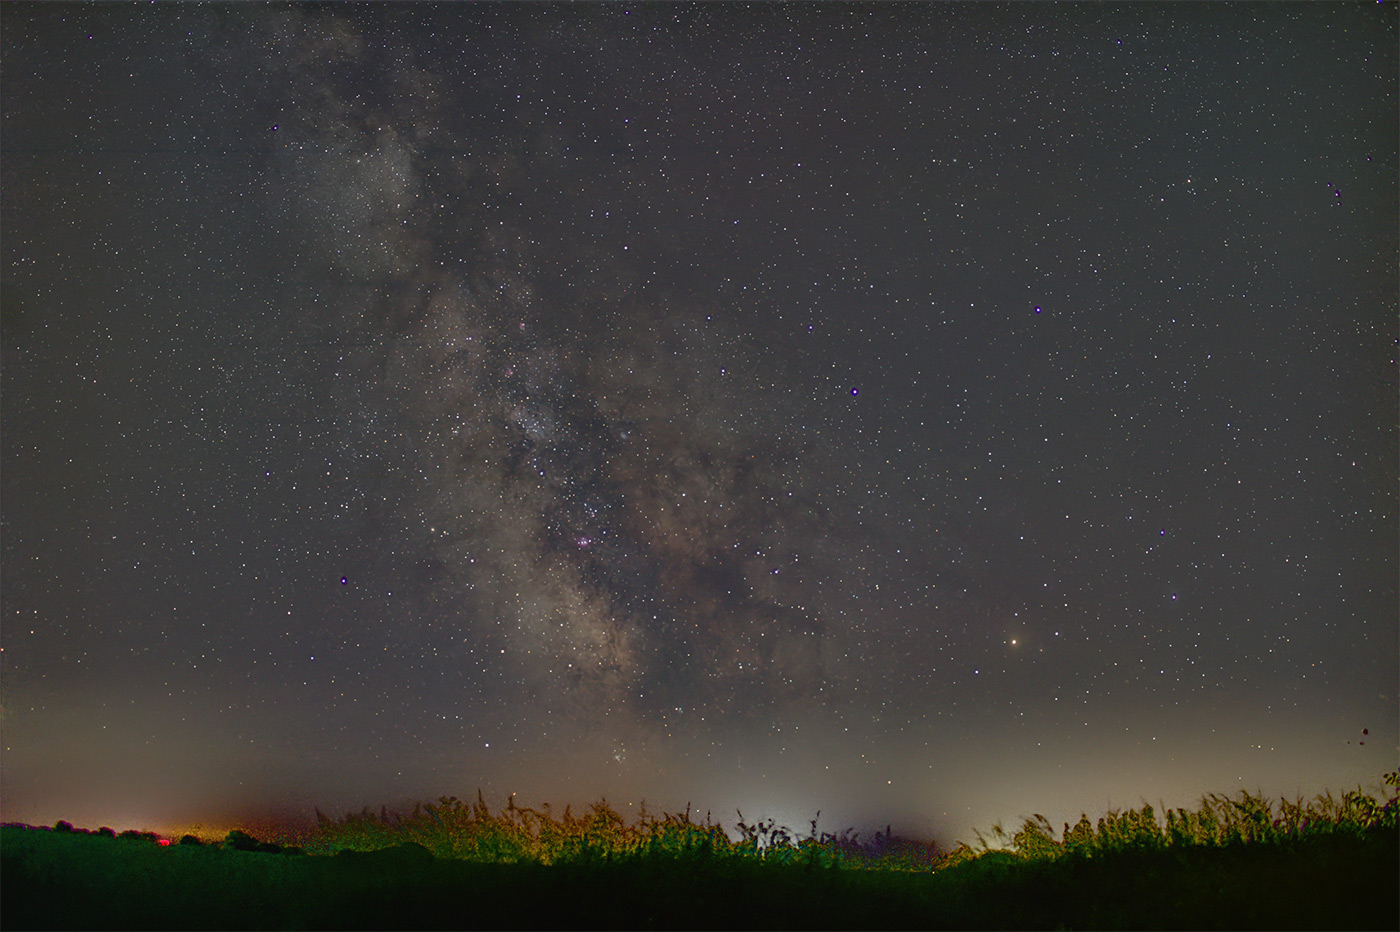
Exif
Camera: Canon EOS 7D
Lens: Canon EF-S 18-55mm IS.
Tripod: Manfrotto 290 lite
Method:
Lights: 200 x 10 sec, ISO 1600, f4 (for sharper stars).
Darks: 20 x 10 seconds
Flats: 0
Bias: 0
Stacked in Sequator, Stretched in Photoshop.
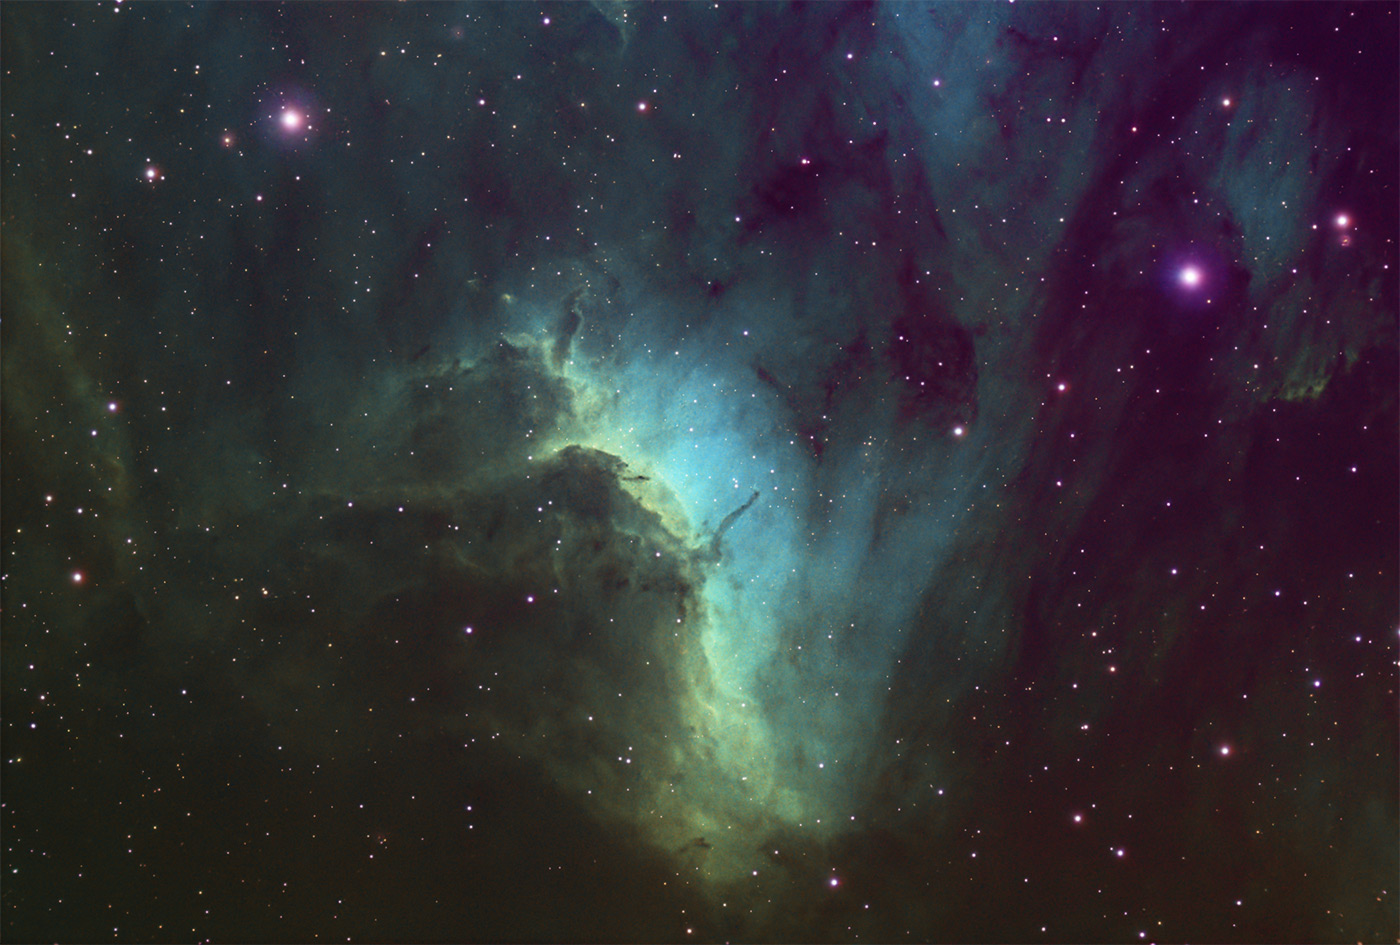
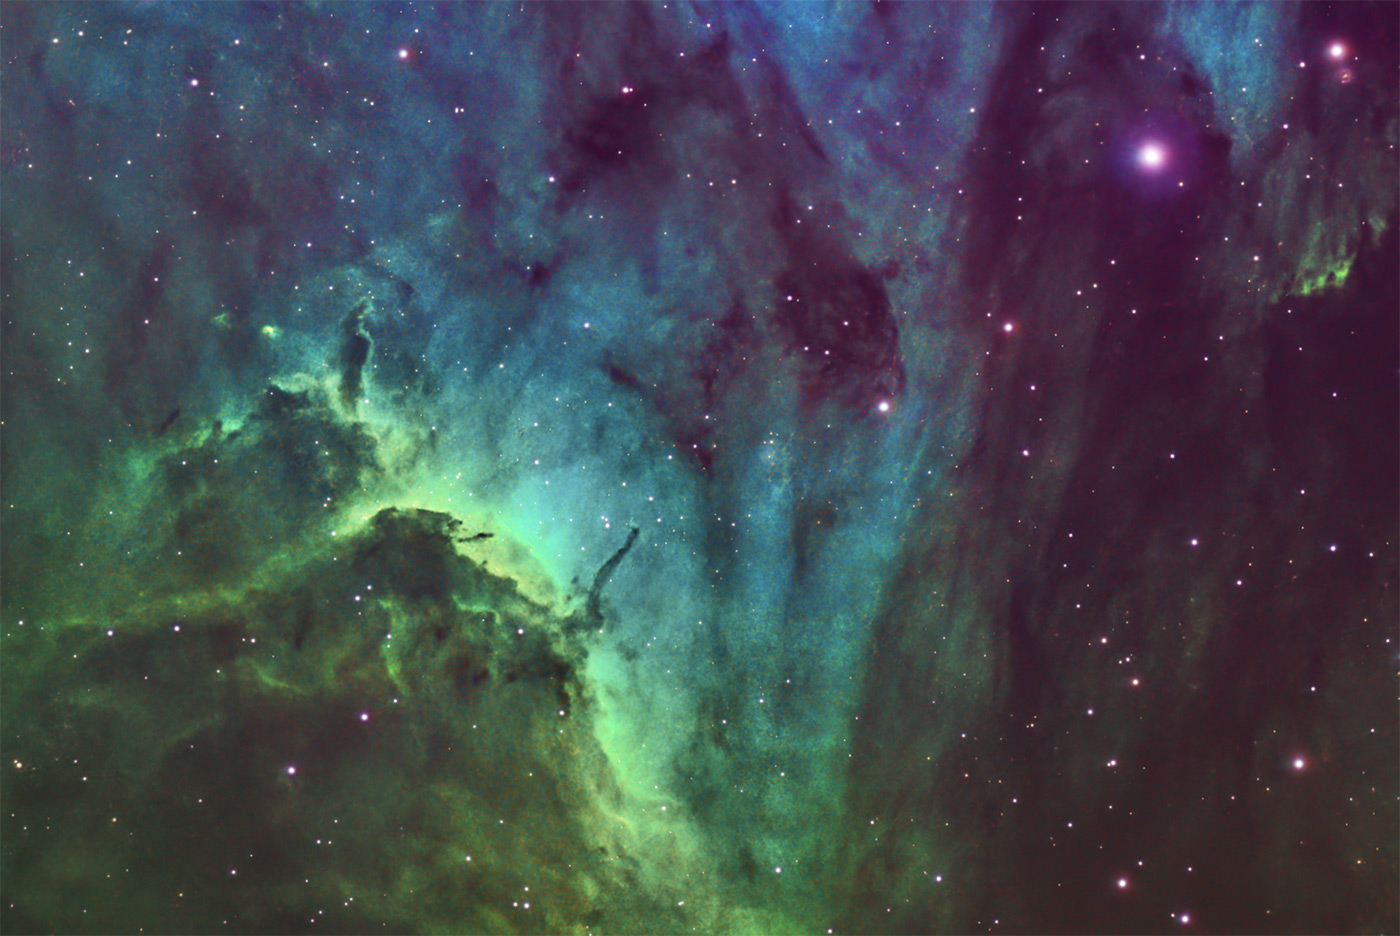
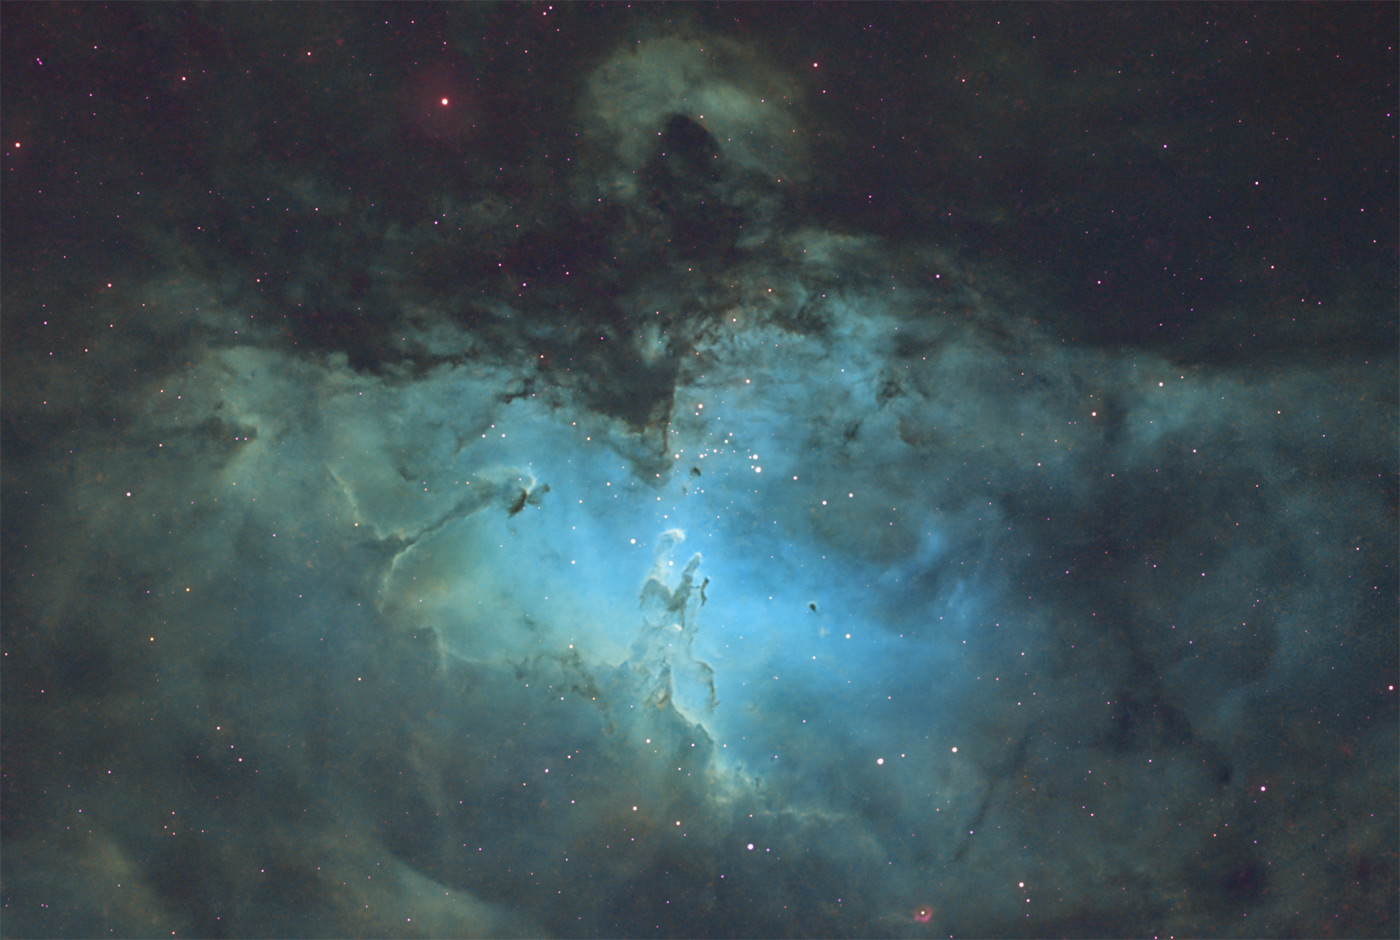
The Pelican Nebula (IC 5070)
As regular readers will know, I have for a few months now, tried my best to increase the data I have captured on the Pelican Nebula. I have finally managed to get 4 hrs of SII data using the Askar Colour Magic C2 filter, and extracting the red channel to use as SII in Pixinsight. I have to be honest, I am a bit disappointed with the result:
EXIF
Camera: ZWO ASI585MC Pro.
Telescope: Altair Astro 70ED Telescope (420mm).
Mount: Juwei 17 Mount Similar: ZWO New AM5N Harmonic Drive
Filter: Optolong L eNhance / Askar Colour Magic C2
Guide Camera: ZWO ASI120mm-s
Guide Scope: SVBony 30mm (f4)
Computer: ZWO ASIAIR pro
Method:
Lights: 120 x 120 sec Gain 251 - Optolong L eNhance
120 x 120 sec Gain 251 - Askar Colour Magic C2
Darks: 0
Flats: 0
Bias: 0
Stacked in DSS, Processed in Pixinsight with RC-Astro Suite of tools, L eNhance data for Ha and OIII, SII from C2 filter (red channel), then recombined as SHO.
So you may think why am I disappointed?
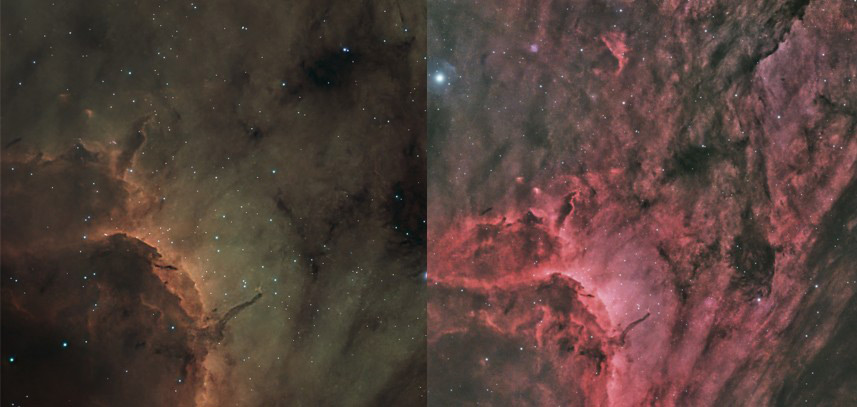
In the above image on the left you can see last years attempt at the Pelican. Clearly this years OIII and Ha data (on the right) is far better, with much more definition and interesting features (you can see the full image of this here).
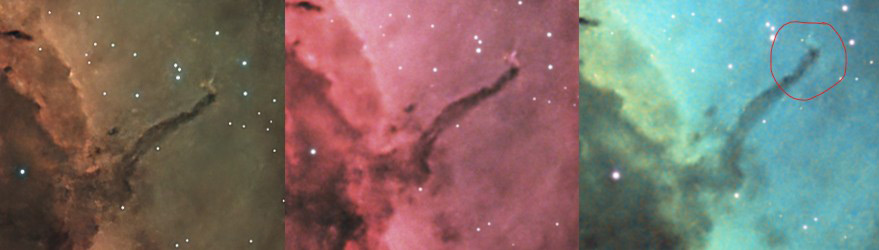
However, when we look at the SHO image we can see quite a bit of degradation of the detail, despite the data in the central image all being present in the right image. For example, as you can see above the filament at the end of the finger like structure which protrudes has all but disappeared. So I guess that the SII data must have somehow weakened the image, not just a bit either. So lets take a deep dive into the theory behind it...
The resolving power of a telescope is fundamentally limited by diffraction. When light passes through a circular aperture, it does not form a perfect point but instead produces a diffraction pattern. This pattern consists of a bright central spot surrounded by fainter rings. The central bright spot is called the Airy disk, named after the astronomer George Biddell Airy. The size of the Airy disk determines how close two point sources can be before their diffraction patterns overlap so much that they can no longer be distinguished as separate. This is why diffraction sets a hard physical limit on resolution.
The diameter of the telescope’s aperture controls the size of the Airy disk. In the resolution formulas, the word diameter simply means the diameter of the telescope’s objective lens or mirror. A larger diameter produces a smaller Airy disk and therefore better resolution. A smaller diameter produces a larger Airy disk and poorer resolution. The wavelength of light also plays a role, because the Airy disk becomes larger at longer wavelengths and smaller at shorter wavelengths. This means that the colour of light you observe in directly affects the theoretical resolution.
Several criteria are used to define the resolution limit. The Rayleigh criterion is based on the point where the first minimum of one Airy pattern falls on the central maximum of the other. The Dawes limit is an empirical rule based on visual observations of double stars. The Sparrow limit defines the point where two Airy disks merge with no dip between them. These criteria give slightly different numbers, but all describe the same underlying diffraction limit.
Applying this to my own equipment, my Sky-Watcher 70ED has an aperture diameter of 70 millimetres. Using standard approximations for green light, the Rayleigh limit is about 138 divided by 70, which is roughly 1.97 arcseconds. The Dawes limit is about 116 divided by 70, which is roughly 1.66 arcseconds. The Sparrow limit is about 105 divided by 70, which is roughly 1.50 arcseconds. This means that even in perfect conditions, the telescope cannot resolve details finer than about 1.7 to 2.0 arcseconds because the Airy disk produced by a 70 millimetre diameter aperture is that size.
To understand how this interacts with my ASI585MC Pro camera, I calculate the pixel scale. The 70ED has a focal length of 420 millimetres. The ASI585MC Pro has pixels that are 2.9 micrometres in size. The angular size of one pixel on the sky is given by the formula 206.265 times the pixel size divided by the focal length. Substituting the values gives about 1.42 arcseconds per pixel. This means each pixel covers roughly 1.42 arcseconds of sky.
My telescope’s diffraction limit is around 1.7 to 2.0 arcseconds, and my camera samples at 1.42 arcseconds per pixel. This means the camera is sampling slightly finer than the telescope can resolve, which is ideal. I am not losing detail because of the pixel size. The telescope aperture diameter is the limiting factor, not the camera.
Filters influence resolution because they change the wavelength of light that reaches the sensor. Shorter wavelengths give better theoretical resolution because the Airy disk is smaller. Longer wavelengths give worse theoretical resolution because the Airy disk is larger. A broadband filter allows a wide range of wavelengths, so the effective resolution is a blend of all those wavelengths. A narrowband filter restricts the light to a very specific wavelength, so the diffraction limit becomes tied to that wavelength alone.
The Optolong L-eNhance filter passes three main emission lines. These are H alpha at about 656 nanometres, OIII at about 500 nanometres, and H beta at about 486 nanometres. The OIII and H beta lines are in the blue-green part of the spectrum and therefore give better theoretical resolution because the Airy disk is smaller at those wavelengths. The H alpha line is in the deep red and produces a larger Airy disk, so the theoretical resolution is slightly worse. When using the L-eNhance, the camera receives a mixture of these wavelengths, so the final image contains contributions from both the finer OIII and H beta resolution and the slightly softer H alpha resolution.
The Askar Colour Magic C2 filter is a dual-band filter. It passes two emission lines: OIII at about 500 nanometres and SII at about 672 nanometres. These two wavelengths sit at opposite ends of the visible spectrum in terms of resolution behaviour. The OIII line is in the blue-green region and therefore gives better theoretical resolution because the Airy disk is smaller at that wavelength. The SII line is in the deep red and produces a larger Airy disk, so the theoretical resolution is slightly worse. This means that when imaging with the C2 filter, the OIII component provides finer detail while the SII component provides slightly softer diffraction-limited resolution. The final image is a combination of these two behaviours.
In practice, the atmosphere interacts differently with these wavelengths. OIII is more affected by seeing because shorter wavelengths are more sensitive to turbulence. SII is less affected by seeing because longer wavelengths are more stable in poor atmospheric conditions. This means that although OIII has the best theoretical resolution, SII may sometimes produce steadier images in real-world conditions. The C2 filter therefore produces a blend of high-resolution OIII data and more stable but slightly lower-resolution SII data.
In real observing conditions, the atmosphere usually limits resolution more than the telescope does. Typical seeing in the United Kingdom is around 2 to 3 arcseconds, sometimes better, sometimes worse. This means that most of the time, the atmosphere will prevent me from reaching the theoretical diffraction limit of the telescope. My setup is therefore well matched. The telescope defines the fundamental resolution, the camera samples it appropriately, and the atmosphere usually determines the final result.
This means that the seeing on the nights I imaged the SII data must have been much worse than the night I captured the OIII and Ha.
The Eagle Nebula (M16)
This is one of those regions in the sky that feels alive the moment you look at it. It sits thousands of light years away in Serpens, but the structure has a sense of motion and energy that makes it feel much closer. The bright central area spreads outward like wings, with dark lanes cutting through the glow, giving the nebula a shape that is both dramatic and strangely fragile.
What makes the Eagle Nebula so compelling is that it captures a moment in the ongoing cycle of star formation. Inside its clouds, new stars are taking shape from dense pockets of gas and dust. At the same time, the stars that have already formed are blasting the surrounding material with intense radiation and powerful winds. This creates a constant struggle between gravity pulling matter together and radiation pushing it apart. The most famous example of this is the set of towering structures known as the Pillars of Creation. These columns are made of thick, cold material that shields the forming stars inside, yet the same radiation that helped create them is slowly eroding them away.
The Hubble Space Telescope image of the Pillars of Creation is one of the most recognisable astronomical photographs ever taken. It revealed the fine structure of the pillars in a way that had never been seen before, showing their textured surfaces, their sculpted edges, and the tiny jets and knots where new stars are emerging. That image changed the way people thought about star formation, because it showed that these processes are not abstract or distant. They are happening right now, in real time, inside structures that look almost solid but are constantly being reshaped by the forces within them.
Across the nebula, the same contrasts appear everywhere. Smooth glowing regions sit beside sharp-edged shadows. Cavities carved out by stellar winds lie next to dense knots where gravity is still gathering material. Every wavelength reveals something different. Hydrogen shows the broad sweep of the nebula. Oxygen highlights the hotter, more energetic regions. Sulphur brings out the slower, denser structures. Together they create a layered view of a landscape that is constantly changing.
For astrophotographers, the Eagle Nebula is rewarding because it responds beautifully to long exposures and narrowband filters. The pillars stand out clearly in hydrogen and sulphur, while oxygen reveals the surrounding cavities and shock fronts. With enough integration time, the faint outer regions begin to appear, giving the whole scene a sense of depth and scale. It is one of those objects that reveals more every time you revisit it, whether you are refining your technique, improving your equipment, or simply spending more time on the data.
What makes the Eagle Nebula so captivating is that it shows star formation as an active, ongoing process. It is not quiet or gentle. It is chaotic, energetic, and full of competing forces shaping the same cloud of gas. When you look at it, you are seeing a moment in a story that will continue to unfold over millions of years. That sense of witnessing something in motion, even across such vast timescales, is what gives the Eagle Nebula its unique appeal.
Last year I took a photo of the Eagle Nebula and used a PixelMath Script in Pixinsight which I had written to take the one shot colour image I had and convert it to SHO.
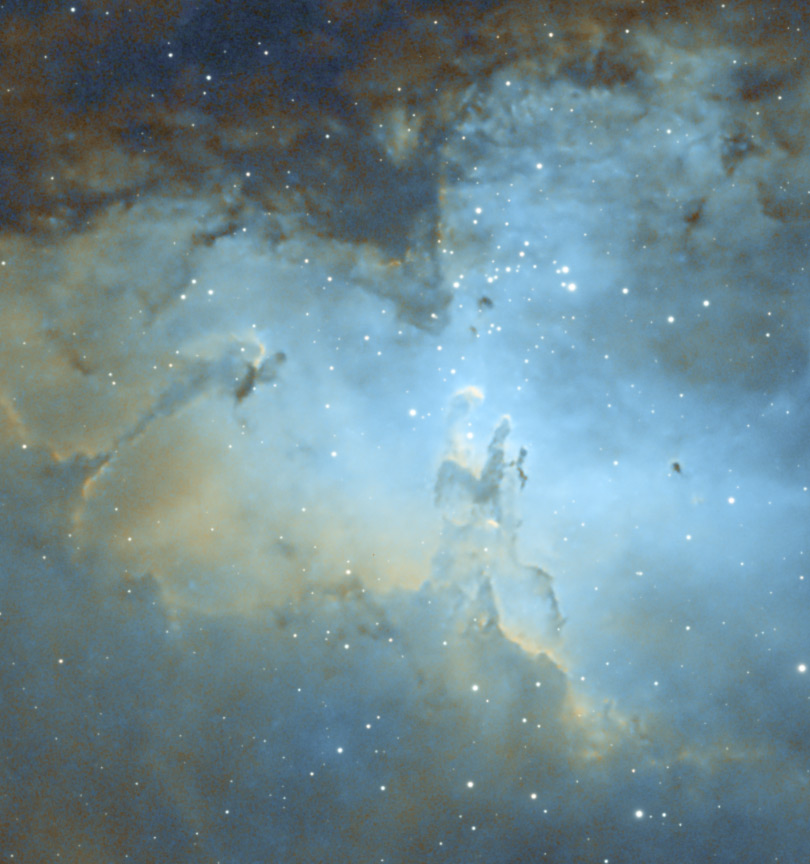
As you can see it wasn't too bad, at the time I was delighted with the result. So I thought it may be a nice idea if I tried to image it again, but this time be able to do it with real (ish) SHO using the L eNhance and C2 filters.
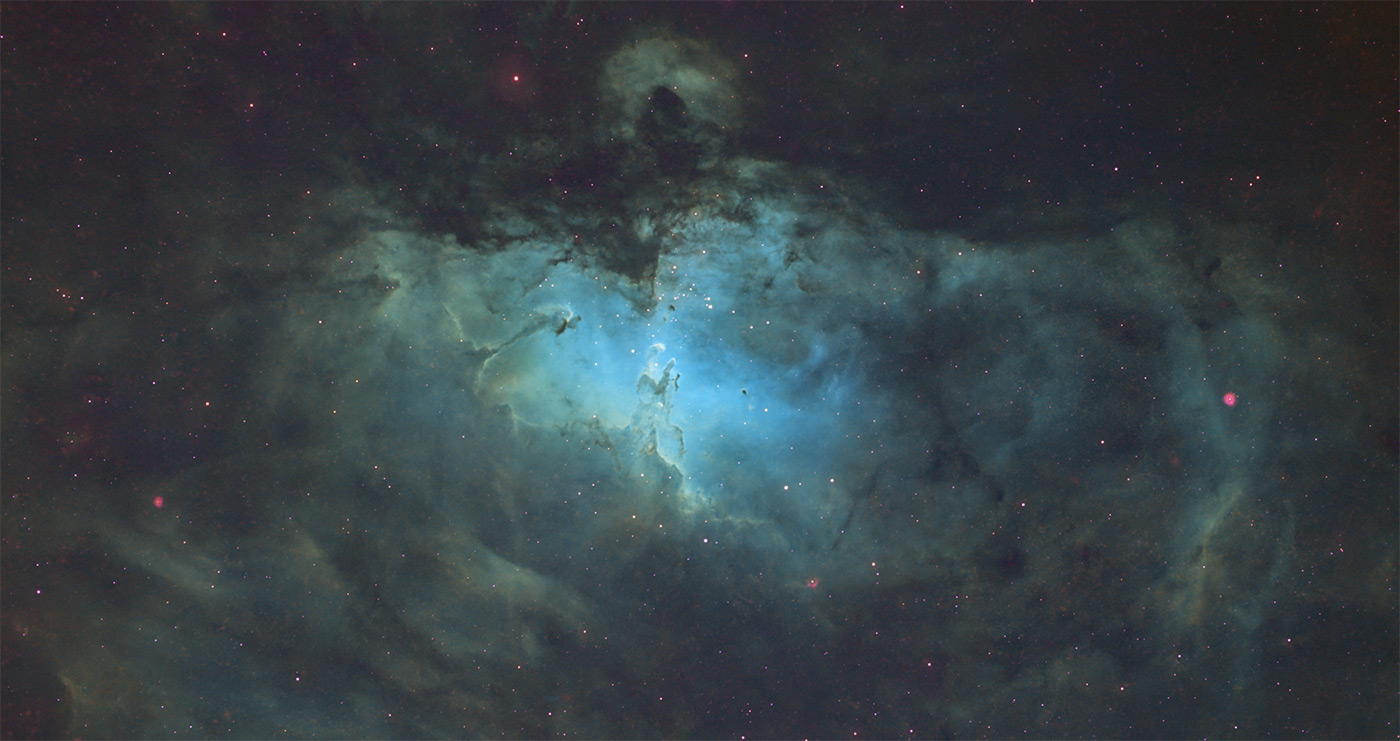
At close crop I am not seeing the sharpness I expected, I do wonder if I am pushing the limits of the kit I have. That aside I am very happy with this image.
Exif
Camera: ZWO ASI585MC Pro.
Telescope: Altair Astro 70ED Telescope (420mm).
Mount: Sky-Watcher EQ5 Pro
Filter: Optolong L eNhance filter.
Guide Camera: ZWO ASI120mm-s
Guide Scope: SVBony 30mm (f4)
Computer: ZWO ASIAIR pro
Method:
Lights: 75 x 120 sec Gain 252.
Darks: 0
Flats: 0
Bias: 0
Stacked in DSS, Processed in Pixinsight with RC-Astro Suite of tools. Finishing touches in Photoshop.
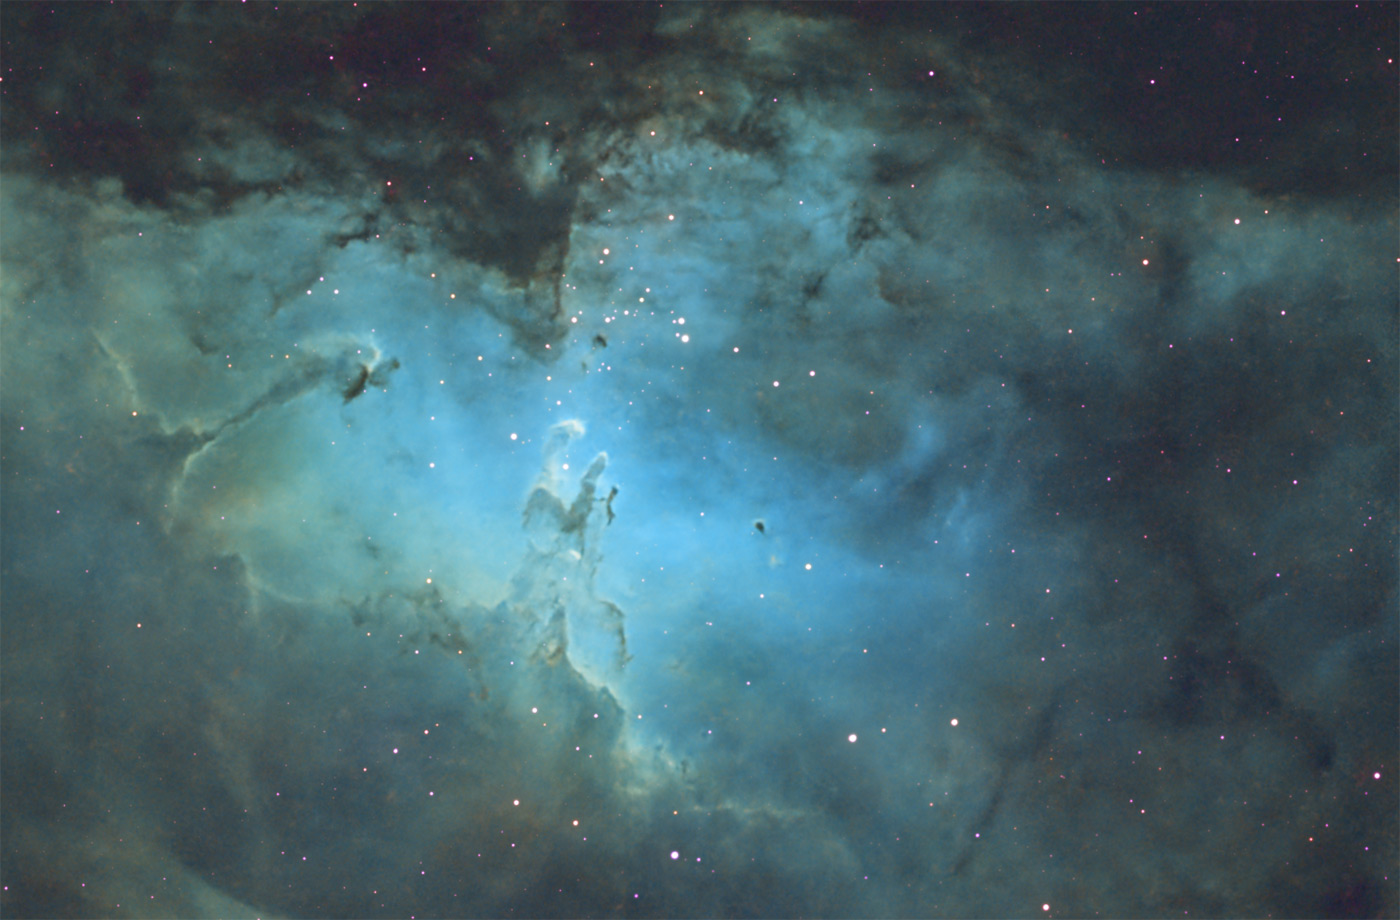
The Veil Nebula (NGC 6090)
The Veil Nebula is the scattered remains of a massive star that exploded thousands of years ago, leaving behind a vast, delicate web of glowing gas. It sits in the constellation of Cygnus, stretching across a region of sky so large that no single frame can capture it all. What makes the Veil so striking is the way the supernova shockwave has torn the original cloud into fine, threadlike structures. Instead of a single bright patch, the nebula is broken into long, curling filaments that look almost like smoke caught in a breeze.
The most famous part of this structure is the Witch’s Broom, also known as NGC 6960. It lies on the western edge of the Veil and appears to sweep across the sky like a trail of glowing embers. The bright star 52 Cygni sits right in front of it, giving the whole scene a sense of depth, as if the star is suspended in front of a glowing curtain. The Witch’s Broom is made of gas that has been shocked and heated by the expanding supernova blast wave. As the wave moves outward, it compresses and excites the gas, causing it to glow in different colours depending on the elements present. Oxygen produces the cool blue-green strands, while hydrogen and sulphur add warmer tones.
What makes the Witch’s Broom so captivating is the level of detail in its structure. The filaments are incredibly thin, almost like strands of hair, yet they twist and curl in complex patterns. These shapes trace the path of the shockwave as it moves through the interstellar medium, revealing the turbulence and uneven density of the material it encounters. Even small changes in density can cause the wave to bend or split, and the nebula preserves these interactions like frozen ripples.
The Veil Nebula as a whole is a reminder of how violent events can create something unexpectedly beautiful. A star that once outshone entire clusters ended its life in a catastrophic explosion, but the aftermath has produced one of the most intricate and photogenic structures in the night sky. The Witch’s Broom is the most dramatic part of that story, a sweeping arc of glowing gas that shows both the power of the original explosion and the delicate structures left behind.
For astrophotographers, the Witch’s Broom is a rewarding target because it responds so well to narrowband imaging. Oxygen reveals the fine, electric filaments, while hydrogen and sulphur add depth and contrast. With enough exposure time, the faintest strands begin to appear, giving the impression of a tangled, luminous web. It is one of those objects that becomes more impressive the deeper you go, and every improvement in technique brings out new layers of structure.
NGC 6960, is only one part of the larger Veil Nebula complex, but it captures the essence of what makes the entire structure so compelling. It is the visible trace of a long‑gone star, shaped by shockwaves and turbulence, and preserved across thousands of years as a glowing reminder of the life and death cycles that shape our galaxy.
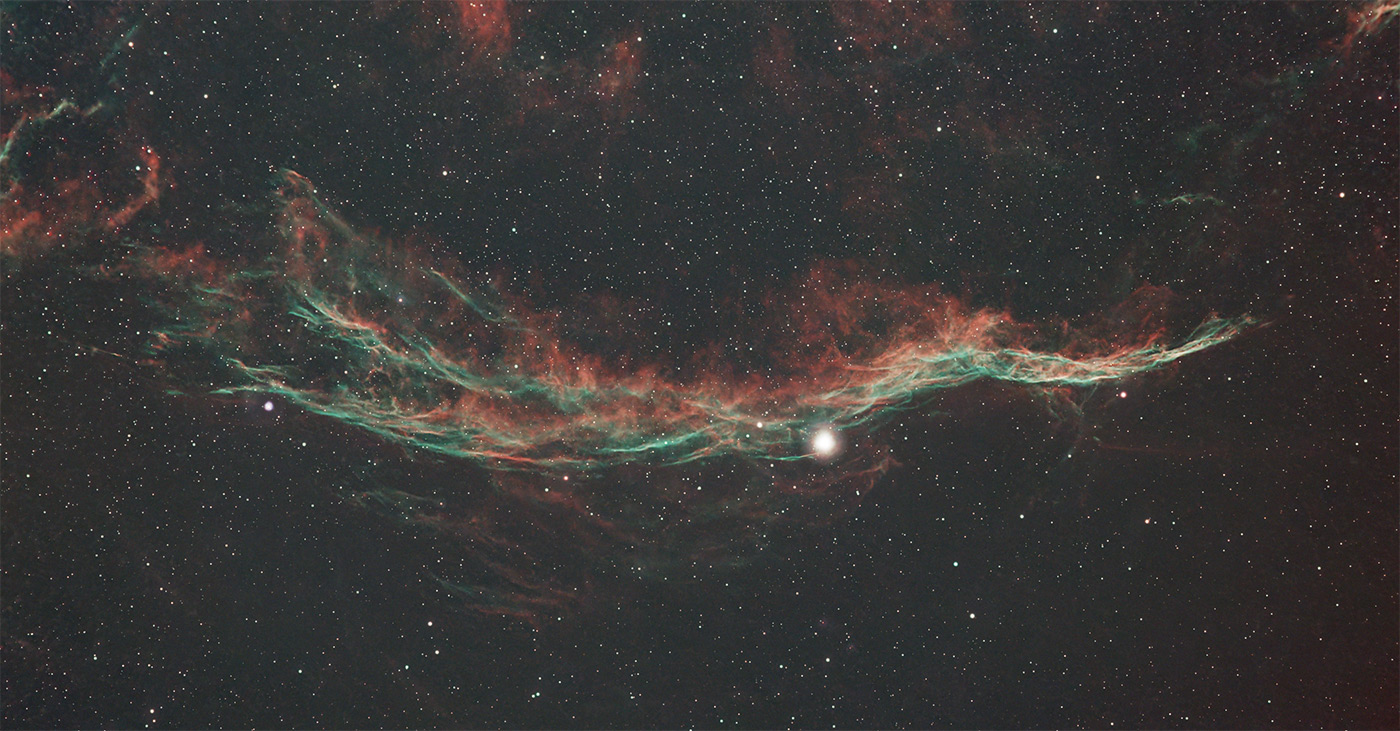
Exif
Camera: ZWO ASI585MC Pro.
Telescope: Altair Astro 70ED Telescope (420mm).
Mount: Sky-Watcher EQ5 Pro
Filter: Optolong L eNhance filter.
Guide Camera: ZWO ASI120mm-s
Guide Scope: SVBony 30mm (f4)
Computer: ZWO ASIAIR pro
Method:
Lights: 60 x 120 sec Gain 252.
Darks: 0
Flats: 0
Bias: 0
Stacked in DSS, Processed in Pixinsight with RC-Astro Suite of tools.
Share this post:
By Jonathan Penberthy on 29/06/2026
Jonathan Penberthy
Cosmic Shutter Seeker and Star Programmer
Jonathan Penberthy is the Cosmic Shutter Seeker and Star Programmer at Park Cameras, with over 20 years of experience as a software engineer. His career journey has spanned industries, but a move to Park Cameras sparked a passion for astrophotography. Jonathan’s interest began while working on a lens selection app, leading him to explore the night sky with a Canon 7D. When he’s not programming or photographing the stars, he enjoys sailing and navigating by the cosmos. Learn more on his profile page.

Trade in your old equipment
Fast and easy trade in service ensures your old gear is collected efficiently and you are paid quickly! It's very simple to trade in your unwanted photography gear. Just head over to our dedicated Sell or Part Exchange page, fill out the details, and we'll get back to you with an offer for your old gear. Take the cash, or put it towards the cost of your new gear. It's up to you! Find out more
sign up to the newsletter
Keep up to date on the latest photography news, events and offers. Sign up now