- Call us 01444 237070

-
- Back
- Used Cameras
- Used Accessories
- Used Lenses
- Back
- Used Canon Lenses
- Used Nikon Lenses
- Used Fujifilm Lenses
- Used Sony Lenses
- Used Micro 4/3rds Lenses
- Used Leica Lenses
- Used Panasonic Lenses
- Used Pentax Lenses
- Used Samyang Lenses
- Used Sigma Lenses
- Used Tamron Lenses
- Used Tokina Lenses
- Used Voigtlander Lenses
- Used Zeiss Lenses
- Used Hasselblad Lenses
- Used Video
- Used Film Equipment
- Used Stock Alert
- Used Blank Test
- Sell or Part Exchange
- Used Clearance
- Recently Added Used Equipment
- Park Picks
- Faulty
- Trade-In
- Blog
- New in
- Call us
- Contact us
- Stores
- Sign in
- Categories
- Tips & Inspiration
- Reviews
- News
- Events
- Features
- Buying Guides
- Competitions
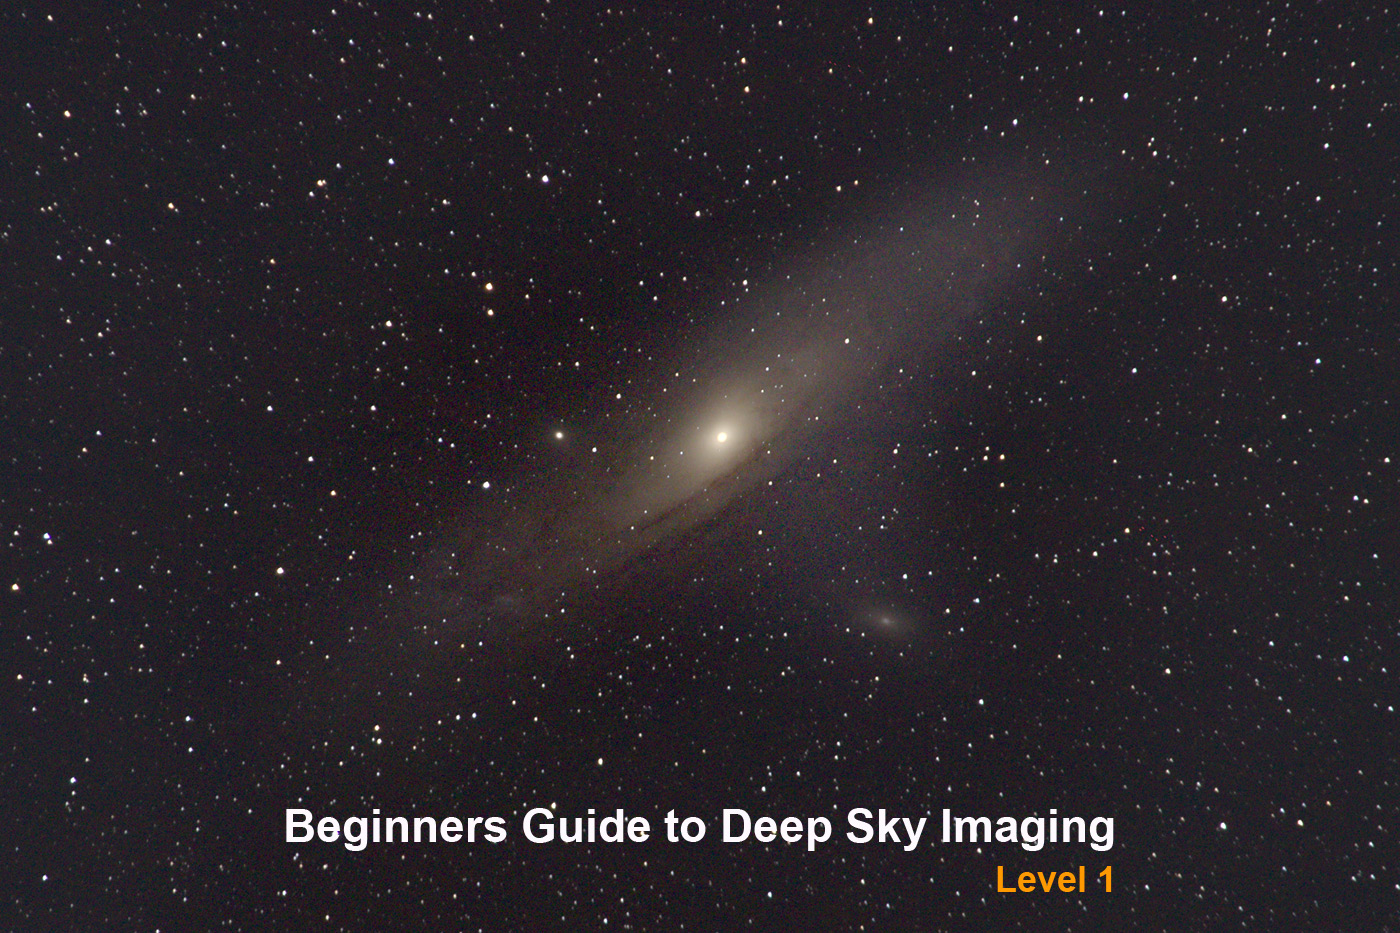
Beginners Guide to Deep Sky Imaging Level 1
This is a general beginners guide to teach the first steps in deep sky imaging, and is the most basic of guides (Level 1). This process is how to capture nebulae and the Milkyway galaxy, can also be adapted for other galaxies too. However, this will not work with Luna or planetary photography.
The absolute minimum kit you need is a DSLR or mirrorless camera, fairly fast lens, sturdy tripod, computer (Windows), Photoshop and a dark clear night sky!
Ideally an intervalometer for your camera.
I started out with:
- Used Canon 7D
- Used Canon 50mm F/1.8 STM Lens
- Manfrotto 290 Tripod
- Laptop - Windows 10, 8GB RAM i5 processor
- Cheap intervalometer
The minimum skills you need are determination and patience and a lot of patience!
I live in a Bortle 4/5 location so light pollution is a real factor, you can find your Bortle here, and of course don't hesitate to go to somewhere a bit darker!
Focusing
It is very difficult to focus a camera in the dark. So here are my tips, they are not perfect, but have served me well.
- During the day, focus on a far away object, as far away as you can for your lens, essentially infinity focus - don't trust your lens markings, we need the sharpest focus we can get. Then get some tape and tape the lens in that position, or if you don't wish to risk damaging your lens then make a note where the position is, for example take a photo on your phone of the position.
- If it is already dark, look through the view finder, or magnify your live view to the max on the back screen of your camera and rotate the focus ring to make the stars as small as possible. I have found with some lenses, it is impossible to achieve infinity focus, but you can get close enough that if you don't pixel peep, it doesn't look too bad!
Theory - the rule of 500
The Earth rotates at about 1,000 mph on its axis, in turn it revolves around the Sun at around 67,000 mph, and our whole solar system rotates around our galaxy (Milky way) at 514,000 mph. Feeling dizzy?
As such, we need to counter the rotation of the Earth against the relative rotation of the night sky to our location. In this most basic of guides we are not using a mount or star tracker, and so we need to be very particular about our exposure times, and minimise vibration of the camera, so remove your camera strap as it will cause issues!
Full frame camera
Take the focal length of your lens, so in my example above with my 50mm, divide 500/50 (focal length) = 10 seconds.
This means you can take a 10 second exposure without seeing any noticeable star trails.
Crop sensor (APS-C)
Take the focal length of your lens, so in my example above with my 50mm, divide 500/ (50 x (focal length) x 1.5 (crop factor)) = 6.66 seconds.
This means you can take a 6 second exposure without seeing any noticeable star trails.
That is in theory. In reality I have found that it depends on the lens and location. So I start out with this number of seconds and then decrease it till I can't see any star trails in my test image, unless you want star trails... but thats another guide!
Finding the target
I would recommend starting out with a very easy to find constellation, because this can be very difficult. Using a star guide tool like stellarium-web will help, but for this tutorial we are going to be assume you are familiar with the constellation Orion which is visible in our Northern Hemisphere winter skies, if you are reading this at another time of year, then I would recommend trying Cygnus which also has many interesting deep sky objects to photograph, even with a 50mm lens.
As this happens, the whole of Orion comfortably fills the frame of a Canon 7D with a 50mm lens. So this makes framing up and re-framing up very easy, as you can centre Orion's belt in your image. However, what I would recommend, is being conscious of the fact that our view of the sky rotates as the Earth spins, and so we will start seeing image rotation when we stack the images on the edge of the frames.
As such make sure the main thing you wish to photograph is as central as possible.
Imaging
At any star party you may attend, you will hear the cry "imaging!" from all corners, a customary declaration that the individual doesn't wish for any unwanted photons to reach their sensor, and so it is seen as the done thing to use a red light for seeing such as a head torch and nothing else from this point onwards. Of course, if you are on your own use your normal torch or whatever you have with you until such a time as you have started your data capture.
What ever you do, make sure you are set to capture the highest quality RAW images you can. No JPGs!
Lights
- Create a folder called '[YEAR-MONTH-DATE] [TARGET NAME] LIGHTS' in your camera and make sure these images are saved here (replace appropriate words with values).
- Set up your intervalometer (if you have one - most cameras will have settings similar if not) to image based on the number of seconds you have determined you can from the rule above, and the number of subs you wish to take. Give yourself a good few seconds before the plan starts to allow any motion to cease, and again between each frame (or sub as they get referred to) especially if you have a DSLR as the mirror movement can cause vibration. I wouldn't recommend doing an image run of more than 5-10 mins max without a dedicated star tracker or mount as the sky will have shifted too much. So in the case of my kit, I would do something like this:
- 10 second wait when button on intervalometer/ shutter button is pushed to allow vibration to stop.
- 40 x 6 sec exposures, with a 2 second pause between each one.
- Check you are in focus.
- Start your plan running.
- Repeat this step as much as you can, moving your camera and checking focus as required, over multiple nights if you like!
Darks
- Create a folder called '[YEAR-MONTH-DATE] [TARGET NAME] DARKS' in your camera and make sure these images are saved here (replace appropriate words with values).
- Put your lens cap back on and repeat the imaging plan you did for Lights. This will capture a set of images that show the dead pixels, amp glow and other noise caused by your camera, which has introduced photons to your sensor that you dont want in your image.
Flats
- Create a folder called '[YEAR-MONTH-DATE] [TARGET NAME] FLATS' in your camera and make sure these images are saved here (replace appropriate words with values).
- Let's not pretend that our sensors are 100% clean, nor that our lenses are completely free from dust, or in some cases fungus! Not to mention vignetting.
These issues can all be fixed with these Flat frames. So in order to do this, I point my camera on its tripod straight up. Put a white screen on my phone and wrap the phone in a thin white t-shirt/handkerchief to diffuse the light, then take another 40 frames at about 1/40 sec, so that the histogram is 1/3rds to 1/2 way across the screen, or if you can't be bothered to find this setting on your camera, then you can see the dust etc. in the image and the image is a sort of off white/grey colour.
There are other calibration frames like Bias, Dark Flats etc. But as this is a very basic guide so I won't go in to them!
Processing
Stacking
So by now you should have all of your subs (at least 40 Lights, 40 Darks, and 40 Flats) all in RAW format! There are many free and paid for processing applications for this part, but by far the easiest and simplest one is Deep Sky Stacker (DSS), you can download it for free from here: deepskystacker (note the website is not encrypted).
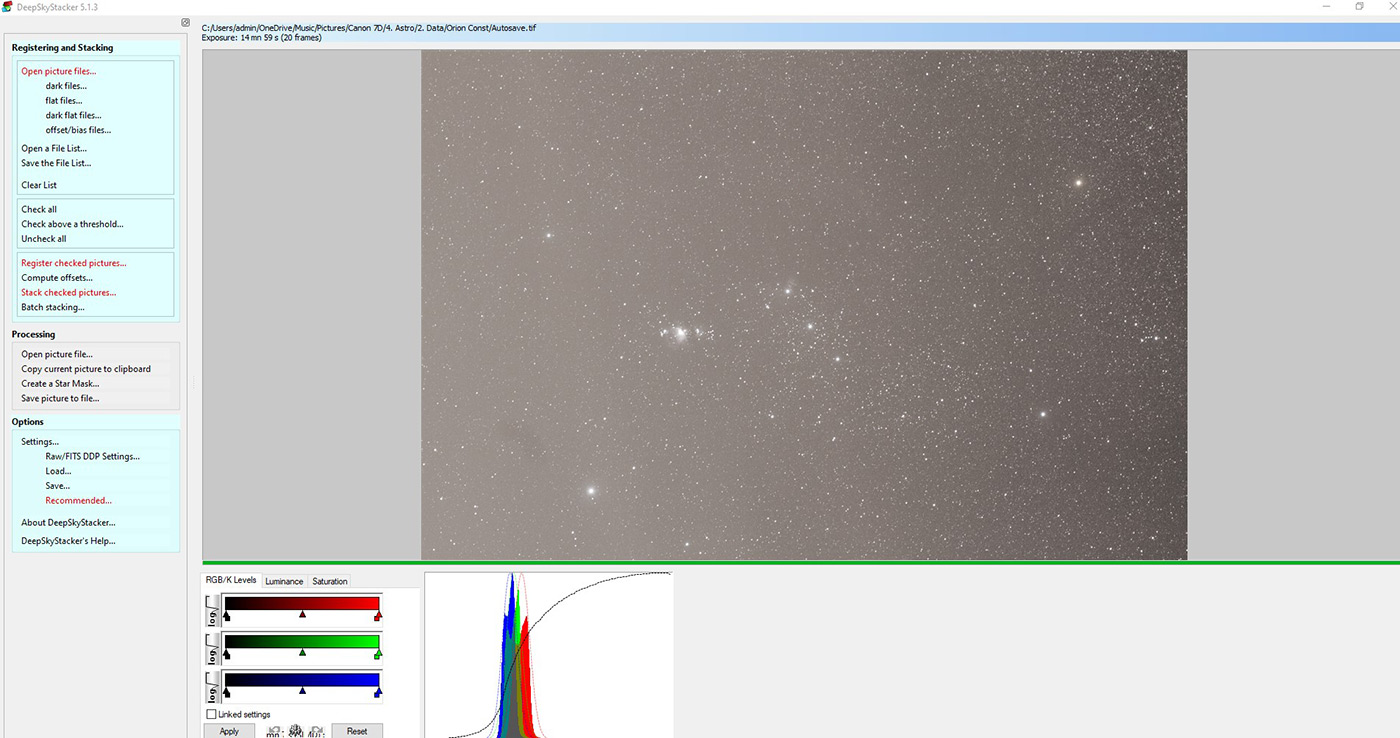
- Open DSS and add your Light frames by clicking the 'Open picture files...' option in the left hand pane.
- Add your Darks to 'darks files...'.
- Add your Flats to 'flats files...'.
- Now click 'Check all'.
- Next click 'Register checked pictures...'
- Change the select the best option to 80% - This is a basic guide, and I find this will get rid of your worst frames.
- Click OK.
- In the next window that opens, it will list the issues with your stacking. In this guide we shall ignore these and just click OK.
- The stacking will now take place. This will take a while (depending on your computer).
- When it has finished, you should see your linear image that has been stacked for you in the image pane. This has been auto-saved.
- Close DSS and if prompted save the project.
Stretching
In a more advanced guide I shall go in to star removal and recompiling your image, but in this tutorial I shall skip right to stretching the linear image.
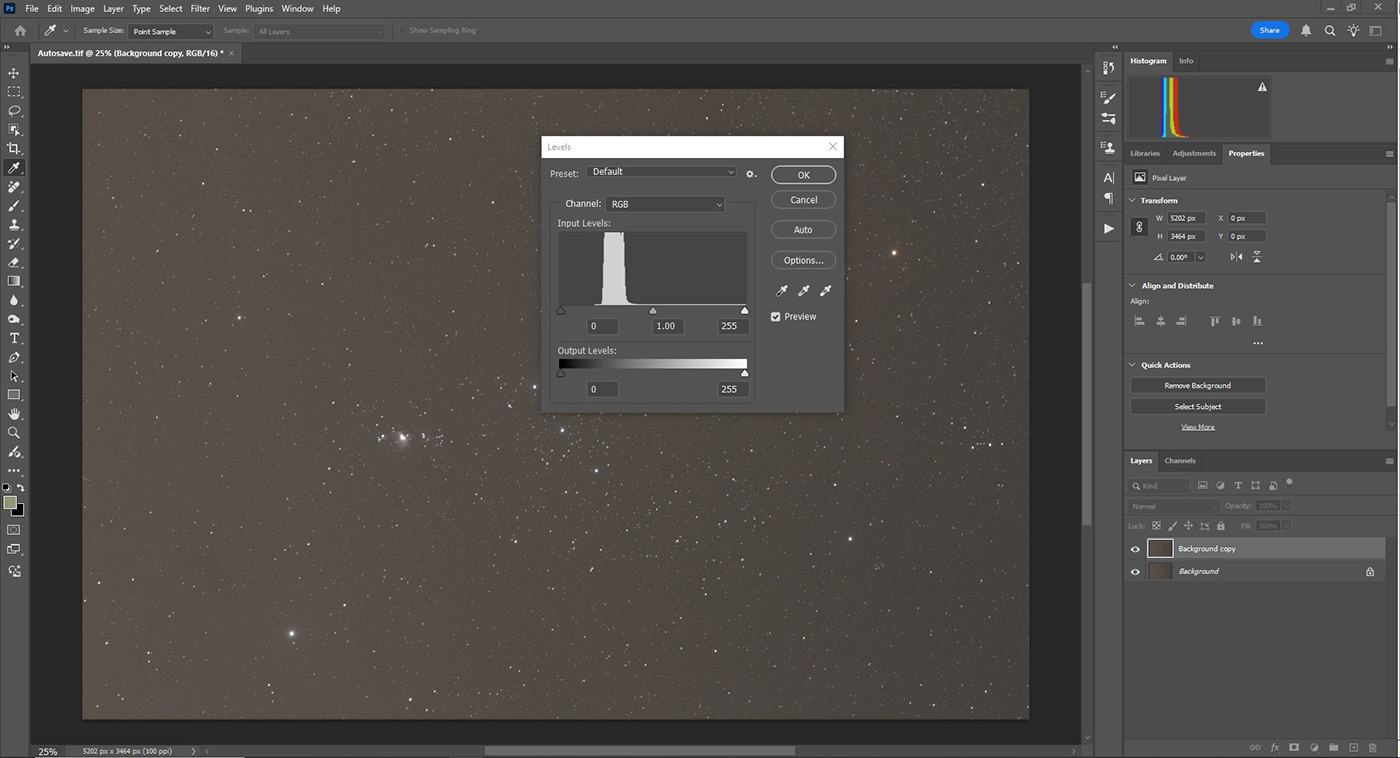
- Click open in Photoshop and navigate to your Lights folder, you will now see a file called Autosave.tif
- Convert the image from 32 bit to 16 bit - go to Image>Mode>16 Bits/channel in the window that opens select Exposure and Gamma in the method dropdown.
- Right click on the 'Background' labeled image in the Layers pane (usually bottom right corner) and select 'Duplicate Layer...' and click OK.
- Now this means if you have made a mess of the copy, we can return to the previous layer! With the 'Background copy' layer selected, we can perform our first stretch. Select from the menu Image>Adjustments>Levels. Looking at the Input Levels slider, move the black point triangle to just before it touches the white area in the chart. Now move the mid point slider to the left, just before it touches the main part of the data in the chart. Click OK. We are stretching the data. You should now start to see a bit of detail come out, but we are far from done yet!
- Now select from the menu Image>Adjustments>Curves. This we will use a lot, but on this occasion we just want to make the layer brighter. So in the preset dropdown select 'Lighter' and click OK.
- Duplicate the Layer again step 3, but this time use the Background copy layer.
- Do another menu Image>Adjustments>Levels and set the black point again.
- Do another menu Image>Adjustments>Curves in the preset dropdown select 'Lighter' and click OK again.
- Now we want to start to add contrast... so select Image>Adjustments>Curves in the preset dropdown select 'strong contrast' and click OK again.
- Repeat steps 6 - 9, try playing with the individual levels of each colour in the RGB, use 'Camera Raw Filter' too all until you are happy with your image. The great thing about using a non-destructive workflow is that you can return to your previous best if your latest tweak didn't work!
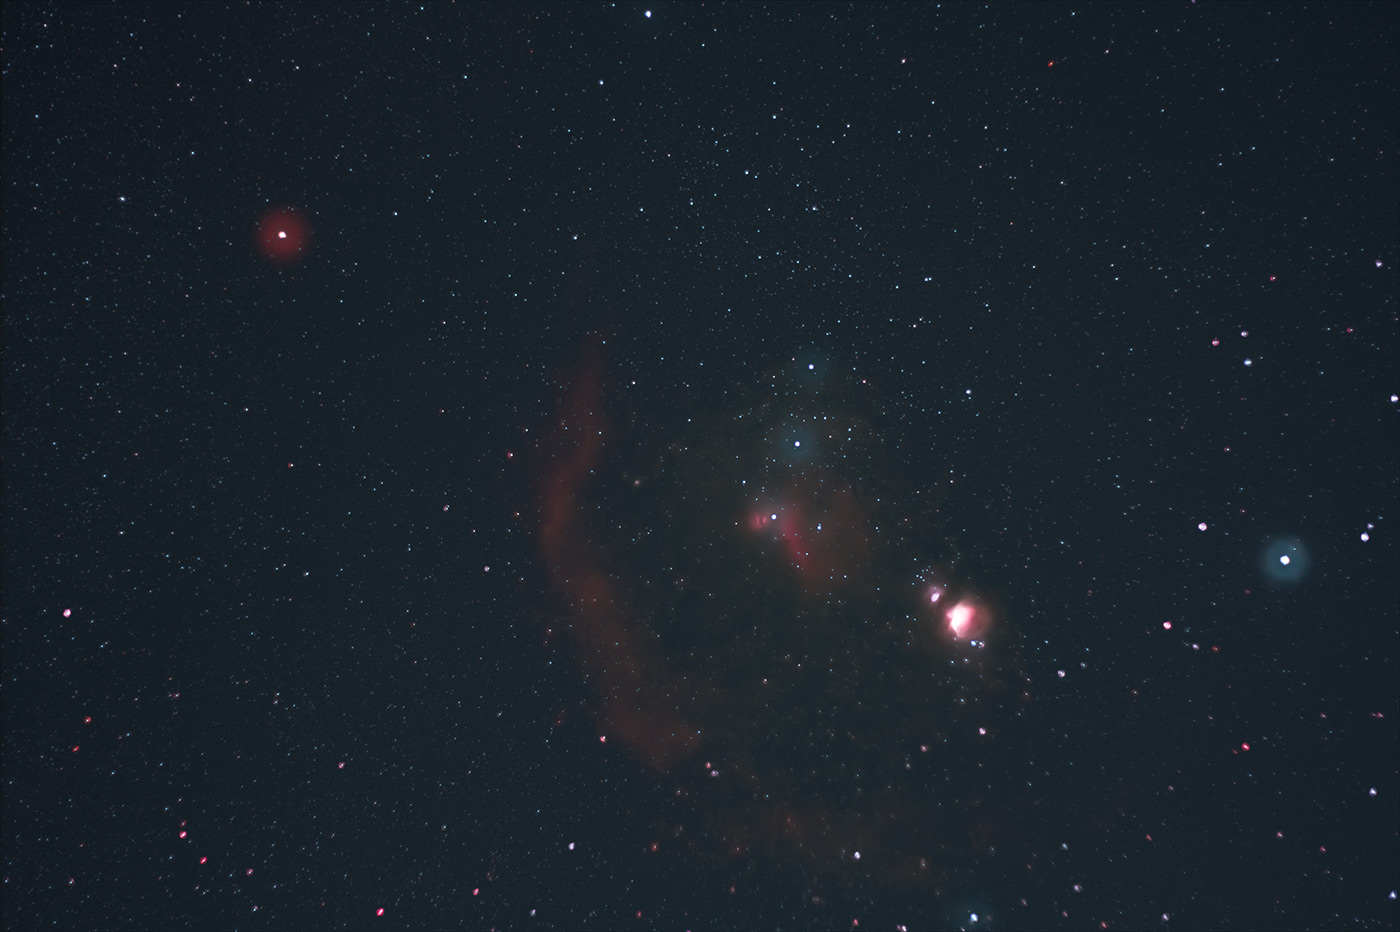
The finished article
After cropping, image rotation and a bit of saturation adjustment and using the noise reduction sliders in Camera Raw Filter in Photoshop, this is the sort of image you can hope to achieve using the most basic of kit listed above. You can see Betelguese the large Red Dwarf star, the Horsehead and Flame Nebula, the Great Orion Nebula, Running Man Nebula and a faint but present Barnards Loop!
Exif
- Used Canon 7D
- Used Canon 50mm F/1.8 STM Lens
- Manfrotto 290 Tripod
- Laptop - Windows 10, 8GB RAM i5 processor
- Cheap intervalometer
Lights
40 x 4 sec subs @ISO1600
Darks
40 x 4 sec subs @ISO1600
Flats
40 x 1/40 sec subs @ISO1600
Processing
Followed the procedure above.
Learn more about astrophotography, monthly night sky highlights and much more in our tips and inspiration blog section.
Click here continue to Level 2
Share this post:
By Jonathan Penberthy on 15/01/2026
Jonathan Penberthy
Cosmic Shutter Seeker and Star Programmer
Jonathan Penberthy is the Cosmic Shutter Seeker and Star Programmer at Park Cameras, with over 20 years of experience as a software engineer. His career journey has spanned industries, but a move to Park Cameras sparked a passion for astrophotography. Jonathan’s interest began while working on a lens selection app, leading him to explore the night sky with a Canon 7D. When he’s not programming or photographing the stars, he enjoys sailing and navigating by the cosmos. Learn more on his profile page.

Trade in your old equipment
Fast and easy trade in service ensures your old gear is collected efficiently and you are paid quickly! It's very simple to trade in your unwanted photography gear. Just head over to our dedicated Sell or Part Exchange page, fill out the details, and we'll get back to you with an offer for your old gear. Take the cash, or put it towards the cost of your new gear. It's up to you! Find out more
sign up to the newsletter
Keep up to date on the latest photography news, events and offers. Sign up now