- Call us 01444 237070

-
- Back
- Used Cameras
- Used Accessories
- Used Lenses
- Back
- Used Canon Lenses
- Used Nikon Lenses
- Used Fujifilm Lenses
- Used Sony Lenses
- Used Micro 4/3rds Lenses
- Used Leica Lenses
- Used Panasonic Lenses
- Used Pentax Lenses
- Used Samyang Lenses
- Used Sigma Lenses
- Used Tamron Lenses
- Used Tokina Lenses
- Used Voigtlander Lenses
- Used Zeiss Lenses
- Used Hasselblad Lenses
- Used Video
- Used Film Equipment
- Used Stock Alert
- Used Blank Test
- Sell or Part Exchange
- Used Clearance
- Recently Added Used Equipment
- Park Picks
- Faulty
- Trade-In
- Blog
- New in
- Call us
- Contact us
- Stores
- Sign in
- Categories
- Tips & Inspiration
- Reviews
- News
- Events
- Features
- Buying Guides
- Competitions
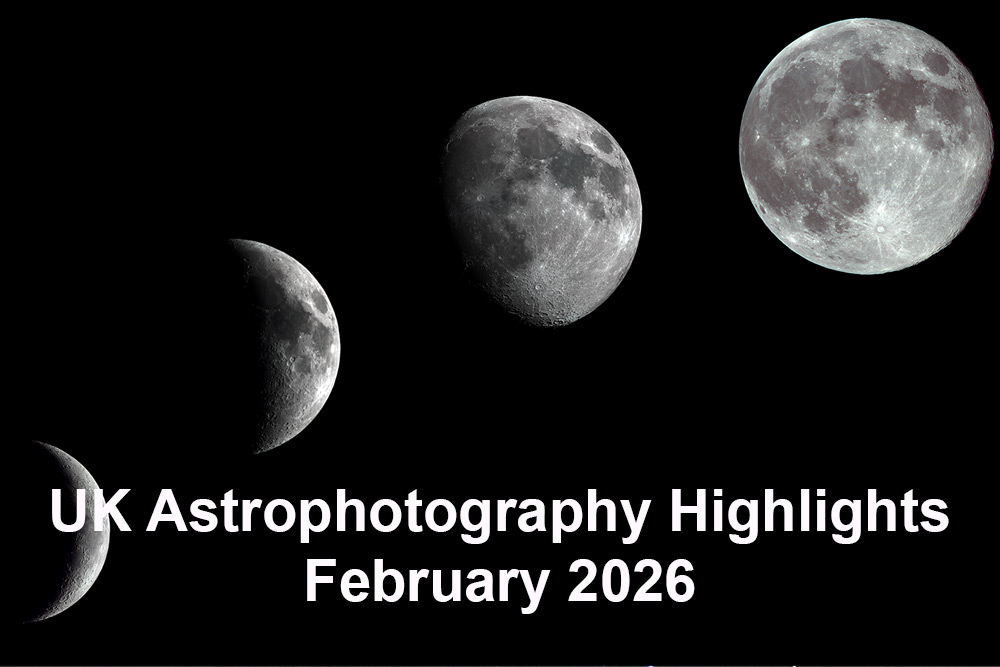
February UK Astrophotography Highlights 2026
For the last 3 weeks our astrophotography dreams have been curbed by the weather, night after night of cloud, rain, sometimes snow, more rain and thick cloud, and did I mention it...cloud! This has really narrowed the window of opportunity to capture images this month.
Aside from the gloomy vista of Jan 26, we have a very exciting opportunity in February. NASA are launching Artemis II, which is the first manned space flight to the moon in 50 years! Whilst the adventure will not see 'boots on the ground' (we will need to wait until 2028 and Artemis III for that) the 4 astronauts will pass the far side of the moon and return to earth, which I believe will surpass Apollo 13's record of the furthest humans have travelled from our planet, making it a very special event indeed.
At the time of writing NASA have scheduled 8th Feb as the opening window for launch, further information about the flight can be seen here.
So you may well be asking, as I immediately did when I read about it, can we photograph the Orion Spacecraft on the way to the moon? I very much believe we can! However, it will require some ingenuity, patience and fortune. In my case with my 70ED scope (call for pricing 01444 237070), ASIAIR, ASI585MC pro camera and EQ5 Pro Mount (call for pricing 01444 237070). There will be some challenges, but theoretically it should be possible. This is my quick guide to capturing this event:
Technical understanding:
This mission is called Artemis II. The name Artemis is deliberate: in Greek mythology, Artemis is the twin sister of Apollo. The original Apollo missions sent humans to the Moon for the first time, and the Artemis programme is the next generation of lunar exploration. The symbolism reflects NASA’s intention to send a more diverse crew, including the first woman and the first person of colour to travel to the lunar vicinity.
The spacecraft:
Throughout its journey from Earth, around the Moon, and back, the spacecraft will change configuration as different modules complete their roles and are discarded. Artemis II uses a combination of systems, which broadly can be split into 3:
1. The Space Launch System (SLS)
This is the giant rocket that lifts the crew off Earth. It includes:
- Solid Rocket Boosters (SRBs) – jettisoned about two minutes after launch
- Core Stage – separates once its fuel is spent
- Interim Cryogenic Propulsion Stage (ICPS) – performs the translunar injection burn, then is discarded.
Once these stages are gone, only the crewed spacecraft continues.
2. The Orion Spacecraft - known as Integrity
This is what the astronauts actually travel in. Orion has two major parts:
- Crew Module (CM)
The pressurised capsule where the astronauts live and work. This is the only part that returns to Earth.
- European Service Module (ESM)
Built by ESA, it provides propulsion, power, water, oxygen, and thermal control.
It is jettisoned just before re‑entry, because it would burn up in the atmosphere.
3. Re‑entry and Recovery
After the service module separates, the Crew Module (Integrity) performs:
- a high‑speed atmospheric re‑entry
- parachute deployment
- splashdown in the Pacific Ocean
- recovery by the U.S. Navy
This is the final configuration of the spacecraft.
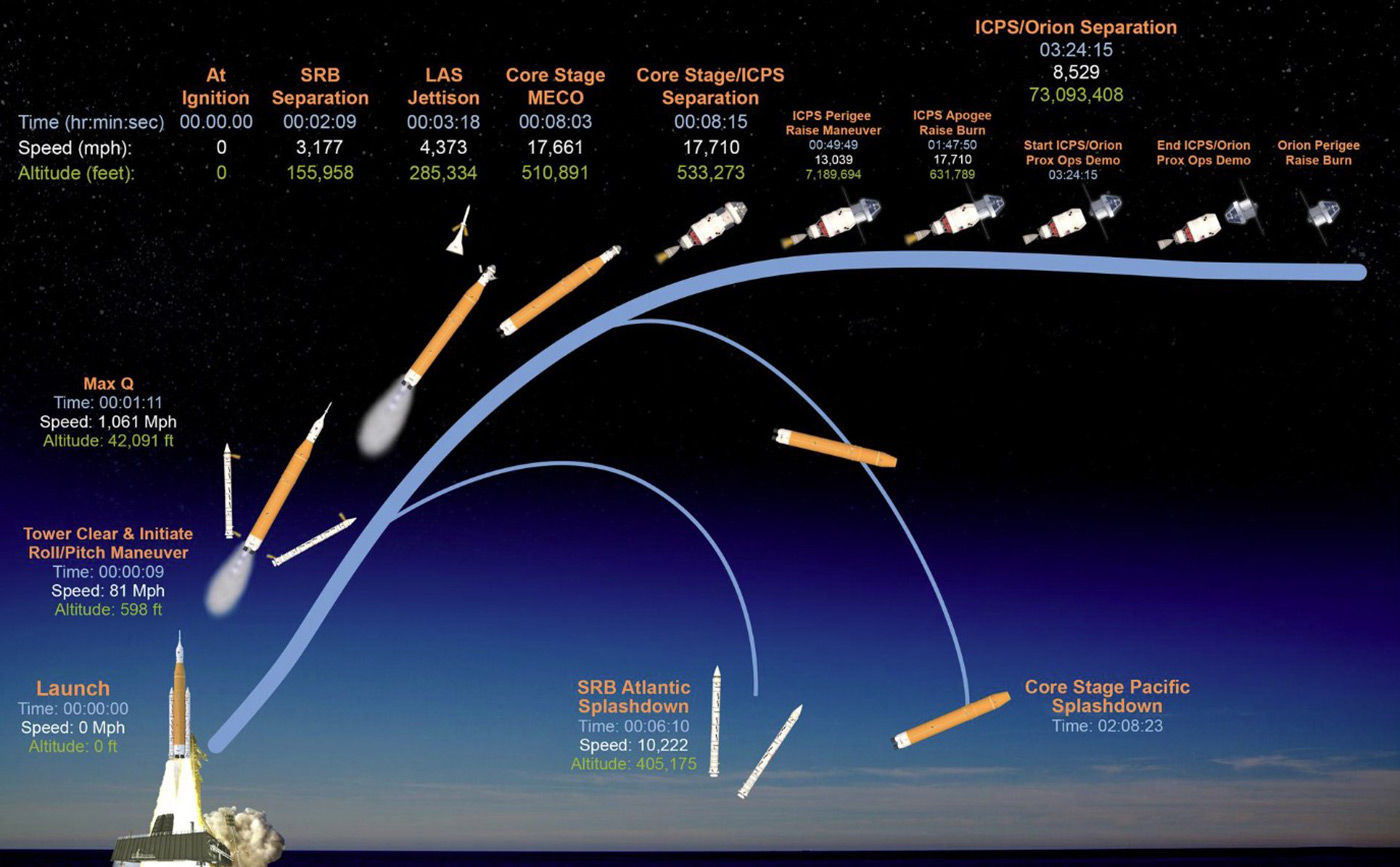
credit NASA
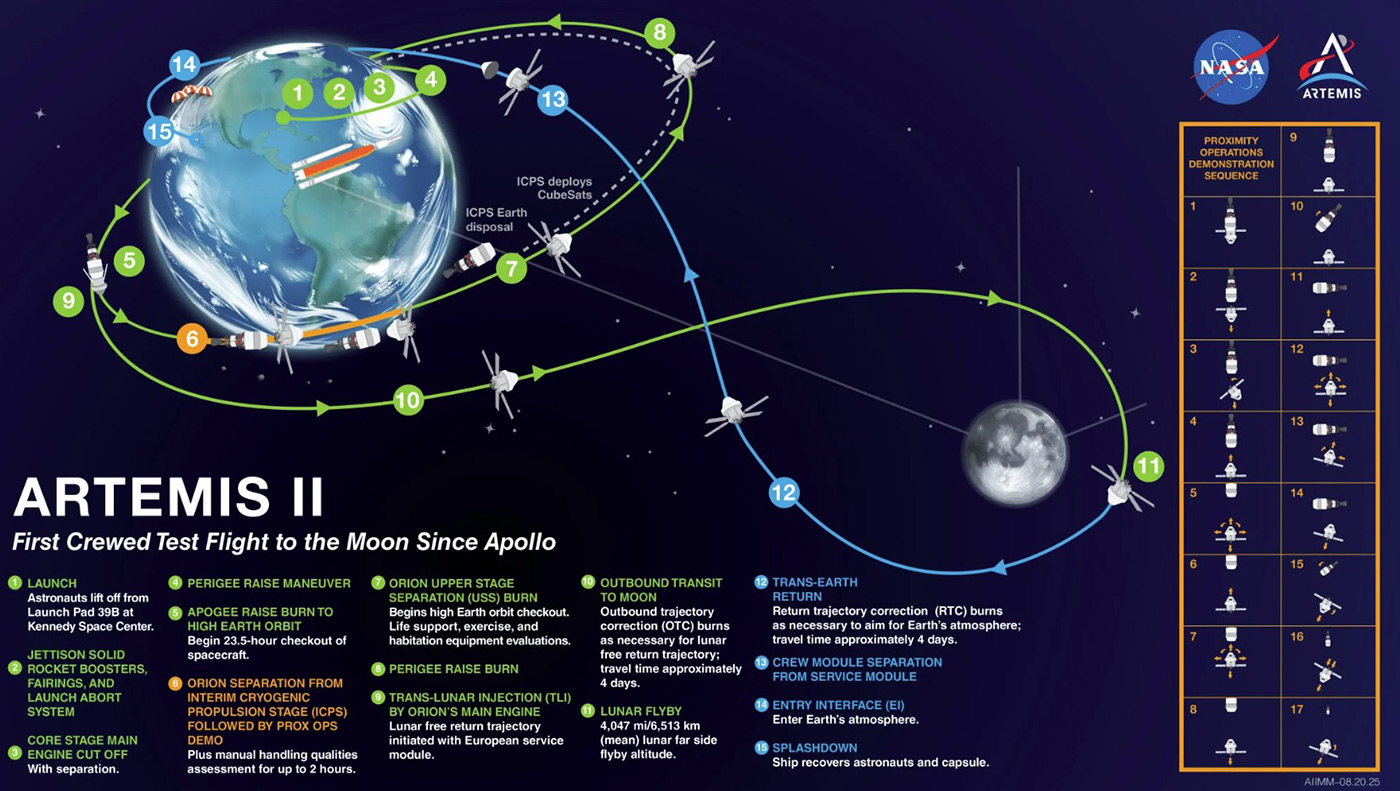
credit NASA
So whilst we dont know the launch time or date exactly, using these two images above and keeping an eye on the NASA website we can piece together a plan of what we can capture and apply it to when. This is my plan:
- Continually monitor news outlets and NASA for launch details - if you are reading this before launch you can watch the live stream here https://www.youtube.com/watch?v=xCrPD7tfcr0
- The second the spacecraft takes off the clock starts ticking, and the timings can be seen in the first NASA diagram above...so our window for photography is going to be between T+ 6 mins - T+ 2 hrs and we may be able to capture the separation of SLS from Orion, and perhaps even the nose cone too (LAS). I am hopeful that using tools like https://transit-finder.com/ and https://stellarium-web.org/ we will be able to track and predict where the spacecraft will be and when. Obviously if it is night this will be a much easier task, if it happens during the day then it may not be possible to see it!
- As you can see in the second NASA image the spacecraft will circle the Earth a few times and so we have more opportunity to capture Orion spacecraft pass overhead, up to about T+ 3hrs 20 mins or so, at this point it will be going 17,000 MPH, which means it will pass us around once every 90 minutes, so in this 3 hour window we will have 2 possibly even 3 chances to capture it!
- So from T+ 3.5hrs for about the next 5 days we will have chance to image Orion moving towards the Moon... sadly, due to the trajectory I do not believe it will be possible to get an image of the craft in front of the Moon, but we will see it along side it.
- After stage 11, we will again have another 5 days or so to try and capture it on its return.
Now for some maths:
The Orion Spacecraft is around 5m wide, so at any stage we will be looking for a fast moving 'star' a bit like when we see ISS.
When Orion is in low/high Earth orbit:
The combination of the 70ED (420mm) and 585mc pro camera with 2.9 µm pixels, means we have an image scale of 1.4 arcseconds / pixel, so we are looking for an object around 3-4 pixels across. With the use of a long(ish) exposure of 1 second, we should see it cross the whole frame of the image, and it is most unlikely we will be able to capture the Moon in the same frame.
When Orion is out near the moon:
The spacecraft will decrease in brightness as it flies towards and around the Moon, and so will cover on my rig around 0.4 pixels per second, it will however appear much fainter as it gets close, but the brightness of Moon may well diminish the visibility of Orion.
So to get an image of the Moon with the spacecraft flying towards or away from it, there will be a sweet spot where both are in frame, it may have to be a composite image to capture both, as such I shall make this my challenge this month!
Last Months Challenge.
As you may remember I tasked myself with photographing the Moon in every phase. Well the first 4(ish) went to plan (within a day or so of each), and captured the first Supermoon of 2026, which just so happened to be on my 48th birthday! Sadly, from then on cloud prevented me from capturing anything more of the Moon, I did try... and as you will see later, not all was lost. So here is my Moon phase result:
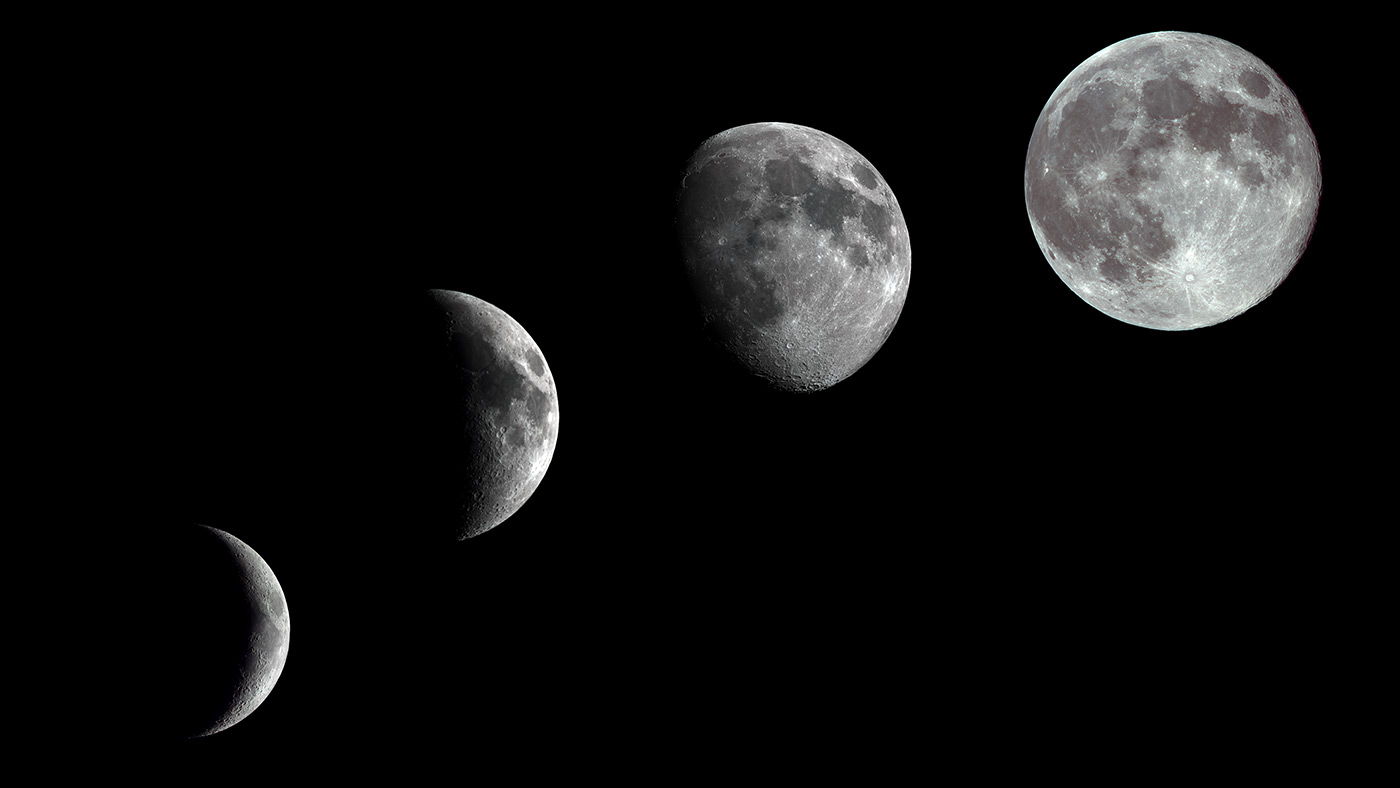
Here are the individual images:
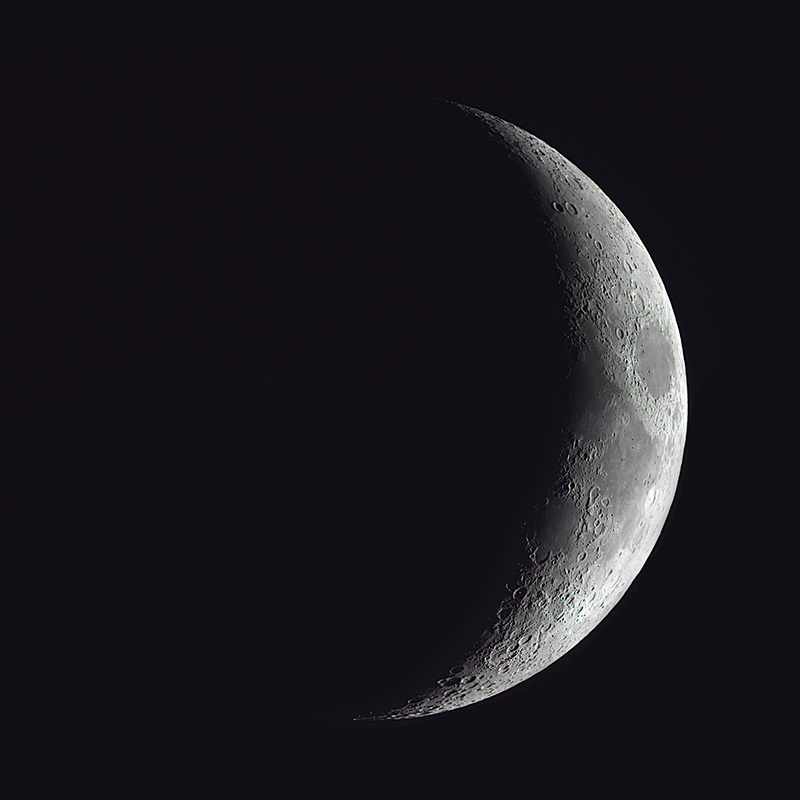
Christmas Eve 2025
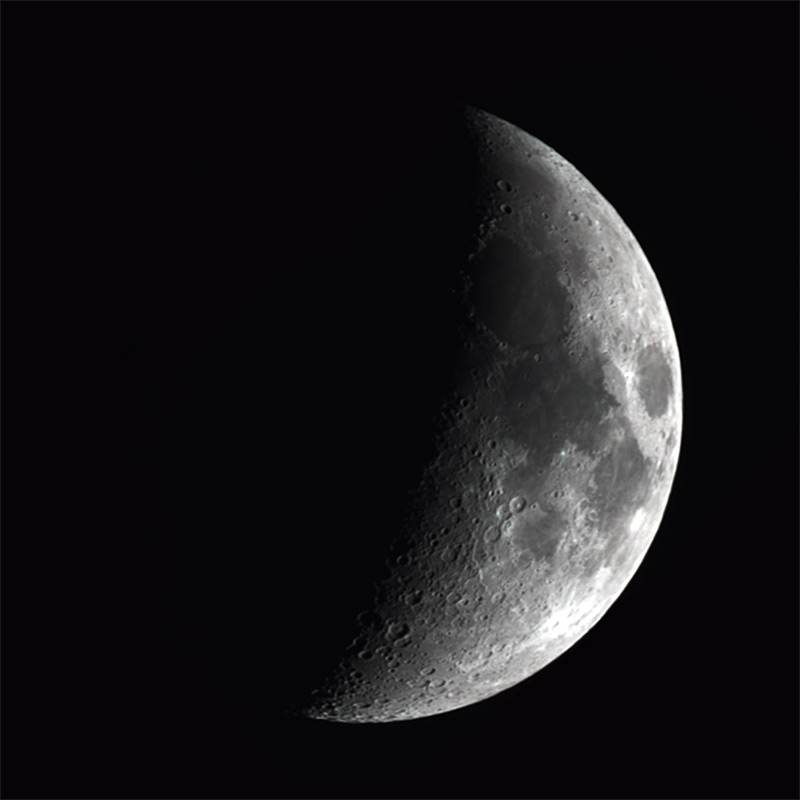
27th December 2025
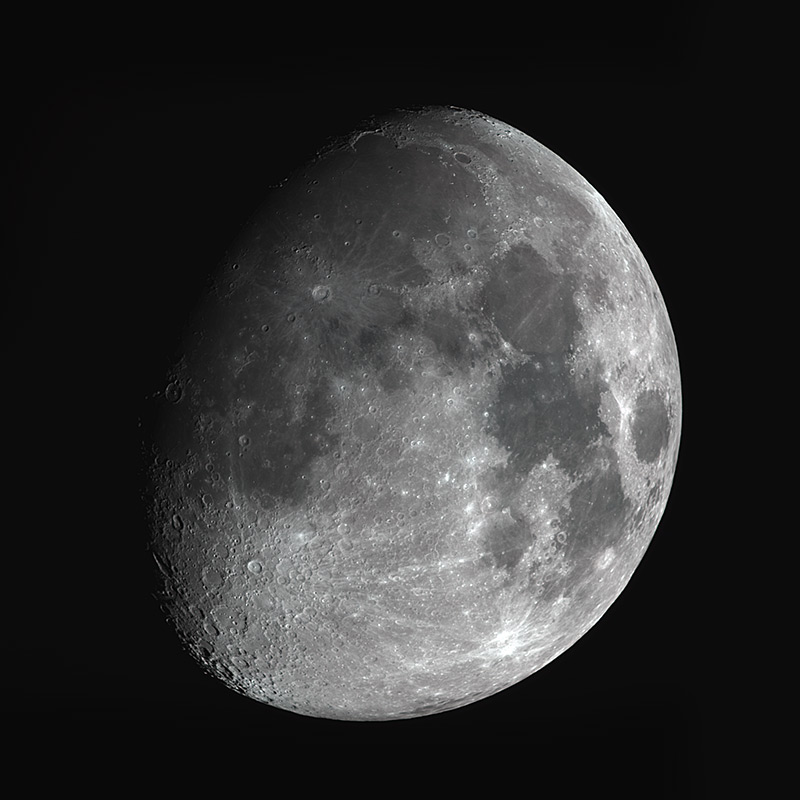
30th December 2025
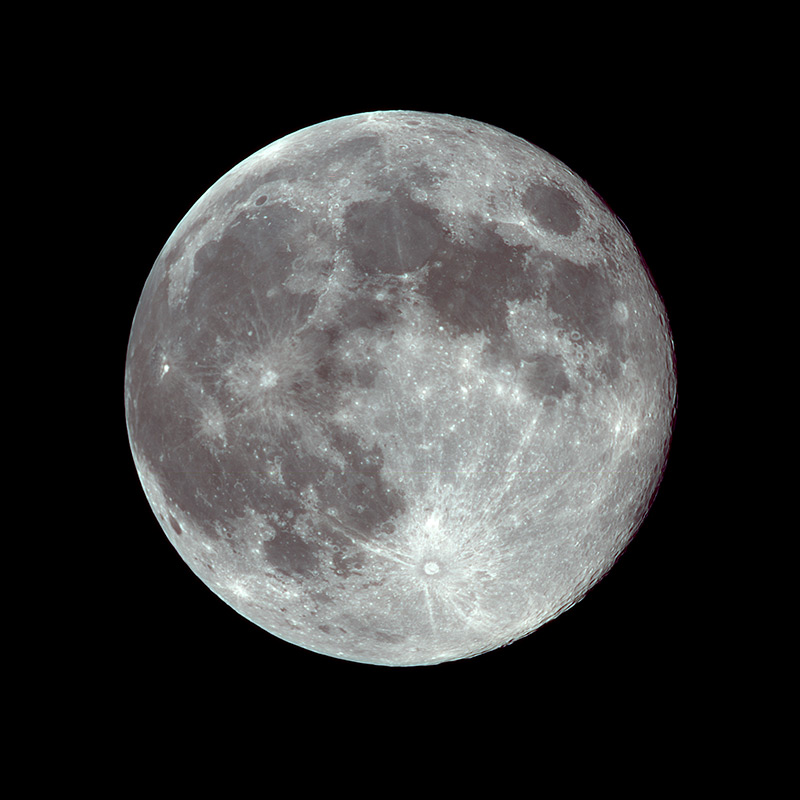
3rd January 2026
Exif for all lunar images:
Camera: ZWO ASI585MC Pro.
Telescope: Altair Astro 70ED Telescope (420mm).
Mount: Sky-Watcher EQ5 Pro
Filter: Optolong L eNHance
Guide Camera: ZWO ASI120mm-s
Guide Scope: SVBony 30mm (f4)
Computer: ZWO ASIAIR pro
Method:
Lights: 30 sec video.
Darks: 0
Flats: 0
Bias: 0
Stacked in AutoStakkert, Processed in Pixinsight with RC-Astro Suite of tools. Finishing touches in Photoshop.
For more information on my exact workflow for capturing Lunar images please read here.
Planetary
Whilst it is no secret that Lunar and Planetary imaging are not my favourite, whilst waiting for the clouds to part one evening, Jupiter was clear to see, and so I seized the
opportunity. Using much the same methodology as capturing the Moon, I dropped the Gain (sort of like ISO on an astronomy camera) right down to 0 and took a 30 second video. I then took a 20 sec exposure with the gain back at 252 to capture her moons and stars. In the image below you can see that the Moon Io is for some reason streaking, I wonder if it is the fact that it orbits Jupiter with such speed that the 5 mins or so between the video and the still image was enough to capture the streak? or was there a star behind it in the image that caused this? I don't really know, but anyway, here is my image:
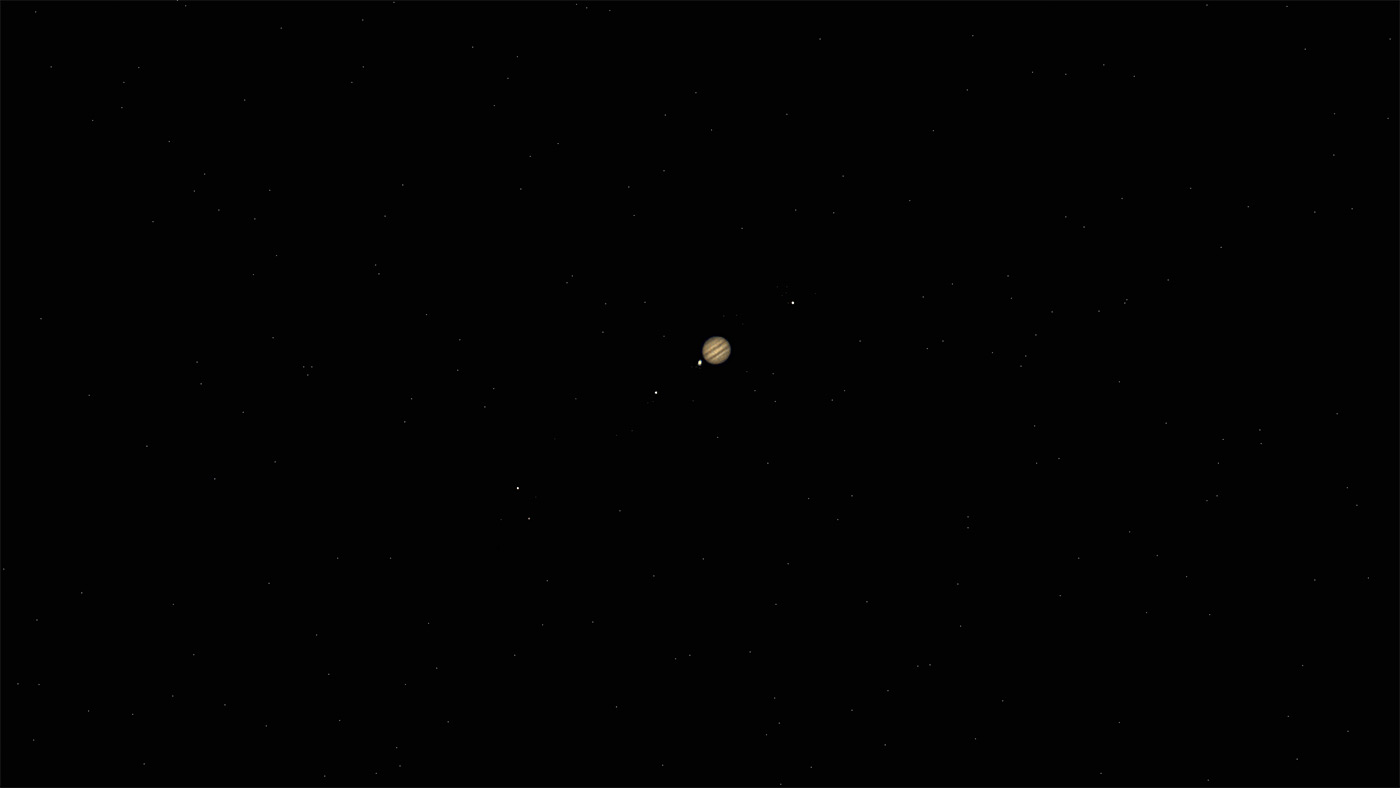
Exif
Camera: ZWO ASI585MC Pro.
Telescope: Altair Astro 70ED Telescope (420mm).
Mount: Sky-Watcher EQ5 Pro
Filter: Optolong L eNHance
Guide Camera: ZWO ASI120mm-s
Guide Scope: SVBony 30mm (f4)
Computer: ZWO ASIAIR pro
Method:
Lights: 30 sec video, Gain 0.
1 x 20 sec Gain 252.
Darks: 0
Flats: 0
Bias: 0
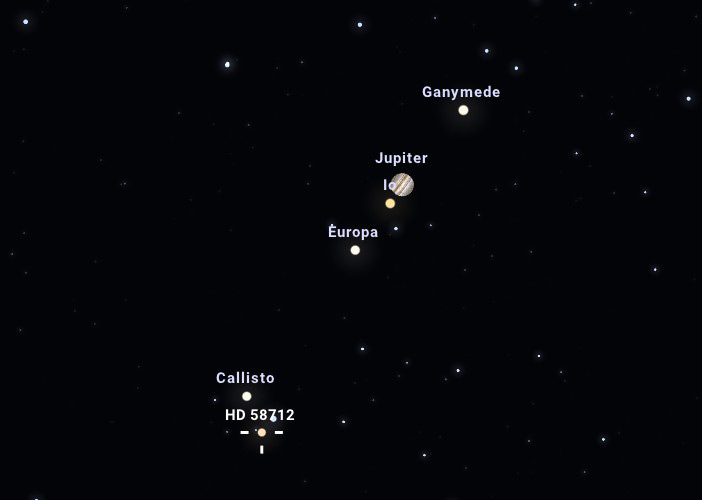
Stacked in AutoStakkert, Processed in Pixinsight with RC-Astro Suite of tools. Finishing touches in Photoshop, and a quick screenshot from Stellarium to show what you are looking at:
Deep Sky
The Flame Nebula (IC434)
As you may remember from last month I have been working towards a mosaic of the Horsehead and Flame Nebula in Orion (IC434). Well sadly due to the abysmal weather I havent been able to progress this project as much as I would like, so here is where I am at with the Flame Nebula:
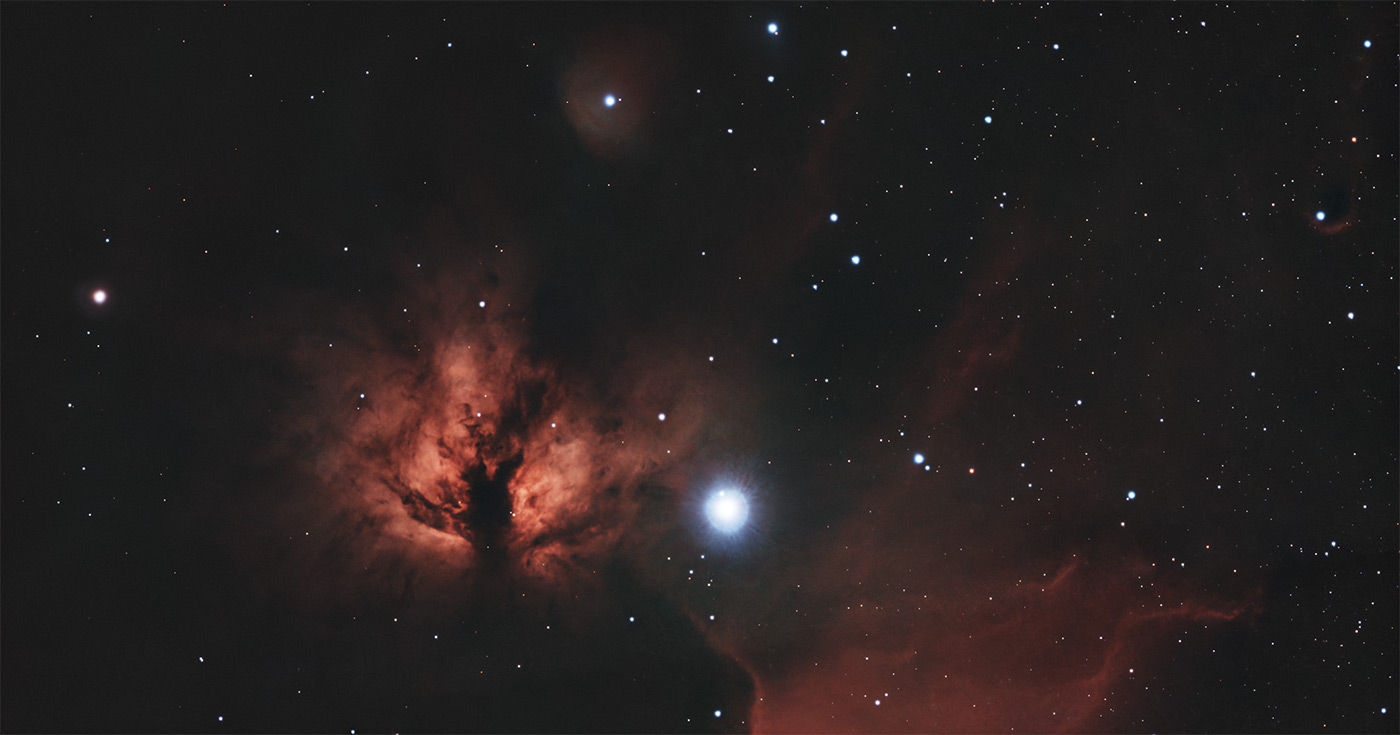
Exif
Camera: ZWO ASI585MC Pro.
Telescope: Altair Astro 70ED Telescope (420mm).
Mount: Sky-Watcher EQ5 Pro
Filter: Optolong L eNHance
Guide Camera: ZWO ASI120mm-s
Guide Scope: SVBony 30mm (f4)
Computer: ZWO ASIAIR pro
Method:
Lights: 45 x 120 sec Gain 252.
Darks: 0
Flats: 0
Bias: 0
Stacked in DSS, Processed in Pixinsight with RC-Astro Suite of tools. Finishing touches in Photoshop.
And a sneak peak on how the whole mosaic is turning out... I think another 10 or so hours on it and it'll be ready.
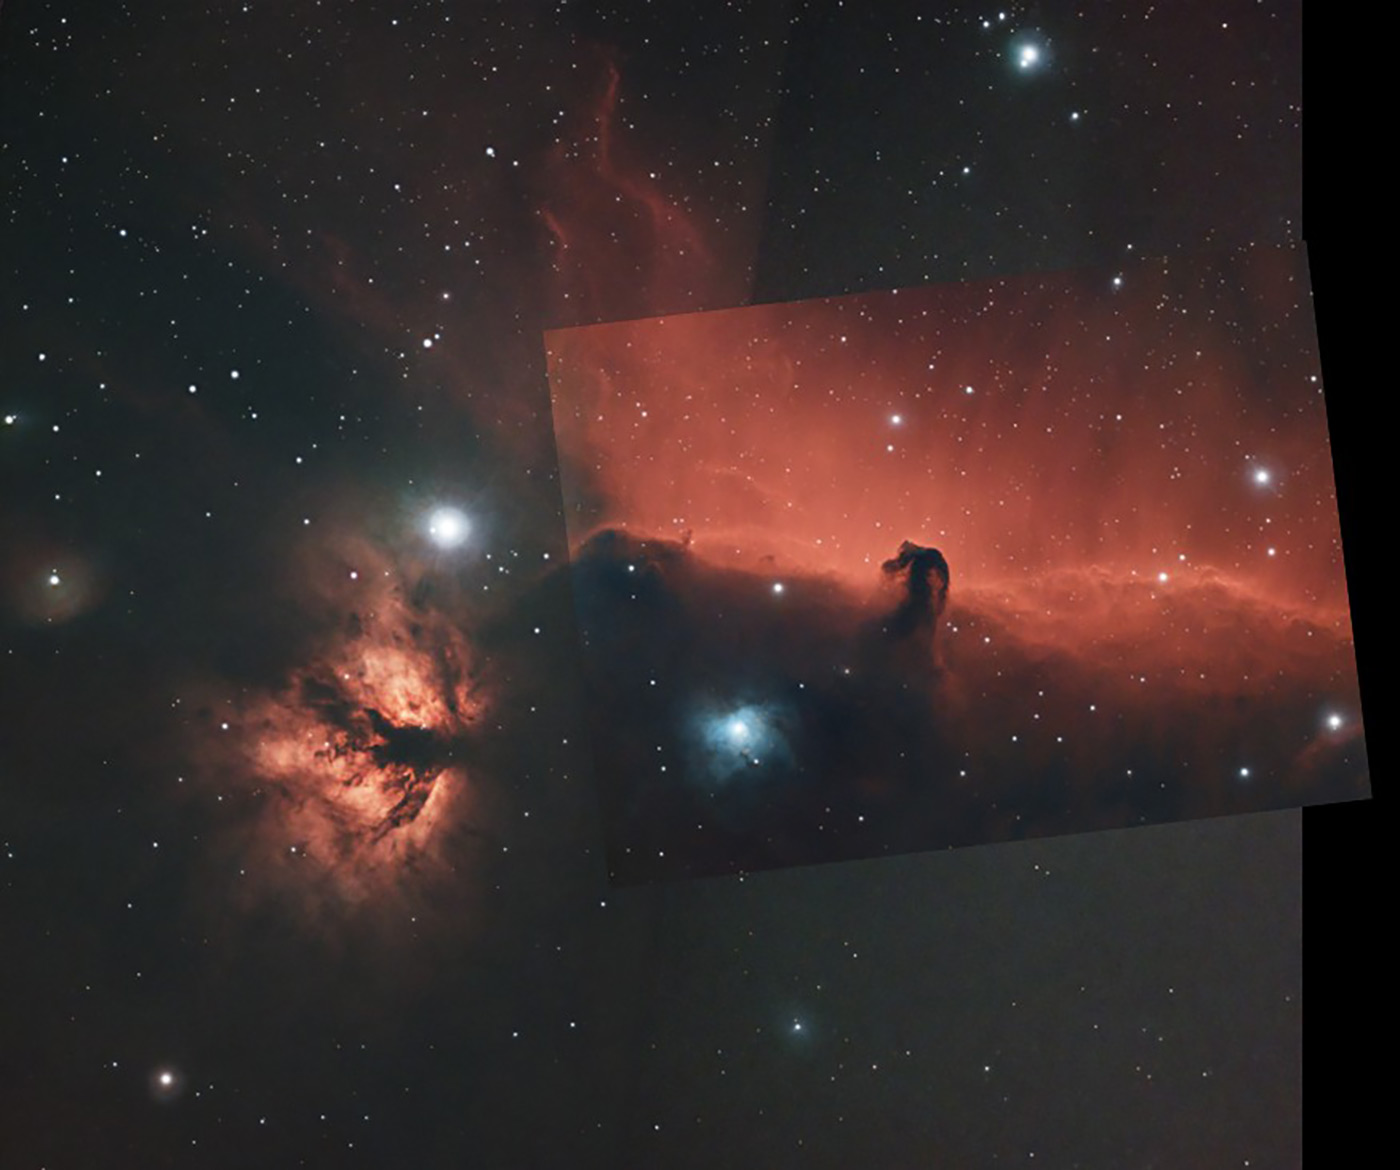
You can read about capturing the Horsehead here.
Lobster Claw Nebula (SH2-157)
The Lobster Claw Nebula has this wonderful mix of elegance and chaos that makes it a favourite among deep‑sky imagers. It sits in the constellation Cassiopeia, tucked into a busy stretch of the Milky Way where star formation, shock fronts, and glowing gas all overlap. What you’re looking at is essentially a huge bubble of ionised hydrogen being sculpted by the radiation and stellar winds of nearby massive stars.
The “claw” shape comes from the way those winds carve arcs and ridges into the surrounding gas. One side of the nebula forms a sweeping, curved shell—almost like a cosmic wave—while the opposite side breaks into filaments and knots where the gas is denser. Embedded within the structure are young, hot stars that pump out ultraviolet light, causing the nebula to glow in the deep reds and oranges typical of H‑alpha emission.
What makes it particularly rewarding to image is the contrast: smooth, flowing arcs right next to intricate, textured regions. Narrowband filters reveal even more complexity, with sulphur and oxygen emissions tracing different layers of the nebula’s history. It’s one of those objects where every extra hour of integration pulls out new subtleties you didn’t realise were there.
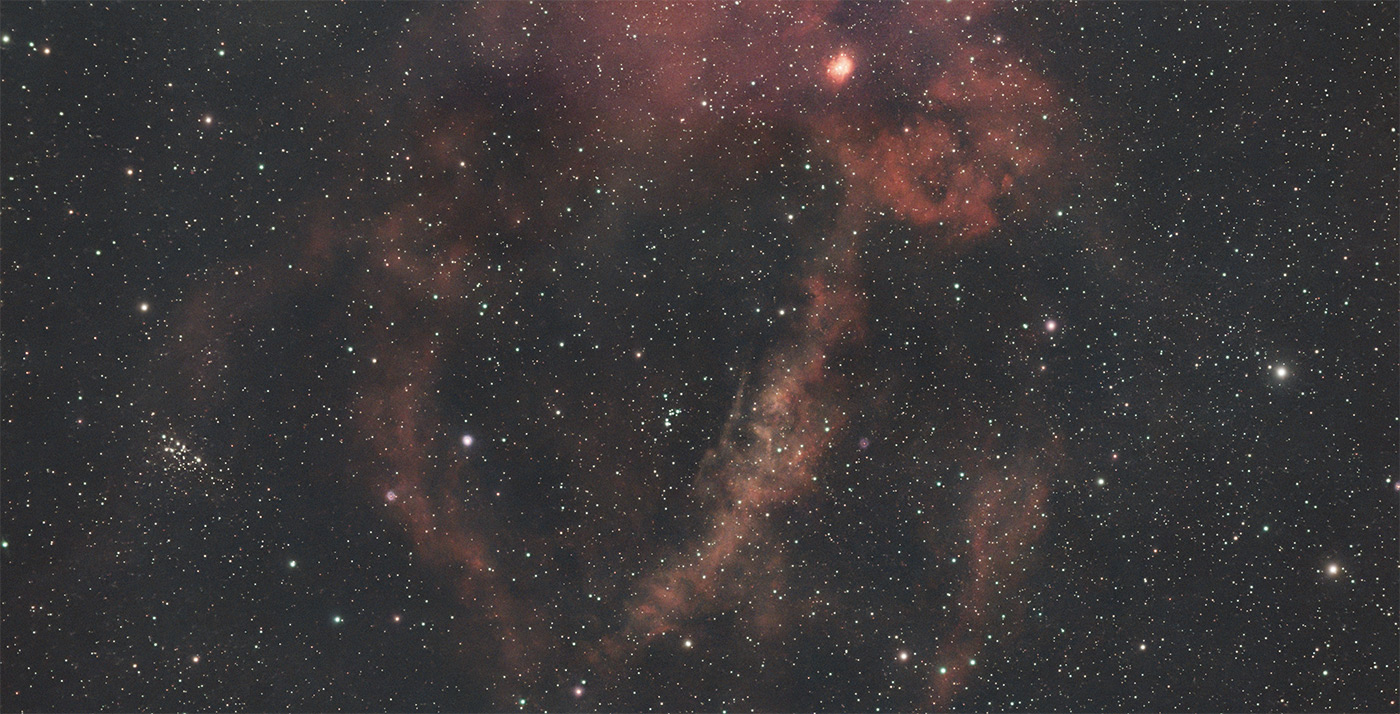
Exif
Camera: ZWO ASI585MC Pro.
Telescope: Altair Astro 70ED Telescope (420mm).
Mount: Sky-Watcher EQ5 Pro
Filter: Optolong L eNHance
Guide Camera: ZWO ASI120mm-s
Guide Scope: SVBony 30mm (f4)
Computer: ZWO ASIAIR pro
Method:
Lights: 30 x 120 sec Gain 252.
Darks: 0
Flats: 0
Bias: 0
Stacked in DSS, Processed in Pixinsight with RC-Astro Suite of tools. Finishing touches in Photoshop.
Cigar Galaxy (M82)
The Cigar is a starburst galaxy in Ursa Major, and the nickname “cigar” comes from its long, narrow profile—almost like a glowing ember stretched across the sky. But the real drama is happening inside it.
At its core, M82 is undergoing an intense wave of star formation, far more vigorous than what we see in a typical spiral galaxy. Massive young stars are being born in dense clusters, and their combined radiation and stellar winds are so powerful that they’re blowing material out of the galaxy’s central regions. Through long‑exposure images, this outflow appears as reddish filaments of ionised gas bursting perpendicular to the galaxy’s disk, almost like smoke rising from a fire.
What makes the Cigar Galaxy especially compelling is that it’s interacting gravitationally with its neighbour, M81. That close encounter stirred up the gas inside M82, compressing it and triggering the starburst we see today.
To image this, I wanted to try and capture the true colours of this wonder, so I did around 40 mins with a UV/IR Cut filter and around an hour with the L eNhance combining the two in Pixinsight, but only the stars from the UV/IR Cut image.
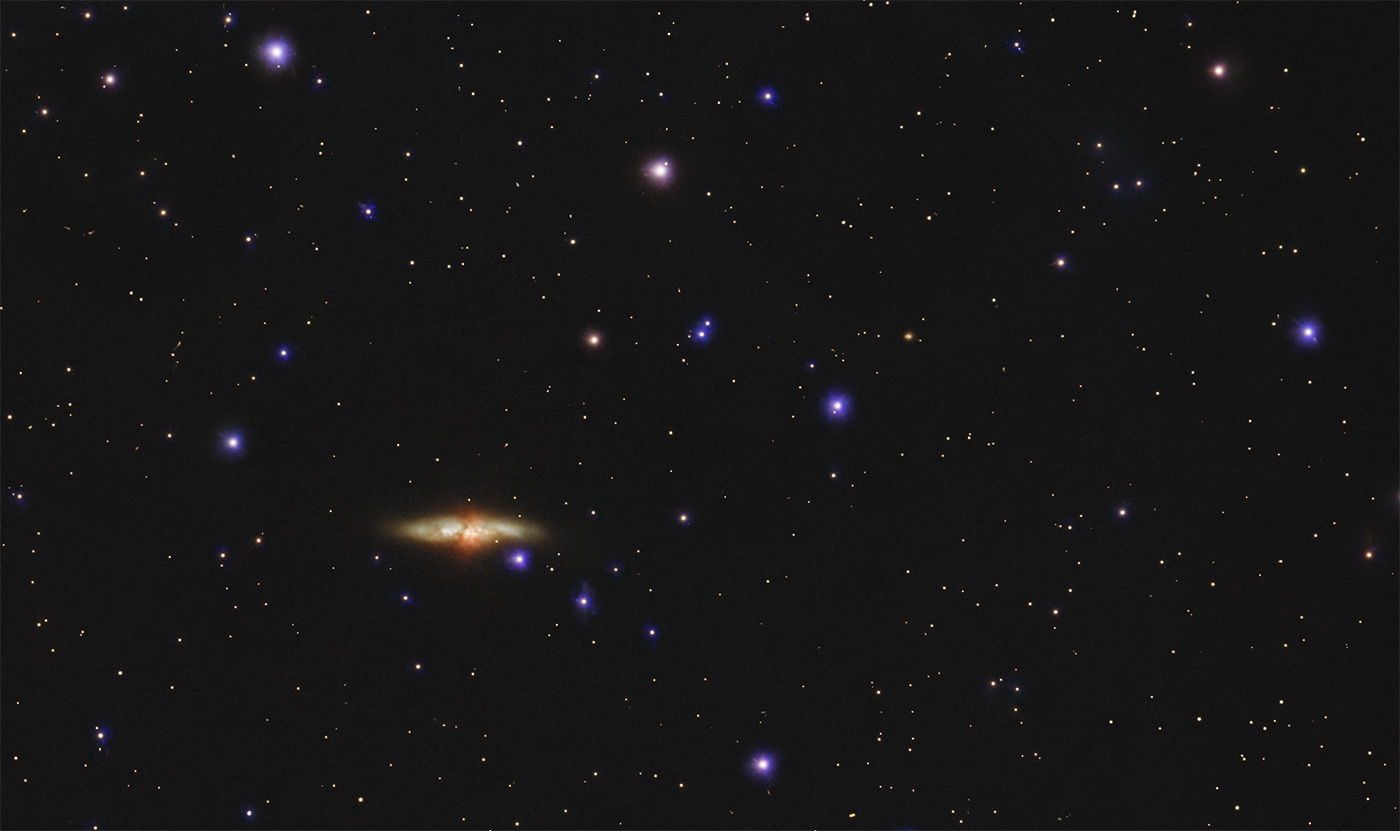
Exif
Camera: ZWO ASI585MC Pro.
Telescope: Altair Astro 70ED Telescope (420mm).
Mount: Sky-Watcher EQ5 Pro
Guide Camera: ZWO ASI120mm-s
Guide Scope: SVBony 30mm (f4)
Computer: ZWO ASIAIR pro
Method:
Lights: 20 x 120 sec Gain 252 UV/IR Cut filter.
30 x 120 sec Gain 252 Optolong L eNHance filter.
Darks: 0
Flats: 0
Bias: 0
Stacked in DSS, Processed in Pixinsight with RC-Astro Suite of tools.
Share this post:
By Jonathan Penberthy on 28/01/2026
Jonathan Penberthy
Cosmic Shutter Seeker and Star Programmer
Jonathan Penberthy is the Cosmic Shutter Seeker and Star Programmer at Park Cameras, with over 20 years of experience as a software engineer. His career journey has spanned industries, but a move to Park Cameras sparked a passion for astrophotography. Jonathan’s interest began while working on a lens selection app, leading him to explore the night sky with a Canon 7D. When he’s not programming or photographing the stars, he enjoys sailing and navigating by the cosmos. Learn more on his profile page.

Trade in your old equipment
Fast and easy trade in service ensures your old gear is collected efficiently and you are paid quickly! It's very simple to trade in your unwanted photography gear. Just head over to our dedicated Sell or Part Exchange page, fill out the details, and we'll get back to you with an offer for your old gear. Take the cash, or put it towards the cost of your new gear. It's up to you! Find out more
sign up to the newsletter
Keep up to date on the latest photography news, events and offers. Sign up now